To access some specialized Mac features you’ll need to hold down one or more keys during startup. If you’re having trouble with your Mac, this can be a great way to troubleshoot and analyze your options.
To use any of these boot keys, hold down the listed key combo as soon as you press your Mac’s power button. If you’re restarting your Mac, press and hold the keys immediately after your Mac begins to restart. Don’t release the keys until you see the described behavior.
macOS Boot Options
Shift: Start your Mac in Safe Mode. Since safe mode only loads essential software, you can determine whether a system process or a user-installed application is causing your problem.
Option: Boot into Startup Manager. From here you can select different startup disks if any bootable partitions are available.
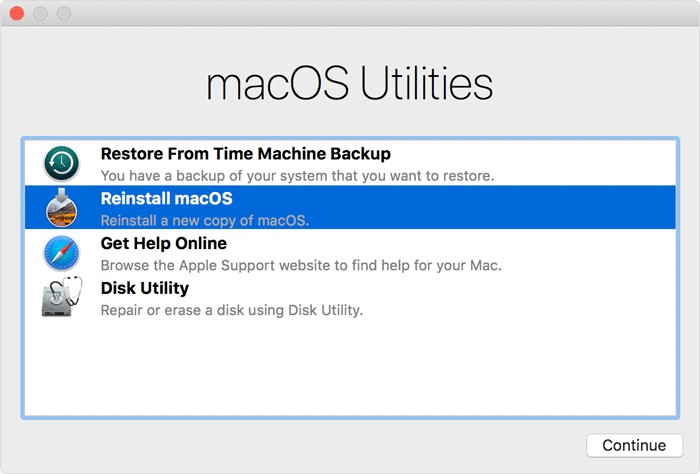
Command + R: Boot into Recovery Mode. Recovery Mode is macOS’s powerful recovery suite with a bunch of options for saving or wiping your Mac. You can use it to reinstall macOS, restore from a Time Machine backup or use Disk Utility to repair or format your hard drive.
Shift + Command + Option + R: Start in Internet Recovery Mode, skipping your system’s hard drive. This allows you to reinstall the build of macOS that came with your computer from the factory. macOS might do this one on its own if your installation is so messed up that you can’t boot into Recovery Mode.
Command + S: Start in single user, command-line-only mode. This is useful for running diagnostic Terminal commands or fsck, but it can’t do much beyond that.
Command + V: Boot in verbose mode. This mode displays logging and diagnostic messages as your Macboots. If your Mac is showing the Apple logo but failing to start completely, try this step to see where in the boot process the error occurs.
Advanced Mac users may find it useful to run macOS or Mac OS X in a virtual machine atop their existing Mac operating system. Creating a virtual machine for Mac OS is now easier than ever before, and we’ll show you how to set up easy Mac virtual machines on a Mac.
For some quick background, virtualization allows you to run another operating system in a confined virtual machine atop an existing operating system through an application layer. This means there is no disk partitioning involved, the virtualized operating system runs just like any other application on your computer. We have covered this broad topic many times before for purposes like running Windows 10 on a Mac with a VM, to running Ubuntu Linux in VirtualBox, to Snow Leopard in a VM, and others. In the guide here, we will be creating a Macintosh virtual machine for running Mac OS on top of Mac OS, which can be helpful for testing out different apps and operating system versions, amongst other purposes.
Apple uses its App Store to distribute its software, like new Mac operating systems. It’s convenient, but sometimes it can take a while for a download to finish. And if you have multiple Macs, it’s inefficient to download the new OS to each and every Mac.
That’s why I like to make a bootable external drive for the sole purpose of installing the Mac operating system. When I need to tend to a bunch of Macs, it’s much faster to use a bootable drive instead of going to each Mac, launching the App Store, searching for the operating system, downloading it (after entering my Apple ID), and then running the installer.
You can create a bootable USB flash drive with the macOS Sierra installer that’s now available. The installer software will take up nearly 5GB of storage space. Here’s how to create a bootable macOS Sierra installer drive.
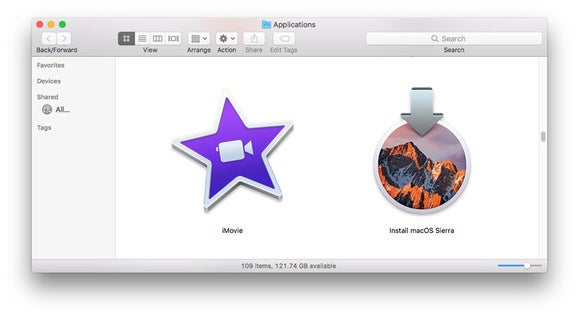
Launch the App Store app, then look for macOS Sierra in the store. (Here’s a link.) Click on the Download button, and your Mac will download the installer to your Applications folder. If it automatically launches after download, quit the installer.
Keep the installer in the Applications folder.
If you’ve already upgraded your Mac to Sierra, the installer is removed from the Applications folder. You can download it again if you go to Purchased in the App Store. Look for macOS Sierra in the list of apps that you’ve bought, and click on the Download button. If it automatically launches after download, quit the installer.
I want to add more RAM to my server running Ubuntu Linux. How do I find out my current RAM chip information such as its speed, type and manufacturer name within a Linux system without opening the case?
You need to use the dmidecode command which is a tool for dumping a computer’s DMI (some say SMBIOS) table contents in a human-readable format. This table contains a description of the system’s hardware components (such as RAM), as well as other useful pieces of information such as serial numbers and BIOS revision. Thanks to this table, you can retrieve hardware information without having to probe for the actual hardware. Open a command-line terminal (select Applications > Accessories > Terminal), and then type:
$ sudo dmidecode --type memory
OR
# dmidecode --type memory | less
OR
$ sudo dmidecode --type 17
Sample outputs:
# dmidecode 2.10
SMBIOS version fixup (2.51 -> 2.6).
SMBIOS 2.6 present.
Handle 0x0011, DMI type 16, 15 bytes
Physical Memory Array
	Location: System Board Or Motherboard
	Use: System Memory
	Error Correction Type: None
	Maximum Capacity: 4 GB
	Error Information Handle: Not Provided
	Number Of Devices: 4
Handle 0x0012, DMI type 17, 27 bytes
Memory Device
	Array Handle: 0x0011
	Error Information Handle: No Error
	Total Width: 72 bits
	Data Width: 64 bits
	Size: 2048 MB
	Form Factor: DIMM
	Set: 1
	Locator: DIMM#1A
	Bank Locator: Bank 1
	Type: DDR2
	Type Detail: Synchronous
	Speed: 667 MHz
	Manufacturer: Not Specified
	Serial Number: Not Specified
	Asset Tag: Not Specified
	Part Number: Not Specified
Handle 0x0013, DMI type 17, 27 bytes
Memory Device
	Array Handle: 0x0011
	Error Information Handle: No Error
	Total Width: 72 bits
	Data Width: 64 bits
	Size: 2048 MB
	Form Factor: DIMM
	Set: 1
	Locator: DIMM#2A
	Bank Locator: Bank 2
	Type: DDR2
	Type Detail: Synchronous
	Speed: 667 MHz
	Manufacturer: Not Specified
	Serial Number: Not Specified
	Asset Tag: Not Specified
	Part Number: Not Specified
Handle 0x0014, DMI type 17, 27 bytes
Memory Device
	Array Handle: 0x0011
	Error Information Handle: No Error
	Total Width: 72 bits
	Data Width: 64 bits
	Size: 2048 MB
	Form Factor: DIMM
	Set: 1
	Locator: DIMM#1B
	Bank Locator: Bank 1
	Type: DDR2
	Type Detail: Synchronous
	Speed: 667 MHz
	Manufacturer: Not Specified
	Serial Number: Not Specified
	Asset Tag: Not Specified
	Part Number: Not Specified
Handle 0x0015, DMI type 17, 27 bytes
Memory Device
	Array Handle: 0x0011
	Error Information Handle: No Error
	Total Width: 72 bits
	Data Width: 64 bits
	Size: 2048 MB
	Form Factor: DIMM
	Set: 1
	Locator: DIMM#2B
	Bank Locator: Bank 2
	Type: DDR2
	Type Detail: Synchronous
	Speed: 667 MHz
	Manufacturer: Not Specified
	Serial Number: Not Specified
	Asset Tag: Not Specified
	Part Number: Not Specified
Since Ubuntu 8.04 (Hardy Heron) the USB aluminum Apple Keyboard has not worked correctly. A change was added to the Ubuntu Linux kernel to make Apple MacBook keyboards gain additional functionality to their limited laptop style keyboard (Ubuntu bug #162083). Unfortunately this code change has some side effects for owners of the full size USB aluminum Apple Keyboard:
Function keys have media functions as default (as the printing on the keycaps indicates). To access the regular F-key functionality, the « fn » key must be pressed and held (except for F5 and F6, which are inverted in this respect). (Ubuntu bug #201711)
On international (non-US) keyboards, two keys are swapped with respect to the printing on the keycaps. (Ubuntu bug #214786)
To make the keyboard behave more like a standard PC keyboard (but against the orinal printing on the keycaps), additional steps are necessary:
Map SysRQ, Scoll Lock, and Pause keys to F13-F15: This still requires a patch that adds a configurable option to the kernel module, or a « keyfuzz » workaround (#262408).
Swap the cmd and super keys: (hid_apple patch) or keyfuzz workaround.
A tar archive containing all workarounds can be found at (un-apple-keyboard)
If you would like to have a better integration, please help by enhancing the patches to implement proper module parameters, and submitting them to the upstream kernel developers. See also: Trouble With Apple Keyboard On Ubuntu
To find the the keycode of any key that you want to modify, simply run in a terminal
xev | sed -n ‘s/^.*keycode *\([0-9]\+\).*$/keycode \1 = /p’
Then you can find the List of Keysyms Recognised by Xmodmap:
This section describe the default behavior of every Apple keyboard.
Apple slim aluminum keyboard (0220)
Characters that are not printed on the keycaps (~,{},[],…) can still be generated as on a standard PC keyboard.
Even if the @ is printed on another keycap as on the standard PC layout, that key will only behave like the standard PC layout key and not generate the @. Use your localized standard PC layout key (combination) to generate the @.