Archive

Articles taggués ‘Apache’

How to analyze and view Apache web server logs interactively on Linux
01/07/2024 Comments off

analyze apache logsWhether you are in the web hosting business, or run a few web sites on a VPS yourself, chances are you want to display visitor statistics such as top visitors, requested files (dynamic or static), used bandwidth, client browsers, and referring sites, and so forth.

GoAccess is a command-line log analyzer and interactive viewer for Apache or Nginx web server. With this tool, you will not only be able to browse the data mentioned earlier, but also parse the web server logs to dig for further data as well – and all of this within a terminal window in real time. Since as of today most web servers use either a Debian derivative or a Red Hat based distribution as the underlying operating system, I will show you how to install and use GoAccess in Debian and CentOS.

Installing GoAccess on Linux

In Debian, Ubuntu and derivatives, run the following command to install GoAccess:

# aptitude install goaccess

In CentOS, you’ll need to enable the EPEL repository and then:

# yum install goaccess

In Fedora, simply use yum command:

# yum install goaccess

If you want to install GoAccess from the source to enable further options (such as GeoIP location), install required dependencies for your operating system, and then follow these steps:

# wget http://tar.goaccess.io/goaccess-0.8.5.tar.gz
# tar -xzvf goaccess-0.8.5.tar.gz
# cd goaccess-0.8.5/
# ./configure --enable-geoip
# make
# make install

That will install version 0.8.5, but you can always verify what is the latest version in the Downloads page of the project’s web site.

Since GoAccess does not require any further configurations, once it’s installed you are ready to go.

Running GoAccess

To start using GoAccess, just run it against your Apache access log.

For Debian and derivatives:

# goaccess -f /var/log/apache2/access.log

For Red Hat based distros:

# goaccess -f /var/log/httpd/access_log

When you first launch GoAccess, you will be presented with the following screen to choose the date and log format. As explained, you can toggle between options using the spacebar and proceed with F10. As for the date and log formats, you may want to refer to the Apache documentation if you need to refresh your memory.

In this case, Choose Common Log Format (CLF):
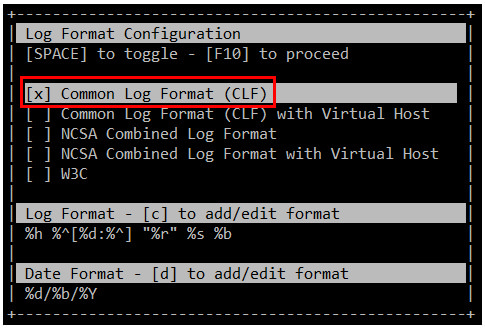
15868350373_30c16d7c30

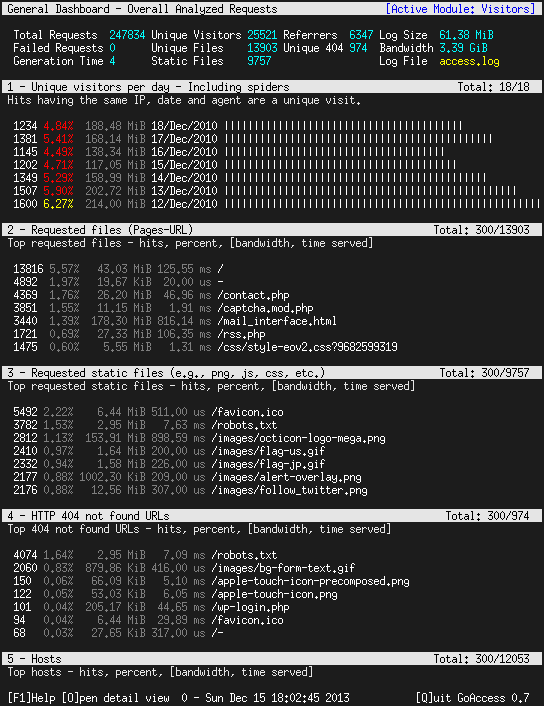
and then press F10. You will be presented with the statistics screen. For the sake of brevity, only the header, which shows the summary of the log file, is shown in the next image:


16486742901_7a35b5df69_b

Lire la suite…

Prevent DDoS with iptables

30/06/2024 Comments off

Iptables against DDoS

Using iptables to fight DDoS attacks.

After a recent conversation on the Ubuntu Forums I wanted to post an example of using iptables.

Of course there are several types of DOS attacks , in this post I will demonstrating the use if iptables to limit the traffic on port 80.

The goal is to keep your web server “responsive” to legitimate traffic, but to throttle back on excessive (potential DOS) traffic.

In this demonstration iptables is configured :

  1. The default policy is ACCEPT (to prevent lockout in the event of flushing the rules with iptables -F).
  2. “Legitimate” traffic is then allowed. In this example I am allowing traffic only on port 80.
  3. All other traffic is then blocked at the end of the INPUT chain (the final rule in the INPUT chain is to DROP all traffic).

The rules I will demonstrate are as follows:

First rule : Limit NEW traffic on port 80

sudo iptables -A INPUT -p tcp --dport 80 -m state --state NEW -m limit --limit 50/minute --limit-burst 200 -j ACCEPT

Lets break that rule down into intelligible chunks.

-p tcp --dport 80 => Specifies traffic on port 80 (Normally Apache, but as you can see here I am using nginx).

-m state NEW => This rule applies to NEW connections.

-m limit --limit 50/minute --limit-burst 200 -j ACCEPT =>This is the essence of preventing DOS.

  • “--limit-burst” is a bit confusing, but in a nutshell 200 new connections (packets really) are allowed before the limit of 50 NEW connections (packets) per minute is applied.

For a more technical review of this rule, see this netfilet page. Scroll down to a bit to the “limit” section.

Second rule – Limit established traffic

This rule applies to RELATED and ESTABLISHED all traffic on all ports, but is very liberal (and thus should not affect traffic on port 22 or DNS).

If you understood the above rule, you should understand this one as well.

sudo iptables -A INPUT -m state --state RELATED,ESTABLISHED -m limit --limit 50/second --limit-burst 50 -j ACCEPT

In summary, 50 ESTABLISHED (and/or RELATED) connections (packets really) are allowed before the limit of 50 ESTABLISHED (and/or RELATED) connections (packets) per second is applied.

Do not let that rule fool you, although it seems very open, it does put some limits on your connections.

Test it for yourself, try using the first rule with and without the second rule.

Lire la suite…

How to configure fail2ban to protect Apache HTTP server

27/06/2024 Comments off

Protecting Apache HTTP server with fail2ban

fail2ban apacheFail2ban: An Apache HTTP server in production environments can be under attack in various different ways. Attackers may attempt to gain access to unauthorized or forbidden directories by using brute-force attacks or executing evil scripts. Some malicious bots may scan your websites for any security vulnerability, or collect email addresses or web forms to send spams to.

Apache HTTP server comes with comprehensive logging capabilities capturing various abnormal events indicative of such attacks. However, it is still non-trivial to systematically parse detailed Apache logs and react to potential attacks quickly (e.g., ban/unban offending IP addresses) as they are perpetrated in the wild. That is when fail2ban comes to the rescue, making a sysadmin‘s life easier.

fail2ban is an open-source intrusion prevention tool which detects various attacks based on system logs and automatically initiates prevention actions e.g., banning IP addresses with iptables, blocking connections via /etc/hosts.deny, or notifying the events via emails. fail2ban comes with a set of predefined « jails » which use application-specific log filters to detect common attacks. You can also write custom jails to deter any specific attack on an arbitrary application.

In this tutorial, I am going to demonstrate how you can configure fail2ban to protect your Apache HTTP server. I assume that you have Apache HTTP server and fail2ban already installed. Refer to another tutorial for fail2ban installation.

What is a Fail2ban Jail

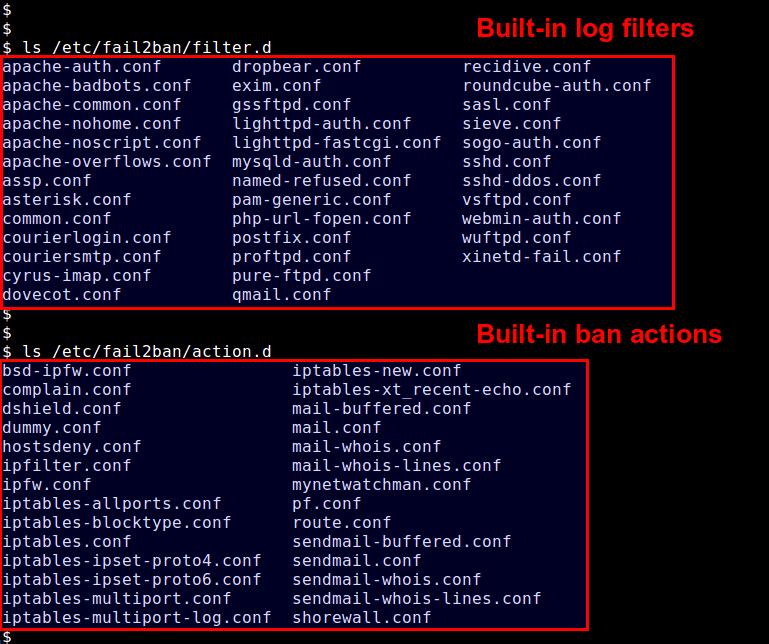
Let me go over more detail on fail2ban jails. A jail defines an application-specific policy under which fail2ban triggers an action to protect a given application. fail2ban comes with several jails pre-defined in /etc/fail2ban/jail.conf, for popular applications such as Apache, Dovecot, Lighttpd, MySQL, Postfix, SSH, etc. Each jail relies on application-specific log filters (found in /etc/fail2ban/fileter.d) to detect common attacks. Let’s check out one example jail: SSH jail.

[ssh]
enabled = true
port = ssh
filter = sshd
logpath = /var/log/auth.log
maxretry = 6
banaction = iptables-multiport

This SSH jail configuration is defined with several parameters:

  • [ssh]: the name of a jail with square brackets.
  • enabled: whether the jail is activated or not.
  • port: a port number to protect (either numeric number of well-known name).
  • filter: a log parsing rule to detect attacks with.
  • logpath: a log file to examine.
  • maxretry: maximum number of failures before banning.
  • banaction: a banning action.

Any parameter defined in a jail configuration will override a corresponding fail2ban-wide default parameter. Conversely, any parameter missing will be assgined a default value defined in [DEFAULT] section.

Predefined log filters are found in /etc/fail2ban/filter.d, and available actions are in /etc/fail2ban/action.d.

16076581722_4d51bf2ce8_o

If you want to overwrite fail2ban defaults or define any custom jail, you can do so by creating /etc/fail2ban/jail.local file. In this tutorial, I am going to use /etc/fail2ban/jail.local.

Lire la suite…

Benchmark Your Webpage with Siege

06/06/2024 Comments off

Siege_Benchmark_WebpageA few articles ago, I wrote about using the “apachebench” or “ab” utility to benchmark your website (see: apachebench). Ab is a great tool, but since then, I have found and fallen in love with a new tool for benchmarking your website. This new tool is named “siege”.

Install Siege on CentOS 6

CentOS 6 has added the siege package to the CentOS EPEL (Extra Packages for Enterprise Linux) repository which makes installation easy using yum if you have the EPEL repository installed. If you need to install it still, you can do it using these quick steps:

# wget http://dl.fedoraproject.org/pub/epel/6/x86_64/epel-release-6-8.noarch.rpm
# rpm -Uvh ./epel-release-6-8.noarch.rpm
Preparing...                ########################################### [100%]
package epel-release-6-8.noarch is already installed

Once the EPEL repository is installed, you can go ahead and install the siege package:

# yum install siege

Using Siege to Benchmark Your Website

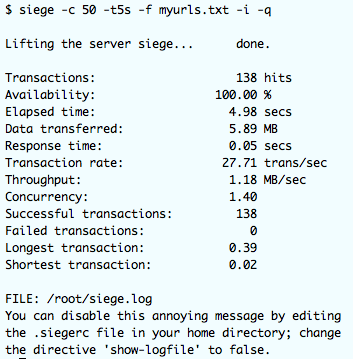
We can get really detailed usage information on the siege utility in the man pages. We can get a list of the switches that siege can use by using the –help option:

# siege --help
SIEGE 3.0.0
Usage: siege [options]
       siege [options] URL
       siege -g URL
Options:
  -V, --version             VERSION, prints the version number.
  -h, --help                HELP, prints this section.
  -C, --config              CONFIGURATION, show the current config.
  -v, --verbose             VERBOSE, prints notification to screen.
  -q, --quiet               QUIET turns verbose off and suppresses output.
  -g, --get                 GET, pull down HTTP headers and display the
                            transaction. Great for application debugging.
  -c, --concurrent=NUM      CONCURRENT users, default is 10
  -i, --internet            INTERNET user simulation, hits URLs randomly.
  -b, --benchmark           BENCHMARK: no delays between requests.
  -t, --time=NUMm           TIMED testing where "m" is modifier S, M, or H
                            ex: --time=1H, one hour test.
  -r, --reps=NUM            REPS, number of times to run the test.
  -f, --file=FILE           FILE, select a specific URLS FILE.
  -R, --rc=FILE             RC, specify an siegerc file
  -l, --log[=FILE]          LOG to FILE. If FILE is not specified, the
                            default is used: PREFIX/var/siege.log
  -m, --mark="text"         MARK, mark the log file with a string.
  -d, --delay=NUM           Time DELAY, random delay before each requst
                            between 1 and NUM. (NOT COUNTED IN STATS)
  -H, --header="text"       Add a header to request (can be many)
  -A, --user-agent="text"   Sets User-Agent in request
  -T, --content-type="text" Sets Content-Type in request

Copyright (C) 2013 by Jeffrey Fulmer, et al.
This is free software; see the source for copying conditions.
There is NO warranty; not even for MERCHANTABILITY or FITNESS
FOR A PARTICULAR PURPOSE.

so, with these options in mind, allow me to demonstrate a few of the coolest siege options that I like best:

Lire la suite…

Categories: Système Tags: , ,

How to manage a DDOS or DOS attempt directed at your Linux Server

18/05/2024 Comments off

Stopping a DDOS (distributed denial of service attack) or DOS (denial of service attack) is no simple task.  Frequently, these attacks become more than just a nuisance, they completely immobilize your server’s services and keep your users from using your website.

We’ve found a few common sense ways to help ease the pain of DDOS and/or DOS attacks.  While no method is fool proof, we certainly can minimize the profound effect these attacks have on your users and subsystems.

Identify the Source

Good luck with that one.  Many DDOS and DOS attacks are from roaming IP addresses.  A distributed denial of service attack can come from many different IP addresses and it quickly becomes impossible for the Linux system administrator to isolate and confine each IP with a firewall rule.

Wikipedia does a great job of describing the various types of attacks here: http://en.wikipedia.org/wiki/Denial-of-service_attack.  For the purpose of this tutorial, I’ll leave the research on the types of attacks up to you, and address the most common form that we’ve encountered over the years, the Apache directed DDOS or DOS attack.

Apache Based Attacks

Symptoms of the Apache DDOS or DOS attack:

  • Website(s) serve slow
  • You notice hanging processes
  • Apache Top tells you that the same IP address is requesting a system resource
  • The system resource continues to multiplex, causing more processes to spawn
  • The Command:
    netstat -ntu | awk '{print $5}' | cut -d: -f1 | sort | uniq -c | sort -n
  • Says that you have a few too many connections to feel comfortable with.

The end result:

  • Apache goes down
  • System load goes sky high
  • Server stops responding
  • You cant ssh to the server node
  • You’ve lost connectivity completely and a reboot is mandatory in order to restore access to the system

Preventative Measures and Counter Measures:

  • Enable SYN COOKIES at the kernel level
    echo 1 > /proc/sys/net/ipv4/tcp_syncookies
  • Enable and Configure iptables to prevent the attack or at least work to identify the attack
    /sbin/iptables -N syn-flood
    /sbin/iptables -A syn-flood -m limit --limit 100/second --limit-burst 150 -j RETURN
    /sbin/iptables -A syn-flood -j LOG --log-prefix "SYN flood: "
    /sbin/iptables -A syn-flood -j DROP
  • Install the APF firewall to work to identify risky behavior
    • APF stands for Advanced Policy Firewall.  Its a rock solid firewall that normally plays nice with iptables.  You can grab a the most recent copy here: http://www.rfxn.com/projects/
  • Install (D)DosDeflate
    • Great software, rock solid, and plays nice with either APF or iptables.  Install and configure the service in seconds using the commands below.  Edit the .conf file to utilize whichever flavor of firewall you’d like to integrate it with.  Set a few configuration settings and you’re done.
    • To Install (D)DosDeflate:
      wget http://www.inetbase.com/scripts/ddos/install.sh
      chmod 0700 install.sh
      ./install.sh
  • If it doesnt workout, its simple to uninstall too.  To uninstall:
    wget http://www.inetbase.com/scripts/ddos/uninstall.ddos
    chmod 0700 uninstall.ddos
    ./uninstall.ddos

So a few tools are outlined above.  We’ve found that this will stop 90% of the attacks that are out there.  Some nice firewall rules above your server (at the router or switch level) also help.  Most of the time we can identify suspicious traffic before it even hits your servers, so a shameless plug here is probably in order.

Source: Liquid Communications