Archive

Archives pour la catégorie ‘Système’

Howto: Performance Benchmarks a Webserver

27/03/2021 Comments off

source: nixCraft

You can benchmark Apache, IIS and other web server with apache benchmarking tool called ab. Recently I was asked to performance benchmarks for different web servers.

Apache benchmark

Apache benchmark

It is true that benchmarking a web server is not an easy task. From how to benchmark a web server:

First, benchmarking a web server is not an easy thing. To benchmark a web server the time it will take to give a page is not important: you don’t care if a user can have his page in 0.1 ms or in 0.05 ms as nobody can have such delays on the Internet.

What is important is the average time it will take when you have a maximum number of users on your site simultaneously. Another important thing is how much more time it will take when there are 2 times more users: a server that take 2 times more for 2 times more users is better than another that take 4 times more for the same amount of users. »

Here are few tips to carry out procedure along with an example:

Apache Benchmark Procedures

  • You need to use same hardware configuration and kernel (OS) for all tests
  • You need to use same network configuration. For example, use 100Mbps port for all tests
  • First record server load using top or uptime command
  • Take at least 3-5 readings and use the best result
  • After each test reboot the server and carry out test on next configuration (web server)
  • Again record server load using top or uptime command
  • Carry on test using static html/php files and dynamic pages
  • It also important to carry out test using the Non-KeepAlive and KeepAlive (the Keep-Alive extension to provide long-lived HTTP sessions, which allow multiple requests to be sent over the same TCP connection) features
  • Also don’t forget to carry out test using fast-cgi and/or perl tests

Lire la suite…

Comment créer un tunnel SSH inverse

02/03/2021 Comments off

Parfois que nous avons besoin de vous connecter via SSH à un autre ordinateur, nous trouvons que cet ordinateur que nous comptions SSH dans (ce que nous allons appeler « destiny ») peuvent utiliser NAT et, par conséquent, il doesn ' t compte avec une adresse IP publique que nous pourrions utiliser pour se connecter à lui, ou il peut être derrière un pare-feu qui a gagné ' t permettent l'accès de l'extérieur.

Si le « destin » peut réussir à établir une connexion SSH vers un autre ordinateur qui n'est accessible, nous pouvons utiliser ce deuxième ordinateur afin d'établir un tunnel SSH inverse à notre ordinateur « destiny », nous allons appeler ce deuxième ordinateur « origine » (même si elle n'est pas réellement l'ordinateur que nous allons utiliser pour gérer à distance les « cibles », mais qu'un pont).

Un tunnel SSH inverse fonctionne en connectant « destinée » à « l'origine » et puis en se servant cette connexion SSH dans « destin » de n'importe quel ordinateur connecté à « l'origine ». Ce tunnel SSH inverse devrait fonctionner dans la plupart des distributions Linux sans problème.

Alors, laisse supposer que nous avons à présent deux ordinateurs :

« L'origine » IP : aaa.bbb.ccc.ddd

« Destiny » IP : inconnue ou non disponible

Tout d'abord, nous établissons la connexion SSH de "destinée" à « l'origine », qui permet la fonctionnalité SSH inverse avec le paramètre – r :

SSH r 61999:localhost:22 [email protected]

Le premier nombre (61999) indique quel port on va pour utiliser « origine » pour vous connecter à « destiny », localhost est le nom de domaine que nous utiliserons pour cela aussi bien, et le dernier numéro (22) indique quel port est le « destin » écouter pour SSH.

Une fois que cette connexion est établie, et être connecté à le "origine" (peu importe si nous sommes connectés local ou à distance), nous pouvons établir la connexion au « destin » :

SSH p 61999 destiny_user@localhost

Effectivement, nous pouvons utiliser un ordinateur avec un accès SSH permanent comme un pont entre des ordinateurs qui ne sont pas autrement accessibles par l'intermédiaire de SSH. N'importe quel ordinateur connecté à le « origine » peut se connecter à autres ordinateurs avec inversion de tunneling SSH activé.


Categories: Réseau, Système, Tutoriel Tags: , ,

8 Practical Examples of Linux Xargs Command for Beginners

28/01/2021 Comments off

The Linux xargs command may not be a hugely popular command line tool, but this doesn’t take away the fact that it’s extremely useful, especially when combined with other commands like findand grep. If you are new to xargs, and want to understand its usage, you’ll be glad to know that’s exactly what we’ll be doing here.

Before we proceed, please keep in mind that all the examples presented in this tutorial have been tested on Ubuntu 14.04 LTS. Shell used is Bash, and version is 4.3.11.

1. How Xargs command works?

Well, before jumping onto its usage, it’s important to understand what exactly Xargs does. In layman’s terms, the tool – in its most basic form – reads data from standard input (stdin) and executes the command (supplied to it as argument) one or more times based on the input read. Any blanks and spaces in input are treated as delimiters, while blank lines are ignored. 


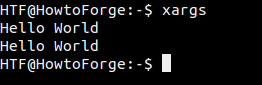
If no command is supplied as argument to xargs, the default command that the tool executes is echo. For example, in the following example, I just executed ‘xargs’ and entered ‘Hello World’ on stdin. As I pressed Ctrl+D (to tell xargs that we’re done with the input), the echocommand was automatically executed, and ‘Hello World’ was printed again.

How xargs command works

2. How to use xargs with another command?

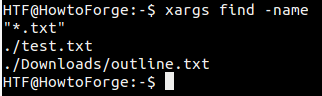
While echo is the default command xargs executes, you can explicitly specify any other command. For example, you can pass the find command along with its ‘-name’ option as argument to xargs, and then pass the name of the file (or type of files) you want find to search as input through stdin.

Here’s the complete command in question:

xargs find -name

For example, we provided « *.txt » in input through stdin, which means we want the find command to search all .txt files in the current directory (as well as its subdirectories).

Here’s the command in action:

Combine xargs with other commands

Lire la suite…

Categories: Système, Tutoriel Tags: , ,

How to Disable Webcam / FaceTime Camera on Mac Completely

22/01/2021 Comments off

Source: osxdaily.com

Some of the more privacy conscious Mac users out there might put tape over their webcam or use apps like Oversight to detect camera activity. While either of those approaches can be satisfactory for many users (or considered totally paranoid and overboard to others), many advanced Mac users in the security community go a step further and just outright disable their Macs front-facing web camera. This article will show you how to completely deactivate the front FaceTime camera on a Mac.


To be clear, this aims to completely disable the software components behind the built-in camera on Macs which prevents it from being used by any application, this webcam is sometimes called the FaceTime camera or the iSight camera, or simply the front-facing camera. All modern Macs have this camera, it is located at the top of the display and embedded into the screen bezel. By disabling the Macs camera, any application that requires it’s usage will no longer function as intended because camera access will become impossible. 

This is an advanced tutorial aimed at advanced users, it is not intended for novice or casual Mac users. This approach disables the Mac built-in camera by changing system level permissions for system level files directly relating to the camera components. If you are not comfortable modifying system files using the command line with super user privileges, do not proceed.

This tutorial applies to modern versions of MacOS including Sierra and El Capitan, you will need turn off rootless temporarily so that you can make modifications to the system folder, if you’re not sure how to do that, you can learn how to disable SIP on Mac OS here. You should aways backup a Mac before making any modifications to system software. Older versions of Mac OS X that wish to disable the iSight camera can follow these instructions instead to accomplish the same effect.

How to Disable the Web Camera on Mac

This is a string of commands that will completely disable the built-in Mac camera, meaning no applications will be able to use the front-facing camera at all. This is intended for advanced users only who thoroughly understand proper syntax and command line usage. 

    1. Back up the Mac if you have not done so already, then you will need to disable SIPfirst (and yes you should re-enable it when finished)
    2. Open the Terminal app as found in /Applications/Utilities/
    3. One by one on their own line and executed separately, issue the following five command strings into the command line and authenticate:

    sudo chmod a-r /System/Library/Frameworks/CoreMediaIO.framework/Versions/A/Resources/VDC.plugin/Contents/MacOS/VDC

    sudo chmod a-r /System/Library/PrivateFrameworks/CoreMediaIOServicesPrivate.framework/Versions/A/Resources/AVC.plugin/Contents/MacOS/AVC

    sudo chmod a-r /System/Library/QuickTime/QuickTimeUSBVDCDigitizer.component/Contents/MacOS/QuickTimeUSBVDCDigitizer

    sudo chmod a-r /Library/CoreMediaIO/Plug-Ins/DAL/AppleCamera.plugin/Contents/MacOS/AppleCamera

    sudo chmod a-r /Library/CoreMediaIO/Plug-Ins/FCP-DAL/AppleCamera.plugin/Contents/MacOS/AppleCamera

    1. Exit Terminal when complete, don’t forget to re-enable SIP on the Mac as well

    (Note you can also use chmod 200 instead of a-r if you prefer using numbers, the effect will be the same and permissions will be –w——-)

    After the Mac camera has been disabled this way, if you attempt to open FaceTime, Skype, Photo Booth, QuickTime, iMovie, or any other app which uses the built-in camera, you will get a message stating “there is no connected camera” on the Mac – which is exactly what you would want to see if you disabled the camera intentionally.

    Mac camera disabled as shown by no camera connected error message

    You should not need to reboot for the changes to take effect, though you may need to relaunch some active applications with camera access.

    How to Re-Enable the Camera on Mac

    Just as before when disabling the camera, to re-enable the Mac camera this way you will likely need to temporarily disable SIP in Mac OS before beginning. Then the commands to issue one by one are as follows:

    sudo chmod a+r /System/Library/Frameworks/CoreMediaIO.framework/Versions/A/Resources/VDC.plugin/Contents/MacOS/VDC

    sudo chmod a+r /System/Library/PrivateFrameworks/CoreMediaIOServicesPrivate.framework/Versions/A/Resources/AVC.plugin/Contents/MacOS/AVC

    sudo chmod a+r /System/Library/QuickTime/QuickTimeUSBVDCDigitizer.component/Contents/MacOS/QuickTimeUSBVDCDigitizer

    sudo chmod a+r /Library/CoreMediaIO/Plug-Ins/DAL/AppleCamera.plugin/Contents/MacOS/AppleCamera

    sudo chmod a+r /Library/CoreMediaIO/Plug-Ins/FCP-DAL/AppleCamera.plugin/Contents/MacOS/AppleCamera

    (Note you can also use chmod 755 instead of a+r if you prefer using numbers to return to -rwxr-xr-x, the effect will be the same)

    You’ll notice the difference between the enabling and disabling commands are simply the permissions change chmod command flag – has turned into a +, indicating the file(s) have read access now whereas before they did not, which is what prevented the camera from working. 

    If this approach is insufficient for your privacy or security needs for whatever reason, you’d likely need to go a step further and actually disassemble your Mac hardware to physically disconnect any camera cables, a task which is quite advanced but undeniably the most effective approach if you want to completely disable the Mac camera and don’t ever want the Macs camera to be used.

    Why would I want to disable the Mac camera?

    Most Mac users would not want to disable their FaceTime / iSight camera. Typically only very advanced Mac users who have a specific reason to completely disable the built-in camera on their Mac would want to do this, whether they are systems administrators, security professionals, for privacy reasons, or otherwise. This is not intended for the average Mac user. If you’re an average, casual, or novice Mac user who is concerned about privacy and any possible camera shenanigans, try putting tape on your web cam, like the FBI director does, which is much lower tech and less involved, easy to reverse, and quite effective since obviously if something is obstructing the camera lens than it is not usable.


    Categories: Sécurité, Système, Tutoriel Tags: ,

    HowTo: The Ultimate Logrotate Command Tutorial with 10 Examples

    19/01/2021 Comments off

    Managing log files effectively is an essential task for Linux sysadmin.

    In this article, let us discuss how to perform following log file operations using UNIX logrotateutility.

    • Rotate the log file when file size reaches a specific size
    • Continue to write the log information to the newly created file after rotating the old log file
    • Compress the rotated log files
    • Specify compression option for the rotated log files
    • Rotate the old log files with the date in the filename
    • Execute custom shell scripts immediately after log rotation
    • Remove older rotated log files

    1. Logrotate Configuration files

    Following are the key files that you should be aware of for logrotate to work properly.

    /usr/sbin/logrotate – The logrotate command itself.

    /etc/cron.daily/logrotate – This shell script executes the logrotate command everyday.

    $ cat /etc/cron.daily/logrotate
    #!/bin/sh
    
    /usr/sbin/logrotate /etc/logrotate.conf
    EXITVALUE=$?
    if [ $EXITVALUE != 0 ]; then
        /usr/bin/logger -t logrotate "ALERT exited abnormally with [$EXITVALUE]"
    fi
    exit 0

    /etc/logrotate.conf – Log rotation configuration for all the log files are specified in this file.


    $ cat /etc/logrotate.conf
    weekly
    rotate 4
    create
    include /etc/logrotate.d
    /var/log/wtmp {
        monthly
        minsize 1M
        create 0664 root utmp
        rotate 1
    }

    /etc/logrotate.d – When individual packages are installed on the system, they drop the log rotation configuration information in this directory. For example, yum log rotate configuration information is shown below.

    $ cat /etc/logrotate.d/yum
    /var/log/yum.log {
        missingok
        notifempty
        size 30k
        yearly
        create 0600 root root
    }

    2. Logrotate size option: Rotate the log file when file size reaches a specific limit

    If you want to rotate a log file (for example, /tmp/output.log) for every 1KB, create the logrotate.conf as shown below.

    $ cat logrotate.conf
    /tmp/output.log {
            size 1k
            create 700 bala bala
            rotate 4
    }

    This logrotate configuration has following three options:

    • size 1k – logrotate runs only if the filesize is equal to (or greater than) this size.
    • create – rotate the original file and create the new file with specified permission, user and group.
    • rotate – limits the number of log file rotation. So, this would keep only the recent 4 rotated log files.

    Before the logrotation, following is the size of the output.log:

    $ ls -l /tmp/output.log
    -rw-r--r-- 1 bala bala 25868 2010-06-09 21:19 /tmp/output.log

    Now, run the logrotate command as shown below. Option -s specifies the filename to write the logrotate status.

    $ logrotate -s /var/log/logstatus logrotate.conf

    Note : whenever you need of log rotation for some files, prepare the logrotate configuration and run the logroate command manually.
    After the logrotation, following is the size of the output.log:

    $ ls -l /tmp/output*
    -rw-r--r--  1 bala bala 25868 2010-06-09 21:20 output.log.1
    -rwx------ 1 bala bala        0 2010-06-09 21:20 output.log

    Eventually this will keep following setup of rotated log files.

    • output.log.4.
    • output.log.3
    • output.log.2
    • output.log.1
    • output.log

    Please remember that after the log rotation, the log file corresponds to the service would still point to rotated file (output.log.1) and keeps on writing in it. You can use the above method, if you want to rotate the apache access_log or error_log every 5 MB.

    Ideally, you should modify the /etc/logrotate.conf to specify the logrotate information for a specific log file.

    Also, if you are having huge log files, you can use: 10 Awesome Examples for Viewing Huge Log Files in Unix

    3. Logrotate copytruncate option: Continue to write the log information in the newly created file after rotating the old log file.

    $ cat logrotate.conf
    /tmp/output.log {
             size 1k
             copytruncate
             rotate 4
    }

    copytruncate instruct logrotate to creates the copy of the original file (i.e rotate the original log file) and truncates the original file to zero byte size. This helps the respective service that belongs to that log file can write to the proper file.

    While manipulating log files, you might find the sed substitute, sed delete tips helpful.

    4. Logrotate compress option: Compress the rotated log files

    If you use the compress option as shown below, the rotated files will be compressed with gzip utility.

    $ cat logrotate.conf
    /tmp/output.log {
            size 1k
            copytruncate
            create 700 bala bala
            rotate 4
            compress
    }

    Output of compressed log file:

    $ ls /tmp/output*
    output.log.1.gz output.log

    5. Logrotate dateext option: Rotate the old log file with date in the log filename

    $ cat logrotate.conf
    /tmp/output.log {
            size 1k
            copytruncate
            create 700 bala bala
            dateext
            rotate 4
            compress
    }

    After the above configuration, you’ll notice the date in the rotated log file as shown below.

    $ ls -lrt /tmp/output*
    -rw-r--r--  1 bala bala 8980 2010-06-09 22:10 output.log-20100609.gz
    -rwxrwxrwx 1 bala bala     0 2010-06-09 22:11 output.log

    This would work only once in a day. Because when it tries to rotate next time on the same day, earlier rotated file will be having the same filename. So, the logrotate wont be successful after the first run on the same day.

    Typically you might use tail -f to view the output of the log file in realtime. You can even combine multiple tail -f output and display it on single terminal.

    6. Logrotate monthly, daily, weekly option: Rotate the log file weekly/daily/monthly

    For doing the rotation monthly once,

    $ cat logrotate.conf
    /tmp/output.log {
            monthly
            copytruncate
            rotate 4
            compress
    }

    Add the weekly keyword as shown below for weekly log rotation.

    $ cat logrotate.conf
    /tmp/output.log {
            weekly
            copytruncate
            rotate 4
            compress
    }

    Add the daily keyword as shown below for every day log rotation. You can also rotate logs hourly.

    $ cat logrotate.conf
    /tmp/output.log {
            daily
            copytruncate
            rotate 4
            compress
    }

    7. Logrotate postrotate endscript option: Run custom shell scripts immediately after log rotation

    Logrotate allows you to run your own custom shell scripts after it completes the log file rotation. The following configuration indicates that it will execute myscript.sh after the logrotation.

    $ cat logrotate.conf
    /tmp/output.log {
            size 1k
            copytruncate
            rotate 4
            compress
            postrotate
                   /home/bala/myscript.sh
            endscript
    }

    8. Logrotate maxage option: Remove older rotated log files

    Logrotate automatically removes the rotated files after a specific number of days.  The following example indicates that the rotated log files would be removed after 100 days.

    $ cat logrotate.conf
    /tmp/output.log {
            size 1k
            copytruncate
            rotate 4
            compress
            maxage 100
    }

    9. Logrotate missingok option: Dont return error if the log file is missing

    You can ignore the error message when the actual file is not available by using this option as shown below.

    $ cat logrotate.conf
    /tmp/output.log {
            size 1k
            copytruncate
            rotate 4
            compress
            missingok
    }

    10. Logrotate compresscmd and compressext option: Sspecify compression command for the log file rotation

    $ cat logrotate.conf
    /tmp/output.log {
            size 1k
            copytruncate
            create
            compress
            compresscmd /bin/bzip2
            compressext .bz2
            rotate 4
    }

    Following compression options are specified above:

    • compress – Indicates that compression should be done.
    • compresscmd – Specify what type of compression command should be used. For example: /bin/bzip2
    • compressext – Specify the extension on the rotated log file. Without this option, the rotated file would have the default extension as .gz. So, if you use bzip2 compressioncmd, specify the extension as .bz2 as shown in the above example.
     
    Categories: Système, Tutoriel Tags: