Archive

Articles taggués ‘replication’

MySQL – Migrate Users from Server to Server

13/06/2024 Comments off

mysql migrate usersSometimes we need to migrate our databases to a new MySQL server.  It is easy to move the databases, but without the users and their permissions, our new databases would be worthless.  Below is a step-by-step on migrating MySQL users to a new MySQL server

Step 1 – Create a Query List That We Can Use to Get Grants for All Users

I use these options so that I wouldn’t get any formatting characters that I would have to manually delete later.

  • -N skip column names in the output
  • -p password – Asks me to type the password so nobody can get it from the command line history
  • -s  silent mode – less formatting output that we don’t want like “|” and “-“

So, let’s get a list of the users in a query that we can use to get the grants.  Our query will be output into the “myfile” file

$ mysql -uroot -N -p -s > myfile
Enter password:
select Distinct CONCAT(‘show grants for `’, user, ‘`@`’, host, ‘`;’) as query from mysql.user;
quit

If we want to see what our query file look like, we can take a quick peek:

[root@classes-dev-mysql ~]# cat myfile
show grants for `user1`@`%`;
show grants for `user2`@`%`;
show grants for `user3`@`10.%`;
show grants for `user4`@`10.%`;
show grants for `jeff`@`10.%`;

Step 2 – Create the MySQL Grant File

We don’t have quite what we want and need yet.  We are looking for a query that will create all of our users on the new MySQL server.  We need to run the query that we just created and it will give us the query that we will use later to create the users.  It will create our grant permission statements in a file named “grantfile”

[root@classes-dev-mysql ~]# mysql -uroot -N -p -s -r < myfile > grantfile
Enter password:

We can take a peek at what our grantfile contains:

$ cat grantfile
GRANT USAGE ON *.* TO ‘user1’@’%’ IDENTIFIED BY PASSWORD ‘5ea9af6g6t27032f’
GRANT ALL PRIVILEGES ON `database1`.* TO ‘user1’@’%’
GRANT USAGE ON *.* TO ‘user2’@’10.%’ IDENTIFIED BY PASSWORD ‘2a123b405cbfe27d’
GRANT SELECT ON `database1`.`table1` TO ‘user2’@’10.%’GRANT ALL PRIVILEGES ON *.* TO ‘user3’@’10.%’ IDENTIFIED BY PASSWORD ‘753af2za1be637ea’
GRANT SELECT, INSERT, UPDATE, DELETE ON *.* TO ‘user3’@’10.%’ IDENTIFIED BY PASSWORD ’08ad9be605rfgcb’…

Step 3 – Create Users and Grant MySQL Permissions on the New MySQL Machine

Now we are done working on the source machine.  We need to copy our file named “grantfile” over to the new machine.

$ scp grantfile [email protected]:/home/myuser

Next, we login to the destination or the new MySQL machine that we are building and run the “grantfile” in MySQL to create our users on the new MySQL machine.

$ mysql -uroot -p < ./grantfile

That’s it.  As long as our databases are named the same in the new MySQL, our users should be ready to use the copy of the databases in the new MySQL machine.

Source: Uptime Made Easy
Installing a high availability web server cluster on Ubuntu 12.04 LTS using HAProxy, HeartBeat and Nginx

12/05/2024 Comments off

How to set-up a high-availability cluster

Here are a few notes about how to set-up a high-availability web server farm using Ubuntu 12.04 LTS using a whole load of awesome software (HAProxy, HeartBeat, Watchdog and Nginx)

The setup

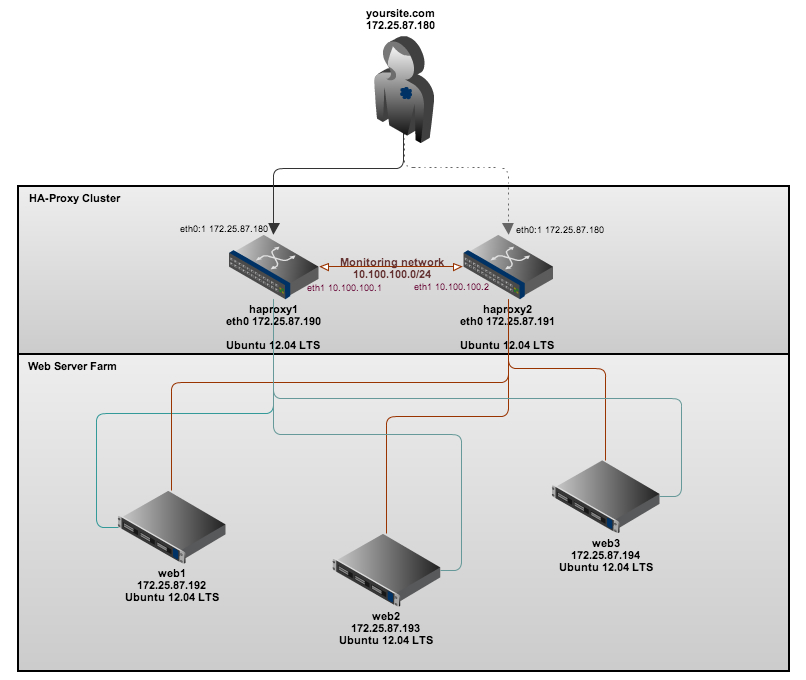
In my setup I have five virtual machines, these are named and used for the following:-

haproxy1 – Our first proxy (master)/load-balancer (running HAProxy, HeartBeat and Watchdog) [IP address: 172.25.87.190]
haproxy2 – Our second proxy (failover)/load-balancer (running HAProxy, HeartBeat and Watchdog) [IP address: 172.25.87.191]
web1 – Our first web server node (running nginx) [IP address: 172.25.87.192]
web2 – Our second web server node (running nginx) [IP address: 172.25.87.193]
web3 – Our third web server node (running nginx) [IP address: 172.25.87.194]

The servers are connected in the following way:-

thesetup

In my next post I will also explain how to configure the web servers to point to a backend shared storage cluster (using NFS) and a MySQL cluster server to have a truly highly available web hosting platform.

Lire la suite…

MySQL Cluster Replication: Multi-Master and Circular Replication

01/05/2024 Comments off

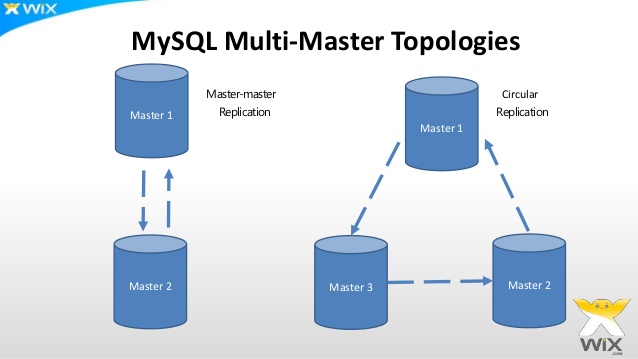
mysql-multi-master-replication-14-638Beginning with MySQL 5.1.18, it is possible to use MySQL Cluster in multi-master replication, including circular replication between a number of MySQL Clusters.

Prior to MySQL 5.1.18, multi-master replication including circular replication was not supported with MySQL Cluster replication. This was because log events created in a particular MySQL Cluster were wrongly tagged with the server ID of the master rather than the server ID of the originating server.

Circular replication example. In the next few paragraphs we consider the example of a replication setup involving three MySQL Clusters numbered 1, 2, and 3, in which Cluster 1 acts as the replication master for Cluster 2, Cluster 2 acts as the master for Cluster 3, and Cluster 3 acts as the master for Cluster 1. Each cluster has two SQL nodes, with SQL nodes A and B belonging to Cluster 1, SQL nodes C and D belonging to Cluster 2, and SQL nodes E and F belonging to Cluster 3.

Circular replication using these clusters is supported as long as the following conditions are met:

  • The SQL nodes on all masters and slaves are the same
  • All SQL nodes acting as replication masters and slaves are started using the --log-slave-updates option

Lire la suite…

Monitor your MySql replication database

26/03/2024 Comments off

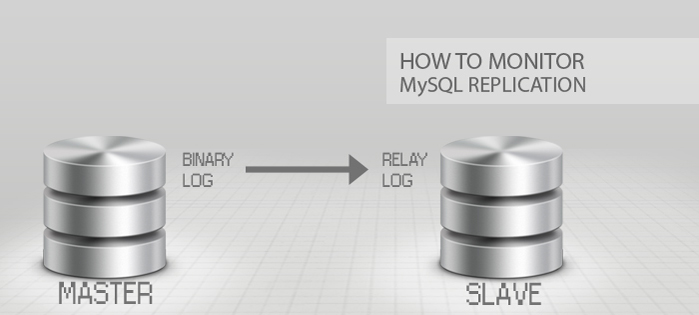
how-to-monitor-mysql-replicationYou have configured your MySql replication, next step is to perform maintenance and monitor your replication. Percona Toolkit for MySQL is a collection of advanced command-line tools to perform a variety of MySQL server and system tasks.

The Percona Toolkit allows you to amongst many tasks to verify MySQL replication integrity, efficiently archive rows, find duplicate indexes, summarize MySQL servers, analyze queries from logs and tcpdump, collect vital system information when problems occur.

To get started you need to install Percona Toolkit, I’m using Ubuntu as an OS on my servers, installing the percona toolkit was straight forward

apt-get install percona-toolkit

To get a summary of your databases use the command – pt-mysql-summary

pt-mysql-summary --u=username --p=password

Next you would want to setup a heartbeat table in your database so you can Monitor MySQL replication delay – for that you will use the pt-heartbeat command.

pt-heartbeat -D wpslavedb --create-table --ask-pass --check --master-server-id 1

You can find the manual for the options here.

pt-heartbeat measures replication lag on a MySQL or PostgreSQL server. You can use it to update a master or monitor a replica. mk-heartbeat depends only on the heartbeat record being replicated to the slave, so it works regardless of the replication mechanism. It works at any depth in the replication hierarchy; for example, it will reliably report how far a slave lags its master’s master’s master.

Start daemonized process to update test.heartbeat table on master:

  pt-heartbeat -D wpslavedb --update -h master-server --daemonize --ask-pass

Monitor replication lag on slave:

  pt-heartbeat -D wpslavedb --monitor -h slave-server --ask-pass
  pt-heartbeat -D wpslavedb --monitor -h slave-server --dbi-driver Pg --ask-pass

Check slave lag once and exit (using optional DSN to specify slave host):

  pt-heartbeat -D wpslavedb --check h=slave-server --ask-pass

If the replication hierarchy is “master -> slave1 -> slave2” with corresponding server IDs 1, 2 and 3, you can:

  pt-heartbeat --daemonize -D wpslavedb --update -h master --ask-pass
  pt-heartbeat --daemonize -D wpslavedb --update -h slave1 --ask-pass

Then check (or monitor) the replication delay from master to slave2:

  pt-heartbeat -D wpslavedb --master-server-id 1 --check slave2 --ask-pass

Or check the replication delay from slave1 to slave2:

  pt-heartbeat -D wpslavedb --master-server-id 2 --check slave2 --ask-pass

if you developing and writing SQL statements, this command is very useful pt-query-digest – Analyze MySQL queries from logs, processlist, and tcpdump

  pt-query-digest slow.log    // requires you to have slow query logged enabled

There are other tools Percona Toolkit, these that I shown is what I find useful for my monitoring and maintenance.

If you want to find out the best MySQL configuration for your application, you can head over to Percona’s website they have a MySql wizards.

Source: torbjornzetterlund.com

Un cluster DRBD / MySQL avec Heartbeat sur Debian 7

25/03/2024 Comments off

Source: denisrosenkranz.com

Nous avons vu précédement comment mettre un place un Cluster Apache actif/passif avec DRBD et HeartBeat. Dans ce tutoriel nous allons voir comment faire la même chose mais avec MySQL.

La configuration de DRBD et de Heartbeat est la même que pour le tutoriel précédent.

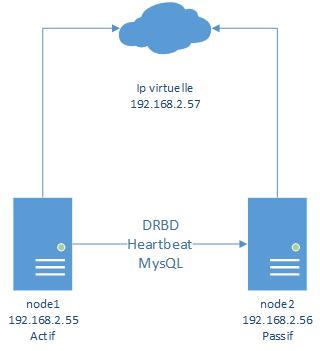
Voilà ce que nous allons mettre en place

DRBDMySQL

Donc pour faire ce tutoriel suivez le tutoriel suivant jusqu’a « Installation d’apache« :

Un cluster DRBD/Apache avec Heartbeat sur Debian 7

Lire la suite…