Whether you are in the web hosting business, or run a few web sites on a VPS yourself, chances are you want to display visitor statistics such as top visitors, requested files (dynamic or static), used bandwidth, client browsers, and referring sites, and so forth.
GoAccess is a command-line log analyzer and interactive viewer for Apache or Nginx web server. With this tool, you will not only be able to browse the data mentioned earlier, but also parse the web server logs to dig for further data as well – and all of this within a terminal window in real time. Since as of today most web servers use either a Debian derivative or a Red Hat based distribution as the underlying operating system, I will show you how to install and use GoAccess in Debian and CentOS.
Installing GoAccess on Linux
In Debian, Ubuntu and derivatives, run the following command to install GoAccess:
# aptitude install goaccess
In CentOS, you’ll need to enable the EPEL repository and then:
# yum install goaccess
In Fedora, simply use yum command:
# yum install goaccess
If you want to install GoAccess from the source to enable further options (such as GeoIP location), install required dependencies for your operating system, and then follow these steps:
# wget http://tar.goaccess.io/goaccess-0.8.5.tar.gz
# tar -xzvf goaccess-0.8.5.tar.gz
# cd goaccess-0.8.5/
# ./configure --enable-geoip
# make
# make install
That will install version 0.8.5, but you can always verify what is the latest version in the Downloads page of the project’s web site.
Since GoAccess does not require any further configurations, once it’s installed you are ready to go.
Running GoAccess
To start using GoAccess, just run it against your Apache access log.
For Debian and derivatives:
# goaccess -f /var/log/apache2/access.log
For Red Hat based distros:
# goaccess -f /var/log/httpd/access_log
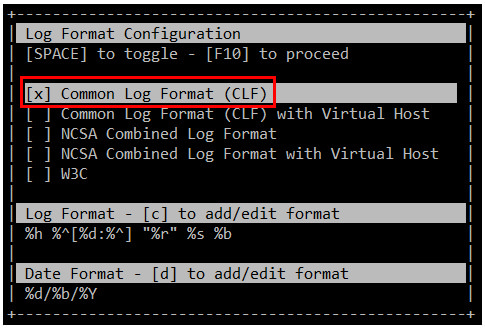
When you first launch GoAccess, you will be presented with the following screen to choose the date and log format. As explained, you can toggle between options using the spacebar and proceed with F10. As for the date and log formats, you may want to refer to the Apache documentation if you need to refresh your memory.
In this case, Choose Common Log Format (CLF):
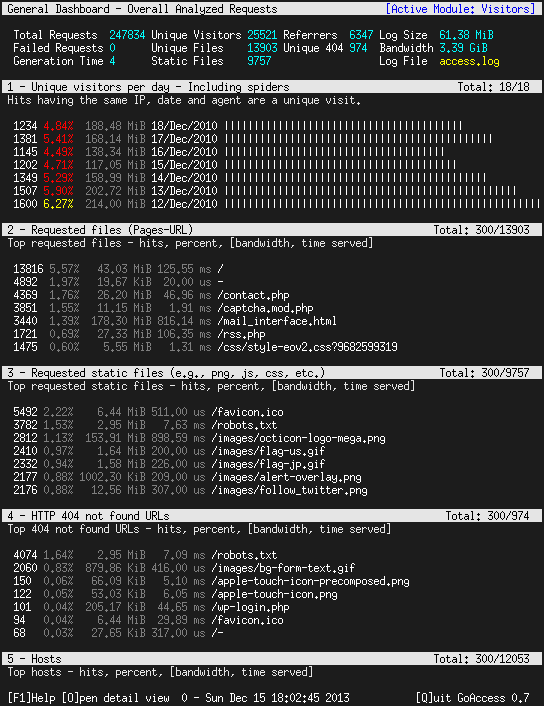
and then press F10. You will be presented with the statistics screen. For the sake of brevity, only the header, which shows the summary of the log file, is shown in the next image:
Of course there are several types of DOS attacks , in this post I will demonstrating the use if iptables to limit the traffic on port 80.
The goal is to keep your web server “responsive” to legitimate traffic, but to throttle back on excessive (potential DOS) traffic.
In this demonstration iptables is configured :
The default policy is ACCEPT (to prevent lockout in the event of flushing the rules with iptables -F).
“Legitimate” traffic is then allowed. In this example I am allowing traffic only on port 80.
All other traffic is then blocked at the end of the INPUT chain (the final rule in the INPUT chain is to DROP all traffic).
The rules I will demonstrate are as follows:
First rule : Limit NEW traffic on port 80
sudo iptables -A INPUT -p tcp --dport 80 -m state --state NEW -m limit --limit 50/minute --limit-burst 200 -j ACCEPT
Lets break that rule down into intelligible chunks.
-p tcp --dport 80 => Specifies traffic on port 80 (Normally Apache, but as you can see here I am using nginx).
-m state NEW => This rule applies to NEW connections.
-m limit --limit 50/minute --limit-burst 200 -j ACCEPT =>This is the essence of preventing DOS.
“--limit-burst” is a bit confusing, but in a nutshell 200 new connections (packets really) are allowed before the limit of 50 NEW connections (packets) per minute is applied.
For a more technical review of this rule, see this netfilet page. Scroll down to a bit to the “limit” section.
Second rule – Limit established traffic
This rule applies to RELATED and ESTABLISHED all traffic on all ports, but is very liberal (and thus should not affect traffic on port 22 or DNS).
If you understood the above rule, you should understand this one as well.
sudo iptables -A INPUT -m state --state RELATED,ESTABLISHED -m limit --limit 50/second --limit-burst 50 -j ACCEPT
In summary, 50 ESTABLISHED (and/or RELATED) connections (packets really) are allowed before the limit of 50 ESTABLISHED (and/or RELATED) connections (packets) per second is applied.
Do not let that rule fool you, although it seems very open, it does put some limits on your connections.
Test it for yourself, try using the first rule with and without the second rule.
Fail2ban: An Apache HTTP server in production environments can be under attack in various different ways. Attackers may attempt to gain access to unauthorized or forbidden directories by using brute-force attacks or executing evil scripts. Some malicious bots may scan your websites for any security vulnerability, or collect email addresses or web forms to send spams to.
Apache HTTP server comes with comprehensive logging capabilities capturing various abnormal events indicative of such attacks. However, it is still non-trivial to systematically parse detailed Apache logs and react to potential attacks quickly (e.g., ban/unban offending IP addresses) as they are perpetrated in the wild. That is when fail2ban comes to the rescue, making a sysadmin‘s life easier.
fail2ban is an open-source intrusion prevention tool which detects various attacks based on system logs and automatically initiates prevention actions e.g., banning IP addresses with iptables, blocking connections via /etc/hosts.deny, or notifying the events via emails. fail2ban comes with a set of predefined « jails » which use application-specific log filters to detect common attacks. You can also write custom jails to deter any specific attack on an arbitrary application.
In this tutorial, I am going to demonstrate how you can configure fail2ban to protect your Apache HTTP server. I assume that you have Apache HTTP server and fail2ban already installed. Refer to another tutorial for fail2ban installation.
What is a Fail2ban Jail
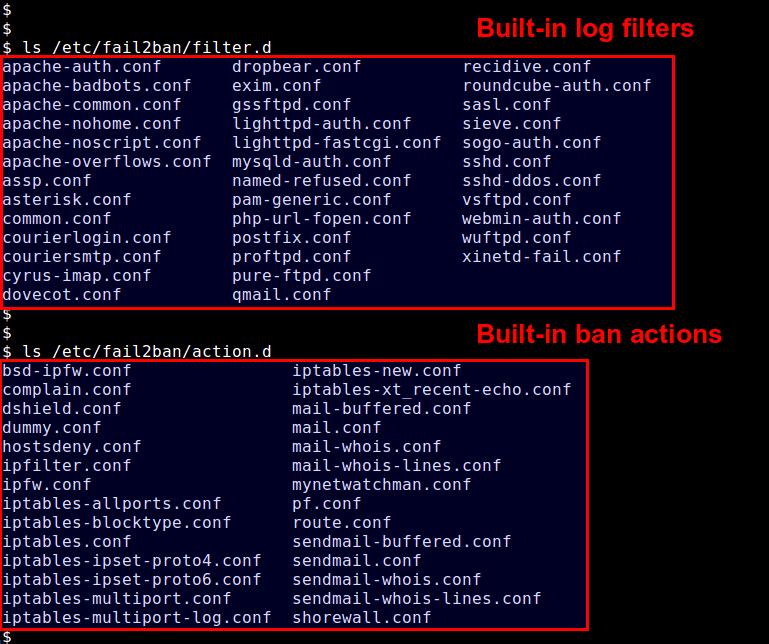
Let me go over more detail on fail2ban jails. A jail defines an application-specific policy under which fail2ban triggers an action to protect a given application. fail2ban comes with several jails pre-defined in /etc/fail2ban/jail.conf, for popular applications such as Apache, Dovecot, Lighttpd, MySQL, Postfix, SSH, etc. Each jail relies on application-specific log filters (found in /etc/fail2ban/fileter.d) to detect common attacks. Let’s check out one example jail: SSH jail.
This SSH jail configuration is defined with several parameters:
[ssh]: the name of a jail with square brackets.
enabled: whether the jail is activated or not.
port: a port number to protect (either numeric number of well-known name).
filter: a log parsing rule to detect attacks with.
logpath: a log file to examine.
maxretry: maximum number of failures before banning.
banaction: a banning action.
Any parameter defined in a jail configuration will override a corresponding fail2ban-wide default parameter. Conversely, any parameter missing will be assgined a default value defined in [DEFAULT] section.
Predefined log filters are found in /etc/fail2ban/filter.d, and available actions are in /etc/fail2ban/action.d.
If you want to overwrite fail2ban defaults or define any custom jail, you can do so by creating /etc/fail2ban/jail.local file. In this tutorial, I am going to use /etc/fail2ban/jail.local.
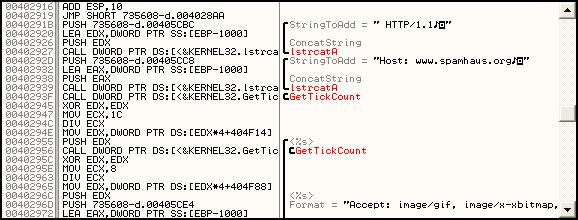
Recently, the anti-spam organization Spamhaus has come under yet another distributed denial-of-service attack. With some help from our good friends at myNetWatchman we were able to obtain a sample of the malware used in the attack. This one is particularly nasty, starting up 1500 threads to send randomized HTTP requests to Spamhaus’ webserver in a loop. This attack tool doesn’t have a command-and-control mechanism, so it was likely force-installed on all the infected systems of an existing botnet.
This kind of attack is particularly troublesome to deal with. While simplistic packet-based attacks can be more easily mitigated upstream, with an HTTP-based attack it is often difficult to distinguish attack traffic from legitimate HTTP requests. And because the attack consumes resources from the webserver, not just the system TCP/IP stack, it can quickly bring even a well-tuned webserver to its knees unless the target has better-than-average resources at its disposal to help weather the storm (like Spamhaus does).
Fortunately, most HTTP-based DoS attacks we have seen have a particular weakness – they are vulnerable to a technique known as « tarpitting ». This idea was first proposed by Tom Liston many years ago when the first scanning worms hit the Internet, and was implemented in his program LaBrea (which he no longer offers for download, due to legal concerns – however, the source code can still be found elsewhere and should work on Linux or BSD-based operating systems). The quickest way to implement tarpitting (if your webserver runs on Linux) is in the Linux netfilter source code. If the tarpit module is compiled for your Linux kernel, the operation becomes as simple as « iptables -A INPUT -s x.x.x.x -p tcp -j TARPIT« .
Tarpitting works by taking advantage of TCP/IP’s idea of window size and state. In a tarpitted session, we respond to the connection initiation as normal, but we immediately set our TCP window size to just a few bytes in size. By design, the connecting system’s TCP/IP stack must not send any more data than will fit in our TCP window before waiting for us to ACK the packets sent. This is to allow connections to deal with packet loss that might occur in a normal session. If the sending system doesn’t get an ACK to a packet sent, it will resend the packet at increasingly longer intervals. In our tarpitted session, we simply don’t ack any of the post-handshake packets at all, forcing the remote TCP/IP stack to keep trying to send us those same few bytes, but waiting longer each time. With this, bandwidth usage falls off quickly to almost nothing.
It might seem reasonable to simply use iptables -j DROP to not respond to connections at all – this will certainly prevent the webserver from seeing the connection, but because the connection may have a timeout set, it is likely we’ll keep seeing connection attempts at a fairly regular rate. Essentially a DROP rule turns our HTTP flood into a SYN flood.
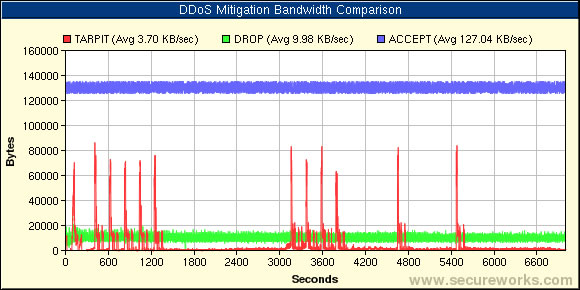
Below is a chart made by running the Spamhaus DDoS malware on a single host in a sandnet, and comparing the bandwidth usage of each iptables mitigation technique with no mitigation. Here we extrapolated the bandwidth usage of the full non-mitigated attack (the blue line in the chart) from just the first 30 seconds of the attack, rather than let it fully DDoS the server the entire two hours. Under load, our untuned Apache server probably would have slowed down, forcing the attack bandwidth to decrease with it as it became unresponsive. In this simulation we are assuming the server can withstand a single attacker with no slowdown.
We see that although with tarpitting, there are momentary spikes as the sessions finally time out and try again, overall the average bandwidth usage is substantially lower with tarpitting as opposed to simply dropping the attacker’s packets.
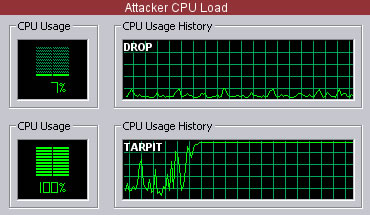
There seems to be an added side-effect to mitigation by tarpit. When the attacked host mitigates with an iptables DROP (no response), the attacker’s CPU load is fairly minimal and the system is responsive. However, as demonstated by the graphic below, under tarpitting the CPU load in our test system quickly rose to 100% as the attacking system’s kernel tried to maintain a large number of open connections in a retry state.
In the case of our test system, the user interface became nearly unresponsive. Of course, this may depend on the overal system CPU speed and RAM (our test was done in a VMware environment which also may be a factor), but if the system becomes unacceptibly slow, it serves as an impetus for the unknowing owner of the attacking system to have the computer cleaned of its botnet infection.
Unfortunately, the TARPIT iptables module is not part of every Linux distribution. It is possible to obtain it by getting the netfilter Patch-o-Matic-NG source and compiling it for your kernel (don’t forget the iptables source must also be patched to support the TARPIT option).
At some point, the scalability of having thousands of iptables rules may come into play. At the University of Florida, Chuck Logan and Jordan Wiens were able to successfully mitigate a DDoS attack from the Netsky virus by writing customized software to detect the attacking hosts and create intelligent chains of iptables rules that were more scalable. Details and source code can be found here.
No matter how you implement it, tarpitting isn’t going to completely stop an attack – it can only slow it down. However, it could be an effective stop-gap measure until upstream providers can effectively null-route an attack on your website, or until the attack stops on its own.
Un site web peut fournir tout type de contenu (des fichiers textes, HTML, Flash, zip…). Ce contenu peut être statique (le serveur transmet un fichier au navigateur) ou dynamique (le contenu est généré par un programme exécuté par le serveur). Les sites web contiennent généralement plusieurs types de documents, certains étant statiques et d’autres dynamiques.
Nous traiterons ici d’Apache 2.2 sur un système Debian (et ses dérivés, comme Ubuntu).
Fichiers log
Par défaut sous Debian, Apache enregistre les erreurs dans le fichier /var/log/apache2/error.log. Quand quelque chose ne fonctionne pas, ce fichier fournit souvent des pistes pour trouver la solution.
Il enregistre également toutes les requêtes dans /var/log/apache2/access.log.
Configuration de base
Sous Debian, Apache se lance automatiquement lorsqu’on l’installe et à chaque démarrage du système. Lorsqu’on modifie sa configuration, il faut lui faire prendre connaissance des changements avec la commande
/etc/init.d/apache2 reload
Pour l’arrêter, le lancer ou le relancer on utilisera la même commande avec stop, start ou restart.
Pour d’autres systèmes il faudra consulter la documentation du système ou celle d’Apache [archive].
Configuration du serveur
La configuration [archive] du serveur se trouve dans /etc/apache2/apache2.conf. Ce fichier contient des instructions Include [archive] qui permettent de déplacer certaines parties de la configuration dans d’autres fichiers. Debian utilise cette fonctionnalité pour les modules [archive] (comme PHP) et la gestion des serveurs virtuels [archive] :
Configuration des modules
Le répertoire /etc/apache2/mods-available contient les modules installés. Le répertoire /etc/apache2/mods-enabled contient les modules activés. Les modules activés sont des liens symboliques vers les modules installés.
Pour activer ou désactiver un module, on peut manipuler directement les liens ou utiliser les commandes a2enmod et a2dismod (voir les pages de man).
Configuration des sites
De la même manière, le répertoire /etc/apache2/sites-available contient les sites web disponibles et /etc/apache2/sites-enabled les sites activés. Il en existe un préinstallé : le site default.
Les sites peuvent s’activer ou se désactiver en manipulant les liens dans sites-enabled ou en utilisant a2ensite et a2dissite. Lire la suite…
 Whether you are in the web hosting business, or run a few web sites on a VPS yourself, chances are you want to display visitor statistics such as top visitors, requested files (dynamic or static), used bandwidth, client browsers, and referring sites, and so forth.