Archive

Articles taggués ‘securite’

How to Restrict IP Addresses from Accessing your Web Server using .htaccess

01/11/2023 Comments off

If you are running the Apache Web Server or your web hosting provider running Apache based web server, you can use .htaccess configuration file to restrict access to your website. This could be a very important issue from security stand point of view especially if your server is being attacked or hacked from any specific or range of IP addresses.

Now, restricting access method works in two ways. First, you can restrict access to certain IP addresses and allow others. Second, you can restrict access to everyone but few IP addresses only. On this post, I will focus on both method and will try to explain as much as I can.

Restrict Certain IP Addresses

If you want to restrict specific IP addresses from accessing your site, you can use the following lines on your .htaccess file.

order deny,allow
deny from 123.4.5.6
deny from 654.3.2.1
allow from all

These lines above will block “123.4.5.6” and “654.3.2.1” IP addresses from accessing your site. You can add as many IP addresses as you want on this “deny from” list. One interesting fact is, Apache web server gives you lot more flexibility in terms of blocking IP addresses. Take a look at the following lines.

order deny,allow
deny from 123.4.5.
allow from all

If you observe it carefully, you will see that the fourth set of digit is missing on this IP address. It means, if any IP address that matches the first three set of digits will be blocked. So basically anyone with IP address like “123.4.5.1” or “123.4.5.244” won’t be able to access your site as in both IP address matches with the first three (123.4.5.) sets of digits blocked by the Apache web server.

Allow Specific IP Addresses

Think of about a site that you built for a very specific purpose and for very few people, where you do not want everyone to show up. Apache allows you to do that as well.

For an example, lets assume that you built a site that you want one of your friend to be able to access and his IP address is “123.4.5.12”. Simply write the following line on your .htaccess file and you are good to go.

order allow,deny
allow from 123.4.5.12
deny from all

In this case Apache will block all IP addresses except your friends IP address. This is as simple as it can get and I hope you got the basic idea.

Note: On all of my example I used either “allow from all” or “deny from all” at the bottom, this is very important. You must declare either one of these line based on your requirement or things might get little more complicated.

Also remember that all blocked IP addresses would be forwarded or shown an “403 Forbidden” error message. You can definitely customize this message as well but that’s something I will talk about in another post.

Source: iftekhar.net
Categories: Logiciel Tags: , , ,

How to secure SSH login with one-time passwords on Linux

28/10/2023 Comments off

As someone says, security is a not a product, but a process. While SSH protocol itself is cryptographically secure by design, someone can wreak havoc on your SSH service if it is not administered properly, be it weak passwords, compromised keys or outdated SSH client.

As far as SSH authentication is concerned, public key authentication is in general considered more secure than password authentication. However, key authentication is actually not desirable or even less secure if you are logging in from a public or shared computer, where things like stealth keylogger or memory scraper can always a possibility. If you cannot trust the local computer, it is better to use something else. This is when « one-time passwords » come in handy. As the name implies, each one-time password is for single-use only. Such disposable passwords can be safely used in untrusted environments as they cannot be re-used even when they are stolen.

One way to generate disposable passwords is via Google Authenticator. In this tutorial, I am going to demonstrate another way to create one-time passwords for SSH login: OTPW, a one-time password login package. Unlike Google Authenticator, you do not rely on any third party for one-time password generation and verification.

What is OTPW?

OTPW consists of one-time password generator and PAM-integrated verification routines. In OTPW, one-time passwords are generated apriori with the generator, and carried by a user securely (e.g., printed in a paper sheet). Cryptographic hash of the generated passwords are then stored in the SSH server host. When a user logs in with a one-time password, OTPW’s PAM module verifies the password, and invalidates it to prevent re-use.

Step One: Install and Configure OTPW on Linux

Debian, Ubuntu or Linux Mint:

Install OTPW packages with apt–get.

$ sudo apt-get install libpam-otpw otpw-bin

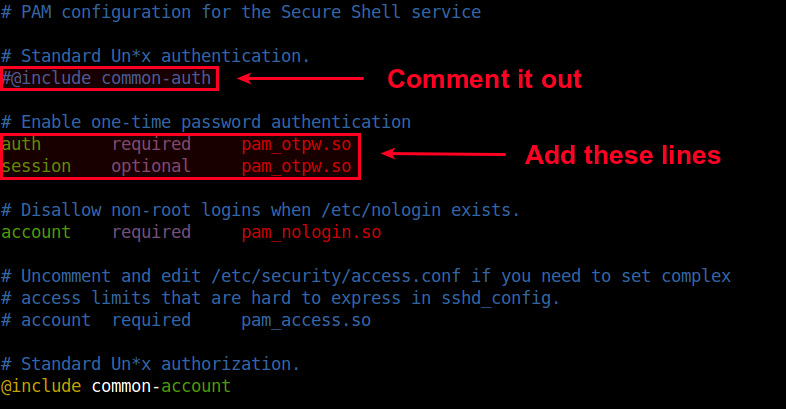
Open a PAM configuration file for SSH (/etc/pam.d/sshd) with a text editor, and comment out the following line (to disable password authentication).

#@include common-auth

and add the following two lines (to enable one-time password authentication):

auth       required     pam_otpw.so
session    optional     pam_otpw.so

16775121360_d1f93feefa_b

Fedora or CentOS/RHEL:

OTPW is not available as a prebuilt package on Red Hat based systems. So let’s install OTPW by building it from the source.

First, install prerequites:

$ sudo yum git gcc pam-devel
$ git clone https://www.cl.cam.ac.uk/~mgk25/git/otpw
$ cd otpw

Open Makefile with a text editor, and edit a line that starts with « PAMLIB= » as follows.

On 64-bit system:

PAMLIB=/usr/lib64/security

On 32-bit system:

PAMLIB=/usr/lib/security

Compile and install it. Note that installation will automatically restart an SSH server. So be ready to be disconnected if you are on an SSH connection.

$ make
$ sudo make install

Now you need to update SELinux policy since /usr/sbin/sshd tries to write to user’s home directory, which is not allowed by default SELinux policy. The following commands will do. If you are not using SELinux, skip this step.

$ sudo grep sshd /var/log/audit/audit.log | audit2allow -M mypol
$ sudo semodule -i mypol.pp

Next, open a PAM configuration file for SSH (/etc/pam.d/sshd) with a text editor, and comment out the following line (to disable password authentication).

#auth       substack     password-auth

and add the following two lines (to enable one-time password authentication):

auth       required     pam_otpw.so
session    optional     pam_otpw.so

Lire la suite…

Rsnapshot

13/08/2021 Comments off

Introduction

Vous le savez maintenant, les sauvegardes sont indispensables… Sauvegardes. Nécessaires, mais facile à oublier, sauf si elles sont effectuées automatiquement.

Voici un tutorial qui décrit la procédure pour mettre en place une solution de sauvegarde automatique simple basée sur rsnapshot.

Rsnapshot est un script écrit en perl.

Il utilise Rsync (et ssh si vous le souhaitez) pour effectuer des sauvegardes à intervalle régulier.

Il est capable de réaliser des sauvegardes d’un systèmes de fichier ou bien de bases de données par l’intermédiaire de scripts.

Un des principaux avantages de rsnapshot est son extrême simplicité.

rsnapshot utilise les « hard link unix » pour :

  • Éviter de dupliquer inutilement les fichiers.
  • Faciliter la restauration.

rsnapshot crée l’illusion de plusieurs sauvegardes complètes, alors qu’il n’y a sur le système de fichier que la première et les différences éventuelles apparues entre cette dernière et les suivantes. Il s’agit d’une méthode de sauvegarde différentielle.

Dans ce tuto nous allons vous expliquer comment mettre en place la sauvegarde différentielle sécurisée d’un répertoire d’une machine distante.

Prérequis: Configuration de SSH et des clefs

Vous devez pouvoir vous connecter aux machines auxquelles vous allez vous connecter sans mot de passe:

Tout d’abord, il faut configurer ssh et importer la clef du serveur distant.

Je vais procéder comme dans ce tuto

Testez:

root@nas:~# ssh -p 10122 vanille
Linux vanille.zehome.org 2.6.32-5-amd64 #1 SMP Tue Jun 14 09:42:28 UTC 2011 x86_64

The programs included with the Debian GNU/Linux system are free software;
the exact distribution terms for each program are described in the
individual files in /usr/share/doc/*/copyright.

Debian GNU/Linux comes with ABSOLUTELY NO WARRANTY, to the extent
permitted by applicable law.
Last login: Thu Aug 11 08:07:48 2011 from nas.zehome.org
root@vanille:~#

Installation de rsnapshot

root@nas:~# apt-get install rsnapshot

Qui vous installera par la même occasion Rsync…

Sauvegarde du fichier de configuration:

root@nas:~# cp /etc/rsnapshot.conf /etc/rsnapshot.conf.sos

Lire la suite…

Le tunnel GRE

19/07/2021 Comments off

Les tunnels

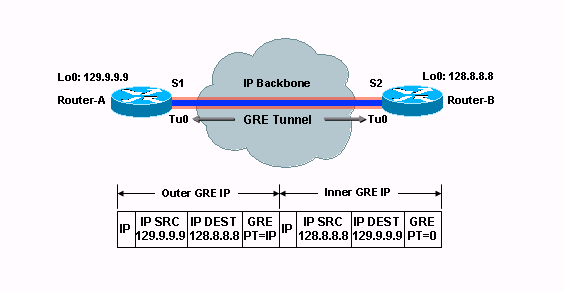
tunnel greGrâce à un tunnel, il est possible de passer directement d’un point à un autre, sans devoir subir les affres de la circulation à la surface. Les tunnels informatiques s’en rapprochent fortement, en proposant un moyen de relier « directement » deux réseaux privés distants, à travers un inter-réseau aussi complexe que l’internet.

Il existe une grande quantité de moyens pour réaliser des tunnels informatiques. PPP peut être considéré comme un tunnel dans des configurations comme PPPoE ou PPPoA. L2TP (Layer 2 Tunneling Protocol), est utilisé sur les réseaux des opérateurs, par exemple dans les connexions ADSL non dégroupées.

PPTP (Point to Point Tunneling Protocol), utilisé par Microsoft, ou encore les tunnels sur IPSec sont d’autres solutions. L’objectif de ce chapitre est de monter le fonctionnement d’un tunnel sur IP à travers une implémentation standardisée : le tunnel GRE, puis à travers une solution plus sécurisée : OpenVPN.

Merci à _SebF, créateur du site frameip.com, pour son aimable collaboration.

Le principe

Imaginons que nous ayons à intervenir sur deux réseaux privés différents, géographiquement éloignés, les réseaux A et B. Si nous voulons interconnecter ces deux réseaux, nous avons à priori deux possibilités :

  • L’une chère, qui consiste à utiliser une liaison spécialisée, proposée par tout bon opérateur de télécoms. Les technologies utilisées par ces opérateurs afin de créer notre réseau privé sont principalement du type ATM1), MPLS2) et, plus anciennement, Frame Relay.
    Les avantages apportés sont la garantie d’un SLA3) et d’une étanchéité renforcée,
  • l’autre, moins chère, qui consiste à interconnecter ces deux réseaux via de l’internet public.

Oui, mais la seconde solution, à priori moins chère, sera plus limitative.

  • Soit, comme c’est le plus souvent le cas, nous ne disposerons que d’une seule adresse IP publique pour accéder à chaque réseau et dans ce cas, nous ne pourrons pas faire facilement communiquer n’importe quelle machine du réseau A avec n’importe quelle machine du réseau B, puisque ces LANs seront montés avec des adresses IP privées. (Voyez le Partage de connexion, mis en œuvre dans de telles configurations),
  • Soit nous disposons de suffisamment d’adresses IP publiques pour monter nos réseaux avec ces adresses, mais alors, toutes nos machines seront directement exposées sur le Net. Cher et difficile (il n’est pas simple, et encore moins gratuit d’obtenir des plages, même petites,  d’adresses IPv4 publiques, encore qu’avec IPv6, ce sera tout à fait réalisable) et pour le moins dangereux.

Comment faire alors ?

Créer une ligne spécialisée virtuelle, qui passera par l’internet, mais qui fonctionnera presque comme une liaison spécialisée.  Bien sûr, pour ce faire, un tunnel est nécessaire afin de créer l’interconnexion, de garantir l’étanchéité. L’avantage est de ne pas être dépendant d’un opérateur et ainsi, de pouvoir choisir la sortie Internet de chaque site indépendamment les unes des autres. Rien en effet n’interdit de construire plusieurs tunnels, éventuellement sur des connexions internet différentes. Nous disposons de plusieurs technologies telles que PPtP, IPSec et celles qui nous intéressent dans cette documentation : Le tunnel GRE et OpenVPN.

Au niveau IP, un tunnel se présente comme ceci :

vpn-1

Et nous aurons l’impression d’avoir à peu près cela :

vpn-2

Bien que la première couche IP circule normalement sur l’internet, en suivant les routes définies par les opérateurs, celle-ci transporte une seconde couche IP et sur cette couche, tout va se passer comme si les deux routeurs communiquaient directement, par l’intermédiaire d’un réseau IP ne comportant que deux nœuds : les deux routeurs.

Grâce à ce tunnel, tout nœud du réseau A pourra communiquer avec tout nœud du réseau B, les deux réseaux étant construits avec des adresses IP privées.

Super non ?

Oui, mais souvenez-vous que IPv4 est un protocole qui n’est pas sécurisé, que nous allons l’utiliser et qui plus est, sur un réseau plutôt mal famé. L’opération n’est donc pas sans risques.

Lire la suite…

Categories: Réseau, Tutoriel Tags: , , ,

How To Create a High Availability Setup with Heartbeat and Floating IPs on Ubuntu 14.04

01/07/2021 Comments off

Source: Digital Ocean – Mitchell Anicas

Introduction

Heartbeat is an open source program that provides cluster infrastructure capabilities—cluster membership and messaging—to client servers, which is a critical component in a high availability (HA) server infrastructure. Heartbeat is typically used in conjunction with a cluster resource manager (CRM), such as Pacemaker, to achieve a complete HA setup. However, in this tutorial, we will demonstrate how to create a 2-node HA server setup by simply using Heartbeat and a DigitalOcean Floating IP.

If you are looking to create a more robust HA setup, look into using Corosync and Pacemaker or Keepalived.

Goal

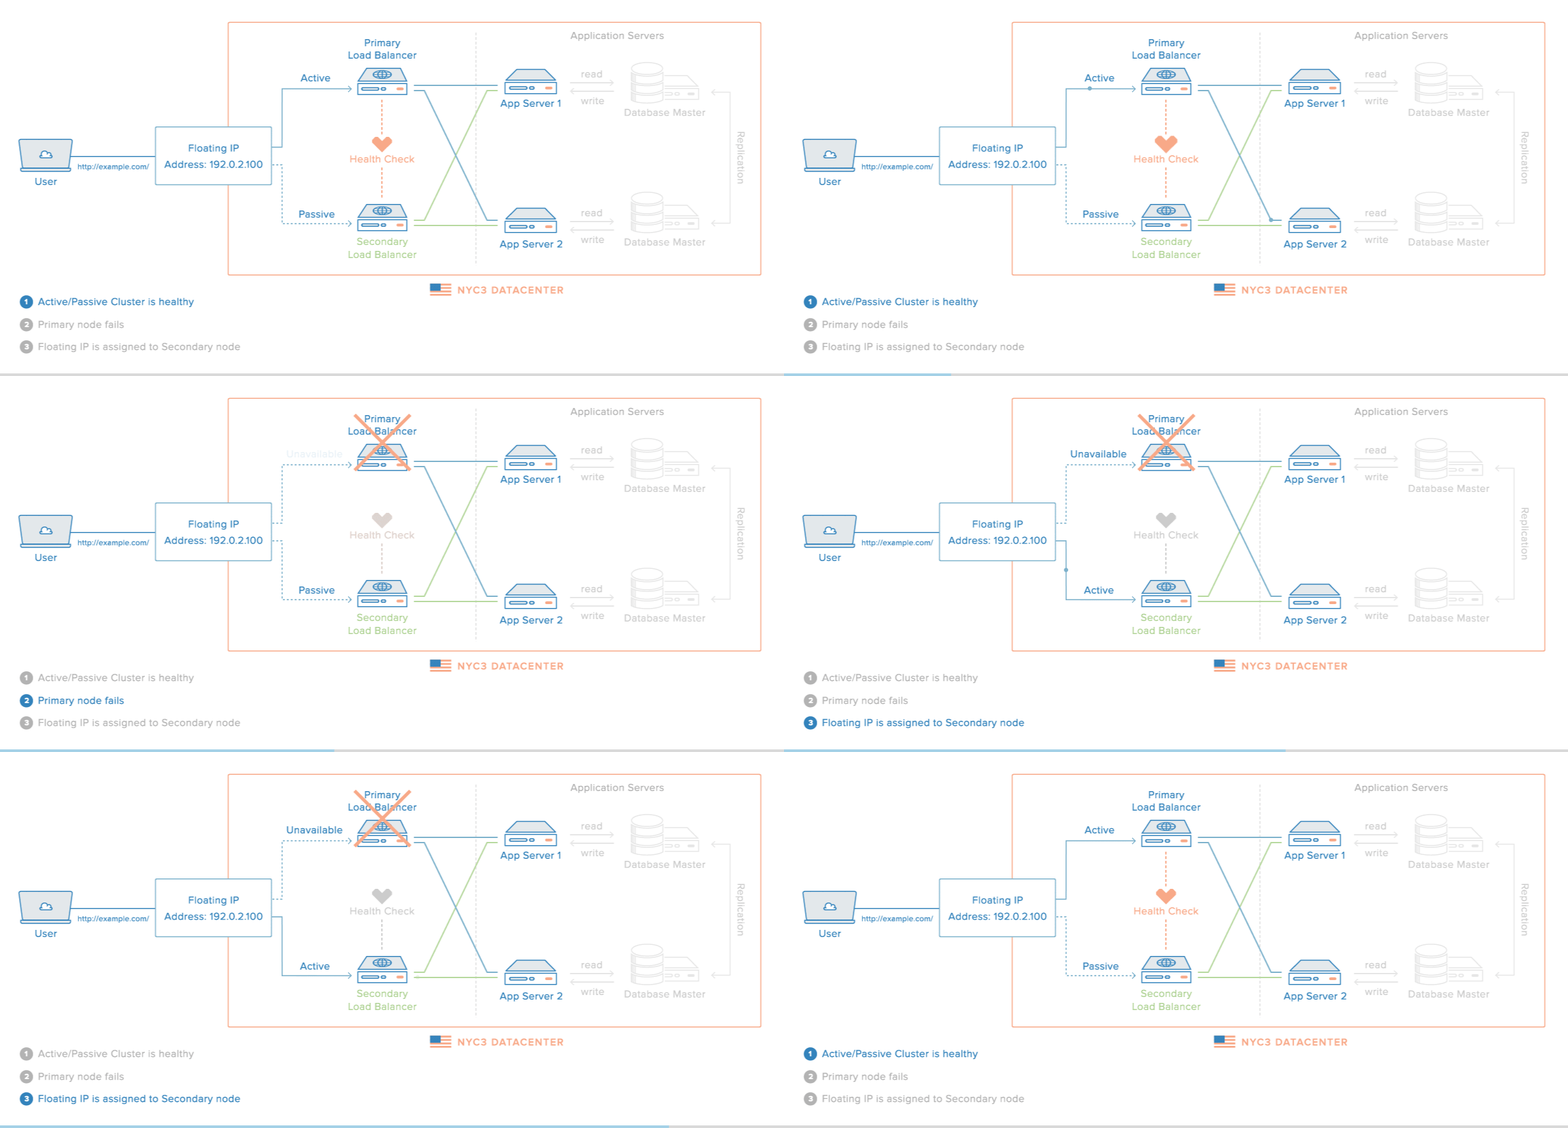
When completed, the HA setup will consist of two Ubuntu 14.04 servers in an active/passive configuration. This will be accomplished by pointing a Floating IP, which is how your users will access your services or website, to point to the primary, or active, server unless a failure is detected. In the event that the Heartbeat service detects that the primary server is unavailable, the secondary server will automatically run a script to reassign the Floating IP to itself via the DigitalOcean API. Thus, subsequent network traffic to the Floating IP will be directed to your secondary server, which will act as the active server until the primary server becomes available again (at which point, the primary server will reassign the Floating IP to itself).

ha-diagram-animated

Note: This tutorial only covers setting up active/passive high availability at the gateway level. That is, it includes the Floating IP, and the load balancer servers—Primary and Secondary. Furthermore, for demonstration purposes, instead of configuring reverse-proxy load balancers on each server, we will simply configure them to respond with their respective hostname and public IP address.

To achieve this goal, we will follow these steps:

  • Create 2 Droplets that will receive traffic
  • Create Floating IP and assign it to one of the Droplets
  • Create DNS A record that points to Floating IP (optional)
  • Install Heartbeat on Droplets
  • Configure Heartbeat to Run Floating IP Reassignment Service
  • Create Floating IP Reassignment Service
  • Test failover

Lire la suite…