Archive

Articles taggués ‘securite’

Voyage au centre du noyau: Traffic Control, la QoS

18/11/2023 Comments off

Gérer la QoS.

On peut aujourd’hui largement envisager d’héberger un ou plusieurs services sur son serveur à domicile, et des mouvements comme auto-hebergement.fr l’on bien illustré. Reste le problème de la bande passante en upload, qui bien que largement suffisante pour héberger des serveurs web, email, jabber ou autre, reste à utiliser intelligemment.

Linux fournit cette intelligence, sous forme d’un scheduler de paquets nommé Traffic Control (TC, pour les intimes), et l’objectif de cet article est de présenter cette technologie et sa mise en place dans un cas d’étude d’hébergement Web, DNS et même BitTorrent. Notons au passage que bon nombre de scripts et programmes existent pour simplifier la mise en place de la QoS (Quality of Service). Citons Wondershaper, Shorewall, ADSL-Optimizer par exemple. Cet article n’en parlera pas, car l’objectif est ici de faire mais aussi de comprendre comment ça marche sous le capot, et pour ça, il faut démonter le moteur et mettre les mains dans le cambouis.

1. Traffic Control, la QoS, les bases

Traffic Control travaille sur les paquets sortant du noyau. Il n’a pas, initialement, pour objectif de contrôler le trafic des paquets entrants. Cette portion de code du noyau se situe entre la couche IP et le pilote du matériel qui transmet sur le réseau. On est donc très bas dans les couches. En réalité, c’est Traffic Control qui est constamment en charge de transmettre au driver de la carte réseau le paquet à envoyer.
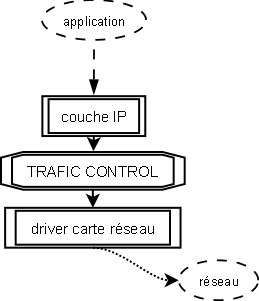
figure1-tcgeneral

Cela signifie, en fait, que le module TC – le scheduler de paquet – est en permanence activé dans le noyau, même quand vous ne pensez pas l’utiliser. Par défaut, ce scheduler maintient une queue (prononcer kiou, une file d’attente) similaire à FIFO dans laquelle le premier paquet entré est donc le premier sortit.

La base de TC est la Queuing Discipline (qdisc) qui représente la politique de scheduling appliquée à une queue. Il existe différentes qdisc. Comme pour le scheduling processeur, on retrouve les méthodes FIFO, FIFO à plusieurs files, FIFO avec hash et round robin (SFQ). On a également un système Token Bucket Filter (TBF) qui attribue des jetons (tokens) à une qdisc pour en limiter le débit (pas de token = pas de transmission = on attend d’avoir un jeton disponible). Cette dernière politique a ensuite été étendue à un TBF hiérarchique, le HTB (Hierarchical Token Bucket). Les politiques que nous allons étudier ici sont TBF, qui pose les fondamentaux, SFQ et HTB. Nous allons également jeter un coup d’oeil à la politique par défaut, que, tout Monsieur Jourdain que nous sommes, nous utilisons sans le savoir: pfifo_fast.

1.1 Premier contact

Jean-Kevin est pressé, il n’a pas de temps à perdre, et tout de suite maintenant, il doit limiter la bande passante sortante de son serveur web à 200kbits par secondes (25ko/s). Au diable la théorie, on y reviendra plus tard, mettons tout de suite les mains dans le cambouis. La mécanique que nous allons mettre en place est simple. Nous allons utiliser une règle Netfilter pour marquer les paquets qui nous intéressent. Ensuite, nous allons fournir à TC une politique qui s’appliquera sur les paquets contenant la marque définie. C’est parti.

1.2 Netfilter MARK

Netfilter permet d’interagir directement avec la structure représentant un paquet dans le noyau. Cette structure, le sk_buff, possède un champ « __u32 nfmark » que l’on va renseigner et qui sera lu par le filtre de TC pour sélectionner la classe de destination du paquet. La règle iptables suivante va appliquer la marque ’80’ sur les paquets sortant (chaine OUTPUT) ayant pour port source le port 80:

# iptables -t mangle -A OUTPUT -o eth0 -p tcp --sport 80 -j MARK --set-mark 80

On peut vérifier que cette règle est bien appliquée aux paquets sortants en visualisant les statistiques de Netfilter.

# iptables -L OUTPUT -t mangle -v
Chain OUTPUT (policy ACCEPT 74107 packets, 109M bytes)
 pkts bytes target prot opt in  out  source   destination
73896  109M MARK   tcp  --  any eth0 anywhere anywhere    tcp spt:www MARK xset 0x50/0xffffffff

1.3 Deux classes dans un arbre

Le binaire /sbin/tc est compris dans le package iproute (sous Debian). Un simple aptitude suffit à l’installer, s’il ne l’est pas déjà. Nous allons créer un arbre dont la racine appliquera la politique HTB. Cet arbre va contenir deux classes: une pour notre trafic marqué, l’autre pour tout le reste et qui sera donc considérée par défaut.

# tc qdisc add dev eth0 root handle 1: htb default 20
# tc class add dev eth0 parent 1:0 classid 1:10 htb rate 200kbit ceil 200kbit prio 1 mtu 1500
# tc class add dev eth0 parent 1:0 classid 1:20 htb rate 1024kbit ceil 1024kbit prio 2 mtu 1500

Les deux classes filles sont raccrochés à la racine. Ces classes possèdent un débit garantie (rate) et un débit maximal opportuniste (ceil). Si la bande passante n’est pas utilisée, alors une classe pourra monter son débit jusqu’à la valeur de ceil. Sinon c’est la valeur de rate qui s’applique. Cela veut dire que la somme des valeurs de rate doit correspondre à la bande passante disponible. Dans le cas d’un upload ADSL classique chez un fournisseur correct, cela sera d’environ 1024kbits (dans le meilleur des cas, éloignement du DSLAM, etc…).

Nous avons maintenant d’un côté un arbre de contrôle de trafic, et d’un autre côté du marquage de paquets. Il reste donc à relier les deux. Cela est fait avec les règles de filtrage de TC. Ces règles sont très simples. On dit à TC de prendre en charge (handle) les paquets portant la marque 80 et de les envoyer (fw flowid) à la classe correspondante. Un point important toutefois, un filtre doit être rattaché à la racine « root » de l’arbre. Sinon, il n’est pas pris en compte.

# tc filter add dev eth0 parent 1:0 protocol ip prio 1 handle 80 fw flowid 1:10

Faisons maintenant le test avec NetCat, on ouvre un port en écoute qui renvoi des zéro. C’est basique et parfait pour tester notre politique. On lance donc :

# nc -l -p 80 < /dev/zero

Et sur une autre machine, on lance un telnet vers le port 80 de la machine en écoute. L’outil iptraf permet de visualiser la connexion en cours et, surtout, son débit (voir figure 2).
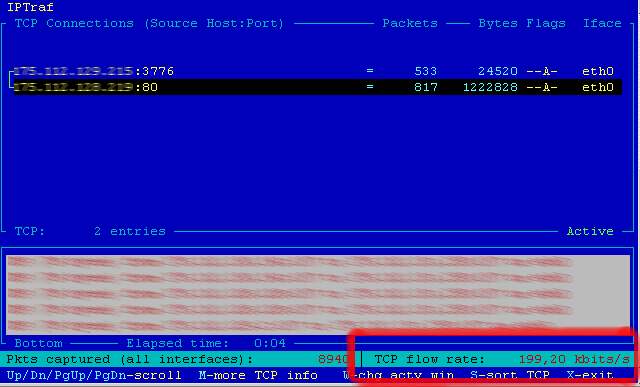
figure2-debitqos

Comme on le voit dans l’encadré rouge, en bas à droite, le débit de la connexion est de 199,20kbps. On s’approche de beaucoup des 200kbps, la précision dépendant quelques paramètres que nous allons étudier. Si l’on teste une connexion du même type sur un autre port, on verra un débit limité à 1024kbps, ce qui correspond au débit de la classe par défaut qui s’applique à tous les paquets non marqués.

Lire la suite…

13 Apache Web Server Security and Hardening Tips

15/11/2023 Comments off

Apache-Security-Tips1We all are very familiar with Apache web server, it is a very popular web server to host your web files or your website on the web. Here are some links which can help you to configure Apache web server on your Linux box.

Here in this tutorial, I’ll cover some main tips to secure your web server. Before you apply these changes in your web server, you should have some basics of the Apache server.

  • Document root Directory: /var/www/html or /var/www
  • Main Configuration file: /etc/httpd/conf/httpd.conf (RHEL/CentOS/Fedora) and /etc/apache/apache2.conf(Debian/Ubuntu).
  • Default HTTP Port: 80 TCP
  • Default HTTPS Port: 443 TCP
  • Test your Configuration file settings and syntax: httpd -t
  • Access Log files of Web Server: /var/log/httpd/access_log
  • Error Log files of Web Server: /var/log/httpd/error_log

1. How to hide Apache Version and OS Identity from Errors

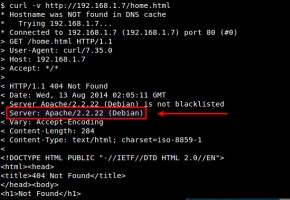
When you install Apache with source or any other package installers like yum, it displays the version of your Apache web server installed on your server with the Operating system name of your server in Errors. It also shows the information about Apache modules installed in your server.

Show-Apache-Version

Show-Apache-Version

In above picture, you can see that Apache is showing its version with the OS installed in your server. This can be a major security threat to your web server as well as your Linux box too. To prevent Apache to not to display these information to the world, we need to make some changes in Apache main configuration file.

Open configuration file with vim editor and search for “ServerSignature“, its by default On. We need to Off these server signature and the second line “ServerTokens Prod” tells Apache to return only Apache as product in the server response header on the every page request, It suppress the OS, major and minor version info.

# vim /etc/httpd/conf/httpd.conf (RHEL/CentOS/Fedora)
# vim /etc/apache/apache2.conf (Debian/Ubuntu)
ServerSignature Off
ServerTokens Prod
# service httpd restart (RHEL/CentOS/Fedora)
# service apache2 restart (Debian/Ubuntu)
 

Hide-Apache-Version

2. Disable Directory Listing

By default Apache list all the content of Document root directory in the absence of index file. Please see the image below.

Apache-Directory-Listing

Apache-Directory-Listing

We can turn off directory listing by using Options directive in configuration file for a specific directory. For that we need to make an entry in httpd.conf or apache2.conf file.
<Directory /var/www/html>
    Options -Indexes
</Directory>
Hide-Apache-Directory-Listing

Hide-Apache-Directory-Listing

Lire la suite…

Categories: Logiciel, Sécurité Tags: , ,

How to turn off server signature on Apache2 web server

14/11/2023 Comments off

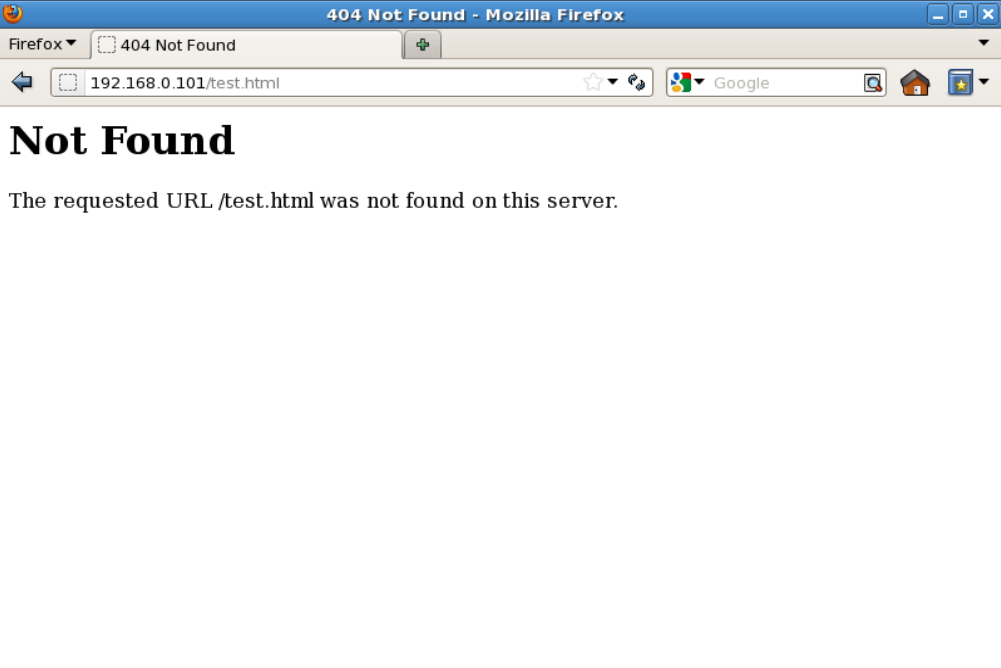
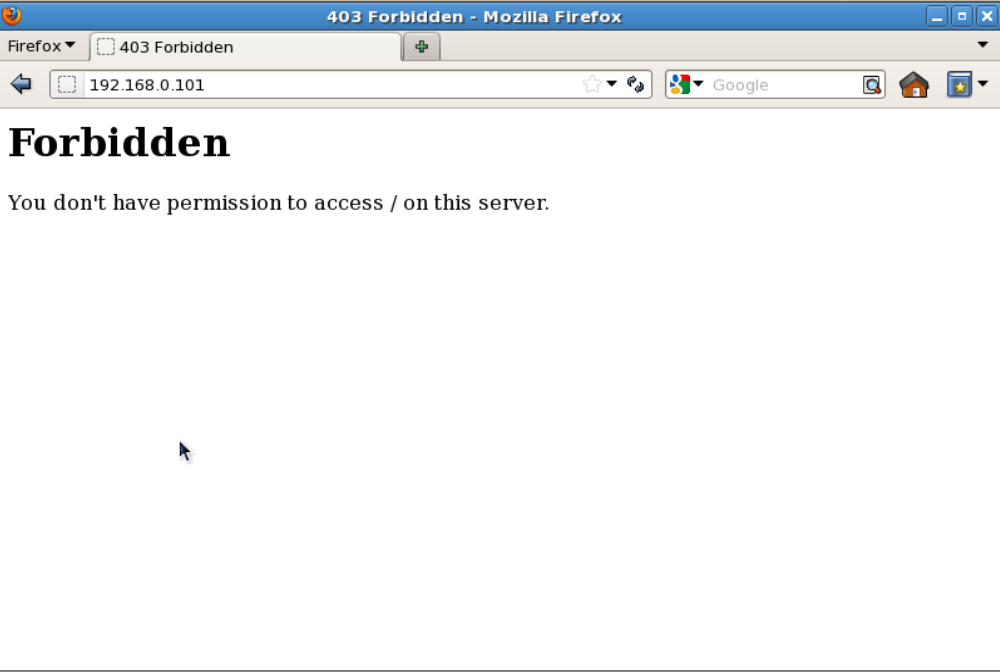
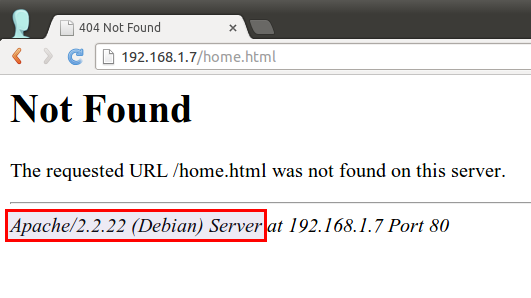
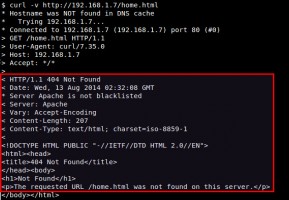
Question: Whenever Apache2 web server returns error pages (e.g., 404 not found, 403 access forbidden pages), it shows web server signature (e.g., Apache version number and operating system info) at the bottom of the pages. Also, when Apache2 web server serves any PHP pages, it reveals PHP version info. How can I turn off these web server signatures in Apache2 web server?

Revealing web server signature with server/PHP version info can be a security risk as you are essentially telling attackers known vulnerabilities of your system. Thus it is recommended you disable all web server signatures as part of server hardening process.

14902970545_c3d406322f_o14879982016_7c7b8bbf3d_o

Disable Apache Web Server Signature

Disabling Apache web server signature can be achieved by editing Apache config file.

On Debian, Ubuntu or Linux Mint:

$ sudo vi /etc/apache2/apache2.conf

On CentOS, Fedora, RHEL or Arch Linux:

$ sudo vi /etc/httpd/conf/httpd.conf

Add the following two lines at the end of Apache config file.

ServerSignature Off
ServerTokens Prod

Then restart web server to activate the change:

$ sudo service apache2 restart (Debian, Ubuntu or Linux Mint)
$ sudo service httpd restart (CentOS/RHEL 6)
$ sudo systemctl restart httpd.service (Fedora, CentOS/RHEL 7, Arch Linux)

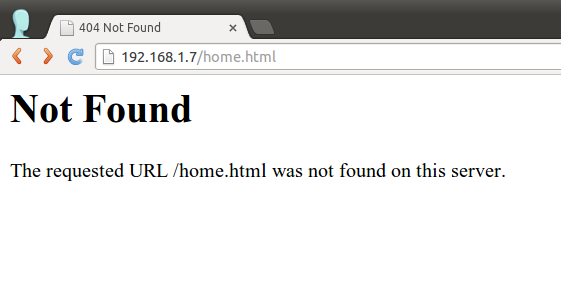
The first line ‘ServerSignature Off‘ makes Apache2 web server hide Apache version info on any error pages.

14879982016_7c7b8bbf3d_o

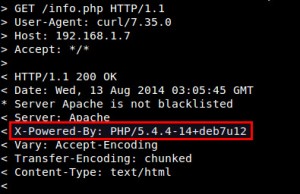
However, without the second line ‘ServerTokens Prod‘, Apache server will still include a detailed server token in HTTP response headers, which reveals Apache version number.

14902970535_e84ec23090_z

What the second line ‘ServerTokens Prod‘ does is to suppress a server token in HTTP response headers to a bare minimal.

So with both lines in place, Apache will not reveal Apache version info in either web pages or HTTP response headers.

14902970505_d79225f25d_z

Hide PHP Version

Another potential security threat is PHP version info leak in HTTP response headers. By default, Apache web server includes PHP version info via « X-Powered-By » field in HTTP response headers. If you want to hide PHP version in HTTP headers, open php.ini file with a text editor, look for « expose_php = On », and change it to « expose_php = Off ».

14899917981_aaef71eb0a

On Debian, Ubuntu, or Linux Mint:

$ sudo vi /etc/php5/apache2/php.ini

On CentOS, Fedora, RHEL or Arch Linux:

$ sudo vi /etc/php.ini

expose_php = Off

Finally, restart Apache2 web server to reload updated PHP config file.

Now you will no longer see « X-Powered-By » field in HTTP response headers.

Source: Xmodulo

Categories: Logiciel, Sécurité Tags: , ,

How to enable SSL for MySQL server and client with ssh

14/11/2023 Comments off

MySQL secure SSH

When users want to have a secure connection to their MySQL server, they often rely on VPN or SSH tunnels. Yet another option for securing MySQL connections is to enable SSL wrapper on an MySQL server. Each of these approaches has its own pros and cons. For example, in highly dynamic environments where a lot of short-lived MySQL connections occur, VPN or SSH tunnels may be a better choice than SSL as the latter involves expensive per-connection SSL handshake computation. On the other hand, for those applications with relatively few long-running MySQL connections, SSL based encryption can be reasonable. Since MySQL server already comes with built-in SSL support, you do not need to implement a separate security layer like VPN or SSH tunnel, which has their own maintenance overhead.

The implementation of SSL in an MySQL server encrypts all data going back and forth between a server and a client, thereby preventing potential eavesdropping or data sniffing in wide area networks or within data centers. In addition, SSL also provides identify verification by means of SSL certificates, which can protect users against possible phishing attacks.

In this article, we will show you how to enable SSL on MySQL server. Note that the same procedure is also applicable to MariaDB server.

Creating Server SSL Certificate and Private Key

We have to create an SSL certificate and private key for an MySQL server, which will be used when connecting to the server over SSL.

First, create a temporary working directory where we will keep the key and certificate files.

$ sudo mkdir ~/cert
$ cd ~/cert

Make sure that OpenSSL is installed on your system where an MySQL server is running. Normally all Linux distributions have OpenSSL installed by default. To check if OpenSSL is installed, use the following command.

$ openssl version
OpenSSL 1.0.1f 6 Jan 2014

Now go ahead and create the CA private key and certificate. The following commands will create ca-key.pem and ca-cert.pem.

$ openssl genrsa 2048 > ca-key.pem
$ openssl req -sha1 -new -x509 -nodes -days 3650 -key ca-key.pem > ca-cert.pem

The second command will ask you several questions. It does not matter what you put in these field. Just fill out those fields.

The next step is to create a private key for the server.

$ openssl req -sha1 -newkey rsa:2048 -days 730 -nodes -keyout server-key.pem > server-req.pem

This command will ask several questions again, and you can put the same answers which you have provided in the previous step.

Next, export the server’s private key to RSA-type key with this command below.

$ openssl rsa -in server-key.pem -out server-key.pem

Finally, generate a server certificate using the CA certificate.

$ openssl x509 -sha1 -req -in server-req.pem -days 730 -CA ca-cert.pem -CAkey ca-key.pem -set_serial 01 > server-cert.pem

Lire la suite…

How to install PSAD Intrusion Detection on Ubuntu 16.04 LTS server

07/11/2023 Comments off

Source: thefanclub.com

This guide is based on various community forum posts.

This guide is intended as a relatively easy step by step guide to:

  • Install CipherDyne PSAD Intrusion Detection and Log Analysis with iptables on Ubuntu 12.04 LTS or later.
  • psad is a collection of three lightweight system daemons that run on Linux machines and analyze iptables log messages to detect port scans and other suspicious traffic.
  • From version 2.2 it also offers full IPv6 support. 

Requirements:

  • Tested on Ubuntu 12.04 LTS – 16.04 LTS server.
  • Should work on most Ubuntu/Debian based ditro’s.

1. Download and install the latest version of PSAD.

  • Download and install the latest version from the Cipherdyne website.
  • Visit the CipherDyne PSAD download page and select the latest source tar archive, as of writing this the latest version is PSAD 2.4.3
  • To download and install the latest version open a Terminal and enter the following :
sudo su
mkdir /tmp/.psad
cd /tmp/.psad
wget http://cipherdyne.org/psad/download/psad-2.4.3.tar.gz
tar -zxvf psad-2.4.3.tar.gz
cd psad-2.4.3
./install.pl 
cd /tmp
rm -R .psad
exit


2. Edit the PSAD configuration file. 

  • Three main settings need to be set in the PSAD configuration file before we can complete the install, edit the others as required.
  • open a Terminal Window and enter :
vi /etc/psad/psad.conf
  • EMAIL_ADDRESSES – change this to your email address.
  • HOSTNAME – this is set during install – but double check and change to a FQDN if needed.
  • ENABLE_AUTO_IDS – set this to Y if you could like PSAD to take action – read configuration instructions before setting this to Y.
  • ENABLE_AUTO_IDS_EMAILS – set this to Y if you would like to receive email notifications of intrusions that are detected.

3. Add iptables LOG rules for both IPv4 and IPv6.

  • For an explanation of this step click here.
  • Add the following iptables policies :
iptables -A INPUT -j LOG
iptables -A FORWARD -j LOG
ip6tables -A INPUT -j LOG
ip6tables -A FORWARD -j LOG

4. Reload and update PSAD.

  • To restart, update the signature file and reload PSAD to complete the install open a Terminal Window and enter :
psad -R
psad --sig-update
psad -H
  • To check the status of PSAD, open a Terminal Window and enter :
psad --Status

Lire la suite…