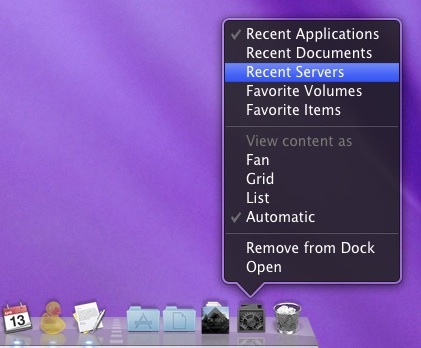
You can add a Recent Items menu to the Mac OS X Dock by using a defaults write command. The default is set to “Recent Applications” but once the Dock item exists you can adjust it to feature other recent items too.
That needs to all be on a single line, so if you copy and paste it make sure the command is one string.
You will then need to kill the Dock:
killall Dock
Now right-click on the newly appeared Recent Applications Dock item and you can change it to be Recent Applications, Recent Documents, Recent Servers, Favorite Volumes, or Favorite Items.
If you want to remove the Recent Items menu, just drag it out of your Dock.
Adds « Copy to Recent, » « Move to Recent, » and « Go to Recent » menu items to Apple’s Mail application. These menu items contain dynamically-updated lists of recently used mailboxes. The number of mailboxes kept in the list is determined by the « Number of Recent Items » setting for Documents in the Appearance panel of the OS X System Preferences.
Usage
Once installed (see instructions below) as you drag or option-drag a message to a mailbox, that mailbox should then appear under
« Copy to Recent » and « Move to Recent » submenus under the « Messages » menu, and
a « Go to Recent » submenu under the « Mailboxes » menu.
Similarly if you use Mail’s built-in « Move To » or « Copy To » menus to move a message to a mailbox, that mailbox should then appear in the lists. The recent mailboxes will be sorted alphabetically, the same as OS X does for recent documents. (You can change the sorting behavior using the Terminal application as described below.)
Si vous êtes sous Mac OSX et que vous avez besoin d’un petit serveur HTTP sur le pouce afin de mettre à dispo quelques pages web statiques (pas de PHP, uniquement du HTML), il n’est pas nécessaire d’installer un Nginx ou un Apache. Il suffit d’ouvrir un terminal et d’entrer la commande suivante :
python -m SimpleHTTPServer 8000
Ensuite, avec votre navigateur sur la machine distante, rendez-vous sur http://IP_DE_LA_MACHINE:8000 (ou localhost:8000 si vous êtes en local) et naviguez dans les répertoires jusqu’à atteindre le fichier HTML que vous souhaitez afficher. A noter que vous pouvez changer le port dans la commande.
Rien de sécurisé là-dedans, donc faites attention, mais l’astuce est toujours bonne à connaitre.
cmd + space ===== highlight menu cmd + opt + space ===== highlight window cmd + delete ===== move/go to trash shfit + cmd + delete ===== empty/clean trash shfit + opt + cmd + delete =====force/immediate empty trash cmd + n ===== new finder window shift + cmd + n ===== new folder cmd + tab ===== get/view info opt + cmd + tab ===== show/display inspector cmd + y/space bar ===== quick look cmd + e ===== eject volume cmd + j ===== view options show/display cmd + k ===== server connect shift + cmd + a ===== applications folderopen shift + cmd + c ===== computer folder open cmd + up arrow ===== enclosing folder open cmd + f ===== find/search
key commands-2 (text editing)
cmd + left arrow ===== go/move to start/end line cmd + up arrow ===== go/move to start/end document opt + left arrow ===== go/move to previous/next word opt + up arrow ===== go/move to previous/next paragraph cmd + x ===== cut cmd + c ===== copy cmd + v ===== paste cmd + a ===== select all cmd + l ===== with selection web search cmd + y ===== with selection sticky note
shift + cmd + 3 ===== screen/appear to file shift + ctrl + cmd + 3 ===== screen/appear to clipboard shift + cmd + 4 ===== area to file space to get window shift + ctrl + cmd + 4 ===== area to clipboard space to get window
key commands-5 (mission control)
ctrl + up arrow ===== mission control view/display
ctrl + down arrow ===== appʼs windows show/display f11 ===== desktop show/display f12 ===== dashboard show/display ctrl + left/right arrow ===== between spaces move tab ===== windows show/display for next app then press ctrl + down arrow spacebar ===== window enlarge under cursor then press ctrl + up arrow
key commands-6 (keyboard control focus)
ctrl + f2 ===== menu bar focus ctrl + f3 ===== dock focus ctrl + f5 ===== window toolbar focus ctrl + f8 ===== menu bar status icons focus left, right, up & down arrow ===== navigate (return) esc ===== exit
key commands-7 (switching applications & windows)
cmd + tab ===== advance/go next app cmd + ` ===== current app’s next window opt + cmd + d ===== dock hide/show
cmd + n ===== new window cmd + , ===== app preferences cmd + o ===== open cmd + h ===== app hide cmd + w ===== close opt + cmd + h ===== others hide cmd + s ===== save cmd + t ===== fonts panel show/display shift + cmd + s ===== save as shift + cmd + c ===== colors panel show/display cmd + p ===== print shift + cmd + / ===== help cmd + q ===== quit/exit ctrl + cmd + f ===== full screen mode
key commands-10 (startup keys)
opt ===== boot volume choose opt + cmd + p + r ===== reset pram cmd + s ===== boot single user mode cmd + r ===== internet & disk utility recovery cmd + t ===== go into target disk mode
Launchpad is OS X 10.7′s iOS-like app launcher, it’s a nice utility but it does have some quirky behavior in Lion. One of the major issues is that sometimes apps won’t appear in Launchpad at all, or when you delete an app it doesn’t disappear as it’s supposed to. If you run into this, try this tipleft in the comments about LaunchPad Control about refreshing Launchpad and its contents.
Relaunching Launchpad
Launchpad is attached to the Dock app, so the easiest way to relaunch LaunchPad is to kill the Dock from the command line:
killall Dock
Both the Dock and Launchpad will relaunch and that should clear up most minor issues with app persistence.
Refresh Launchpad Contents
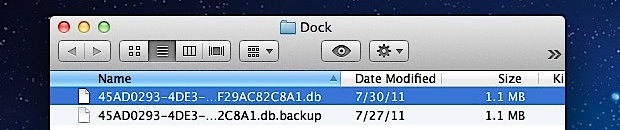
If relaunching alone hasn’t fixed LaunchPad and apps are still not showing up, try deleting Launchpads database files located inside your home ~/Library directory, which forces them to rebuild. The directory path you are looking for is:
~/Library/Application Support/Dock/
The fastest way to get there is by using Command+Shift+G in the Finder to access the “Go To Folder” function, then just paste that directory path in. You will see a folder like this:
If you want to back these up you can, otherwise just delete them by dragging the .db files to the Trash, and then kill the Dock again from the Terminal to force the databases to regenerate.
killall Dock
Take note that you will lose any custom icon placement and folders that are setup within Launchpad, because that information is stored in the database file you are trashing.
One-Line Terminal Command to Refresh Launchpad Contents
If you are comfortable with the command line, you can also do this entire process through the Terminal with the following commands:
rm ~/Library/Application\ Support/Dock/*.db ; killall Dock
If you want control over exactly what shows up in Launchpad rather than just creating a bunch of folders, use the third party System Preference Launchpad Control, it’s free and works as a sql frontend to the Launchpad database.