Archive

Articles taggués ‘Apple’

How to convert .rmvb to .avi (on PowerPC and Intel Macs)?

06/02/2024 Comments off

The good news is it’s very easy. The bad news is you’ll need a PowerPC Mac.A big thank you to Bluemint for pointing out an Universal Binaries version of the Real Codec is actually available, making the conversion possible on both PowerPC and Intel Mac. The instructions below are herewith updated.

What you’ll need:

  1. ffmpegX – It’s a Mac OS X graphic user interface designed to easily operate more than 20 powerful Unix open-source video and audio processing tools
  2. mpeg2enc – Download to your Downloads folder.
  3. mencoder & mplayer – Download and decompress the zip file.

Setup:

The first time you launch ffmpegX it’ll ask you to locate three components (items 2 & 3 above). Click on the respective “Locate” buttons to tell ffmpegX where they are. After that, enter your Mac OS X login password (ffmpegX won’t work if your login password is empty) and click the “Install” button.

Download and Install the Real Codec (Universal Binaries)

  1. Download the “Mac OS X x86″ binary codec package from one of these links on this page.
  2. Unzip the downloaded zip file and install the codec package.
  3. Select “Go to folder …” from Finder’s “Go” menu.
  4. Type “/usr/local/lib/” in the input text field and click “Go”
  5. You should see a “codecs” folder in the new window.
  6. Drag the “codecs” folder to your Desktop, and rename it to “reallib”.
  7. Move the “reallib” folder to “/Library/Applications Support/ffmpegx/”.

Performing the conversion to .avi

UB Rockz on any valid unicode Path/Filename.
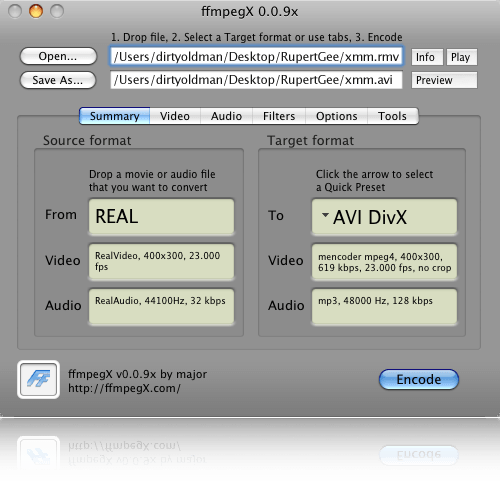
ffmpegx-rmvb
Drag and drop your rmvb file into the “From” well and just click the “Encode” button to start encoding. Unless you’re an expert user, do not be tempted to change any settings when converting a .rmvb file.

In other words, for a successful run, just drag, drop, and click Encode. What more can you ask for?

Footnotes:

  • Re-launch ffmpegX if you messed up the default settings.
  • You can close ffmpegX’s main window after clicking Encode; a new stand-alone Progress window shows you the progress.
  • Repeat the process to convert more files.
  • The “Play” button plays the .rmvb.
  • The “Preview” button plays the (partially) converted .avi file.
  • Press the Return key to stop playback.
  • You can download and install MPlayer to play your .rmvb files. However, it has a bug whereby it only plays video and totally ignores embedded links and other wonderful added features Real is famous for.
Categories: Logiciel, Système Tags: , ,

Merging directories (folders) on Mac OS X

01/02/2024 Comments off

merging directoriesEvery now and then I find myself in a situation where I have a folder (I’ll call it source) of files and nested folders, possibly many levels deep, that I want to copy into another folder (which I’ll call target). target already contains some of the files and folders I’m copying, and it also has files and folders that are not present in source.

Simply copying source to target’s parent folder in the Mac OS X Finder will replace everything in target with the contents of source. This is not always what I want, and in my opinion it’s one of the biggest flaws of the Mac OS X Finder. Not just Mac OS X actually – back in the pre-Mac OS X days there was a utility called Speed Doubler that patched the Finder to add a smart replace option when copying files.

It’s possible to manually open each folder and their subfolders and copy just the files, but it can be very tedious. There are also third party software options that let you merge files when copying, and if you have Apple’s Developer Tools installed there is the FileMerge utility.

However, you can open a Terminal window and copy the files from the command line, which saves you from installing extra software. Since I keep looking up the syntax every time I need to do this I decided to document it here for future reference.

cp

One command line utility that can copy directories without replacing everything in them is cp:

cp -pRv source/ target

The pRv options do the following:

  • p preserves timestamps, flags, modes, and ownerships of files
  • R copies the entire subtree
  • v makes cp output the name of each file that is copied

Note: The / after the name of the source directory is important since it tells cp to copy the contents of the directory and not the directory itself.

rsync

You can also use rsync:

rsync -av source/ target

The av options do this:

  • a tells rsync to copy recursively and preserve file attributes
  • v makes rsync print information to the terminal window about what was copied

Just as with the cp command, the trailing slash after the source directory is important to make sure only the contents of the directory are copied.

ditto

A third option is ditto:

ditto -V source target

The V option prints information about what was copied.

Deleting files that don’t exist in the source directory

Sometimes you want a merge to delete files that exist in the target directory but not in the source directory. That’s easy with rsync (but be careful as there is no undo):

rsync -av --delete source/ target

But wait! What if the target is under version control? Won’t that delete any .svn or .git directories as well? Yep. That can be avoided by adding filters. Let’s say you want to keep all .htaccess and .svn files or directories in the target directory. This does just that:

rsync -av --delete --filter="- .htaccess" --filter="- .svn" source/ target

A useful tip when you involve delete is to add the n option at first to do a “dry run” and only show what would have been deleted. Again, be careful with delete since there is no undo.

Hoping for Finder integration

It would be great if Apple could make it possible to use the Finder to copy folders like this. It could be a secret option somewhere or invoked when you hold certain modifier keys when copying. It doesn’t matter as long as it’s possible.

Most people probably don’t need this feature every day, but when you do need it it can save lots of time. Having the feature built into the Finder would also reduce the risk of people accidentally deleting files because they don’t realise copying folders replaces everything inside them.

 
Categories: Logiciel, Système Tags: , , ,

Récupérer le zoom dans OS X Mountain Lion

20/01/2024 Comments off

La dernière mouture en date d’OSX désactive une fonction assez pratique : le zoom.

Son utilisation est possible sur les versions précédentes en maintenant la touche CTRL + scroll.

Pour la réactiver sous OSX Mountain Lion, il suffit d’aller dans les préférences :

  1. Préférences système…
  2. Accessibilité
  3. Réduite/agrandir

Il suffit ensuite de cocher « Pour effectuer un zoom, utilisez le geste de défilement avec les touches de modification : »

Categories: Logiciel Tags: ,

Clé USB Bootable | Comment faire depuis un Mac ?

18/01/2024 Comments off

Pour créer une clé USB bootable depuis un Mac, ce n’est pas spécialement difficile. Par contre, il est vrai que la méthode n’est pas hyper intuitive à première vue. Pour les fans de la ligne de commande, c’est par ici que çà ce passe! Et pour les autres, ne vous inquiètez pas, c’est très facile, et très simple finalement.

Donc voici, l’opération est constitué de trois étapes principales :

  1. Télécharger une image disque (.iso par exemple) de l’OS de votre choix. Par exemple, pour bien débuter, une image d’une distribution Linux de type LiveCD.
  2. Insérer la clé USB, et s’assurer de démonter le volume : Sinon, nous ne pouvons pas écrire « bas niveau » avec la commande « dd » de unix.
  3. « Graver » l’image disque sur la clé.

Donc, une fois que vous avez télécharger l’image disque, insérer la clé USB dans la prise de votre mac, et ensuite, à partir d’une fenètre Terminal tapez :

diskutil list

En théorie vous devriez voir un affichage similaire à celui:

A partir de cette liste, identifiez votre clé USB. Dans mon cas c’est/dev/disk2. Une fois identifié, nous pouvons passer à l’étape deux, et nous allons tapez cette commande :

diskutil unmountDisk /dev/disk2

N’oubliez pas de remplacer disk2 par le n° de votre clé USB!

Nous sommes prêt à passer à la troisième, et dernière étape : La gravure! (ouais, je sais, une clé USB ne se grave pas…). Donc, pour se faire, notez bien le nom de votre fichier image, nous allons en avoir besoin pour taper cette commande :
sudo dd if=monImageBootable.iso of=/dev/disk2 bs=1m

N’oubliez pas de remplacer disk2 par le n° de votre clé USB!

Le mot de passe root vous sera demandé, ensuite la copie va s’effectuer.

Une fois terminé, il suffit de redémarrer Macosx en appuyant sur la touche ALT pour avoir une sélection des disques bootable, et de choisir la clé USB.


Categories: Système Tags: , ,

Useful Mac bash terminal shortcuts

16/01/2024 Comments off

Open directory in finder

open .

Pbcopy and pbpaste

grep 'searching for' hugeFile.txt | pbcopy
pbpaste | sed 's/ / /g'

mdfind command is the spotlight search from command line

say "Hello there"

The say command invokes the system text-to-speech capabilities.

cd -

Will restore the previous directory you were in. Very handy if you accidentally type cd and flip to home.

And some usefull aliases

alias ..="cd .." alias ...="cd .. ; cd .."
alias ls="ls -G" # list alias la="ls -Ga" # list all, includes dot files alias ll="ls -Gl" # long list, excludes dot files alias lla="ls -Gla" # long list all, includes dot files
alias stfu="osascript -e 'set volume output muted true'" alias pumpit="osascript -e 'set volume 10'"
alias ips="ifconfig -a | perl -nle'/(d .d .d .d )/ && print $1'" alias myip="dig  short myip.opendns.com @resolver1.opendns.com"

Bash Keyboard Shortcuts

Moving the cursor:

  Ctrl   a   Go to the beginning of the line (Home)
  Ctrl   e   Go to the End of the line (End)
  Hold the Option key option and click on the current line = Jump Backwards

  Ctrl   p   Previous command (Up arrow)
  Ctrl   n   Next command (Down arrow)
  Hold the Option key option and click on a previous line = Jump upwards

  Ctrl   f   Forward one character
  Ctrl   b   Backward one character
   Alt   b   Back (left) one word      or use Option Right-Arrow
   Alt   f   Forward (right) one word  or use Option Left-Arrow

  Ctrl   xx  Toggle between the start of line and current cursor position

Editing:

 Ctrl   L   Clear the Screen, similar to the clear command

  Alt   Del Delete the Word before the cursor.
  Alt   d   Delete the Word after the cursor.
 Ctrl   d   Delete character under the cursor
 Ctrl   h   Delete character before the cursor (backspace)

 Ctrl   w   Cut the Word before the cursor to the clipboard.
 Ctrl   k   Cut the Line after the cursor to the clipboard.
 Ctrl   u   Cut/delete the Line before the cursor position.

  Alt   t   Swap current word with previous
 Ctrl   t   Swap the last two characters before the cursor (typo).
 Esc    t   Swap the last two words before the cursor.

 ctrl   y   Paste the last thing to be cut (yank)
  Alt   u   UPPER capitalize every character from the cursor to the end of the current word.
  Alt   l   Lower the case of every character from the cursor to the end of the current word.
  Alt   c   Capitalize the character under the cursor and move to the end of the word.
  Alt   r   Cancel the changes and put back the line as it was in the history (revert).
 ctrl   _   Undo
 
  TAB       Tab completion for file/directory names

For example, to move to a directory ‘sample1’; Type cd sam ; then press TAB and ENTER.
type just enough characters to uniquely identify the directory you wish to open.

Special keys: Tab, Backspace, Enter, Esc

Text Terminals send characters (bytes), not key strokes.
Special keys such as Tab, Backspace, Enter and Esc are encoded as control characters.
Control characters are not printable, they display in the terminal as ^ and are intended to have an effect on applications.

Ctrl I = Tab
Ctrl J = Newline
Ctrl M = Enter
Ctrl [ = Escape

Many terminals will also send control characters for keys in the digit row:

Ctrl 2 → ^@
Ctrl 3 → ^[ Escape
Ctrl 4 → ^
Ctrl 5 → ^]
Ctrl 6 → ^^
Ctrl 7 → ^_ Undo
Ctrl 8 → ^? Backward-delete-char

Ctrl v tells the terminal to not interpret the following character, so Ctrl v Ctrl-I will display a tab character,
similarly Ctrl v ENTER will display the escape sequence for the Enter key: ^M

History:

  Ctrl   r   Recall the last command including the specified character(s)
             searches the command history as you type.
             Equivalent to : vim ~/.bash_history. 
  Ctrl   p   Previous command in history (i.e. walk back through the command history)
  Ctrl   n   Next command in history (i.e. walk forward through the command history)
   Alt   .   Use the last word of the previous command
  Ctrl   s   Go back to the next most recent command.
            (beware to not execute it from a terminal because this will also launch its XOFF).
  Ctrl   o   Execute the command found via Ctrl r or Ctrl s
  Ctrl   g   Escape from history searching mode

Process control:

 Ctrl   C   Interrupt/Kill whatever you are running (SIGINT)
 Ctrl   l   Clear the screen
 Ctrl   s   Stop output to the screen (for long running verbose commands)
 Ctrl   q   Allow output to the screen (if previously stopped using command above)
 Ctrl   D   Send an EOF marker, unless disabled by an option, this will close the current shell (EXIT)
 Ctrl   Z   Send the signal SIGTSTP to the current task, which suspends it.
            To return to it later enter fg 'process name' (foreground).

To use the Alt Key Shortcuts in OS X – Open Terminal Preferences | Settings Tab | Keyboard | Tick « Use option as meta key »

Emacs mode vs Vi Mode

All the above assume that bash is running in the default Emacs setting, if you prefer this can be switched to Vi shortcuts instead.

Set Vi Mode in bash:

$ set -o vi

Set Emacs Mode in bash:

$ set -o emacs

Source: @coderwall and ss64.com

Categories: Système Tags: , , ,