Introduction
In this guide we will create and deploy a scalable WordPress instance consisting of a MySQL database server, a GlusterFS distributed filesystem, Nginx web servers and an Nginx load balancer. By using user-data and droplet meta-data we will automate the deployment of our site. Finally we will provide a Ruby script which will automate this entire process and ease the creation of scalable WordPress sites. Through this tutorial you will learn about the power and flexibility of user-data and droplet meta-data in deploying services on DigitalOcean.
Step One – Planning our Deployment
The deployment we create in this tutorial will consist of a single MySQL database server, multiple GlusterFS servers in a cluster, multiple Nginx web servers and a single Nginx load balancer.
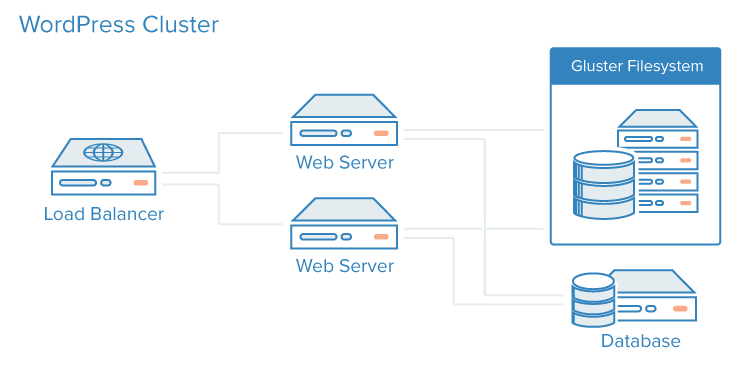
Before we begin we should know:
- What size droplet we will use for our MySQL server
- How many GlusterFS nodes we will create
- What size our GlusterFS nodes will be
- How many web server nodes we will need
- What size droplets we will use for our web servers
- What size droplet we will use for our load balancer
- The domain name we will use for our new site
We can add additional nodes or scale up the nodes we created if we need to later. Once we have decided on these details we can begin deploying our site.
Lire la suite…
Using iptables to list filtering rules is OK. Running this command in a shell loop can help but it needs that you write a shell script.
Another convenient way is to use the watch command:
watch --interval 0 'iptables -nvL'
or
sudo watch --interval 0 'iptables -nvL'
depending on whether you’re logged as super-user or not.
This will show a permanent iptables -L with a refresh interval that can be specified:
watch --interval 0 'iptables -nvL'
will refresh every second.
Typical output will be:
Every 10,0s: iptables -nvL                                                                                         Tue Nov  3 16:35:19 2015

Chain INPUT (policy DROP 44001 packets, 2444K bytes)
 pkts bytes target     prot opt in     out     source               destination
    3   160 fail2ban-ssh  tcp  --  *      *       0.0.0.0/0            0.0.0.0/0            multiport dports 22
  11M 1770M ACCEPT     all  --  *      *       0.0.0.0/0            0.0.0.0/0            state RELATED,ESTABLISHED
 107K 6878K ACCEPT     tcp  --  *      *       78.193.xx.xx         0.0.0.0/0
    0     0 ACCEPT     tcp  --  *      *       195.154.xx.xx        0.0.0.0/0
 231K   14M ACCEPT     tcp  --  *      *       213.36.xx.xx         0.0.0.0/0
    0     0 ACCEPT     tcp  --  *      *       195.154.xx.xx        0.0.0.0/0
    2    92 ACCEPT     tcp  --  *      *       0.0.0.0/0            0.0.0.0/0            tcp dpt:548
    0     0 ACCEPT     icmp --  *      *       0.0.0.0/0            0.0.0.0/0            icmptype 0
 1475  139K ACCEPT     icmp --  *      *       0.0.0.0/0            0.0.0.0/0            icmptype 8
  134  9600 ACCEPT     tcp  --  *      *       0.0.0.0/0            0.0.0.0/0            tcp spt:80
  110  6563 ACCEPT     tcp  --  *      *       0.0.0.0/0            0.0.0.0/0            tcp spt:443
    0     0 ACCEPT     tcp  --  *      *       0.0.0.0/0            0.0.0.0/0            tcp spt:943
 136K 9529K ACCEPT     udp  --  *      *       0.0.0.0/0            0.0.0.0/0            udp dpt:1194
 1423 85360 ACCEPT     tcp  --  *      *       0.0.0.0/0            0.0.0.0/0            tcp dpt:4949
    3   120 ACCEPT     tcp  --  eth0   *       0.0.0.0/0            0.0.0.0/0            tcp dpt:873 state NEW,ESTABLISHED
   24  1910 ACCEPT     udp  --  *      *       0.0.0.0/0            0.0.0.0/0            udp dpt:161
    0     0 ACCEPT     udp  --  *      *       0.0.0.0/0            0.0.0.0/0            udp dpt:162
    0     0 ACCEPT     udp  --  *      *       0.0.0.0/0            0.0.0.0/0            udp dpt:119
    2    92 ACCEPT     tcp  --  *      *       0.0.0.0/0            0.0.0.0/0            tcp dpt:3000
  156  7584 ACCEPT     tcp  --  *      *       0.0.0.0/0            0.0.0.0/0            tcp dpt:8080
 2952  177K ACCEPT     all  --  lo     *       0.0.0.0/0            0.0.0.0/0
    0     0 ACCEPT     tcp  --  *      *       172.27.xx.xx/24      0.0.0.0/0
    0     0 ACCEPT     tcp  --  as0t0  *       0.0.0.0/0            0.0.0.0/0
    3   192 ACCEPT     tcp  --  as0t1  *       0.0.0.0/0            0.0.0.0/0
Source: nixCraft
Q. Can you explain how to setup network parameters such as IP address, subnet, dhcp etc using /etc/network/interfaces file?
A. /etc/network/interfaces file contains network interface configuration information for the both Ubuntu and Debian Linux. This is where you configure how your system is connected to the network.
Defining physical interfaces such as eth0
Lines beginning with the word « auto » are used to identify the physical interfaces to be brought up when ifup is run with the -a option. (This option is used by the system boot scripts.) Physical interface names should follow the word « auto » on the same line. There can be multiple « auto » stanzas. ifup brings the named inter faces up in the order listed. For example following example setup eth0 (first network interface card) with 192.168.1.5 IP address and gateway (router) to 192.168.1.254:
iface eth0 inet static
 address 192.168.1.5
 netmask 255.255.255.0
 gateway 192.168.1.254
Setup interface to dhcp
To setup eth0 to dhcp, enter:
auto eth0
 iface eth0 inet dhcp
Lire la suite…
Introduction
ProxySQL is an open-source
MySQL proxy server, meaning it serves as an intermediary between a MySQL
server and the applications that access its databases. ProxySQL can
improve performance by distributing traffic among a pool of multiple
database servers and also improve availability by automatically failing
over to a standby if one or more of the database servers fail.
In this guide, you will set up ProxySQL as a load balancer for multiple MySQL servers with automatic failover. As an example, this
tutorial uses a multi-primary replicated cluster of three MySQL
servers, but you can use a similar approach with other cluster
configurations as well.
Prerequisites
To follow this tutorial, you will need:
Lire la suite…