Archive

Archives pour la catégorie ‘Système’

Let’s Encrypt

14/06/2024 Comments off

How It Works

Anyone who has gone through the trouble of setting up a secure website knows what a hassle getting and maintaining a certificate can be. Let’s Encrypt automates away the pain and lets site operators turn on and manage HTTPS with simple commands.

No validation emails, no complicated configuration editing, no expired certificates breaking your website. And of course, because Let’s Encrypt provides certificates for free, no need to arrange payment.

This page describes how to carry out the most common certificate management functions using the Let’s Encrypt client. You’re welcome to use any compatible client, but we only provide instructions for using the client that we provide.

If you’d like to know more about how this works behind the scenes, check out our technical overview.

Installing Let’s Encrypt

Note: Let’s Encrypt is in beta. Please don’t use it unless you’re comfortable with beta software that may contain bugs.

If your operating system includes a packaged copy of letsencrypt, install it from there and use the letsencrypt command. Otherwise, you can use our letsencrypt-auto wrapper script to get a copy quickly:

$ git clone https://github.com/letsencrypt/letsencrypt
$ cd letsencrypt
$ ./letsencrypt-auto --help

letsencrypt-auto accepts the same flags as letsencrypt; it installs all of its own dependencies and updates the client code automatically (but it’s comparatively slow and large in order to achieve that).

How To Use The Client

The Let’s Encrypt client supports a number of different “plugins” that can be used to obtain and/or install certificates. A few examples of the options are included below:

If you’re running Apache on a recent Debian-based OS, you can try the Apache plugin, which automates both obtaining and installing certs:

./letsencrypt-auto --apache

On other platforms automatic installation is not yet available, so you will have to use the certonly command. Here are some examples:

To obtain a cert using a “standalone” webserver (you may need to temporarily stop your exising webserver) for example.com and www.example.com:

./letsencrypt-auto certonly --standalone -d example.com -d www.example.com

To obtain a cert using the “webroot” plugin, which can work with the webroot directory of any webserver software:

./letsencrypt-auto certonly --webroot -w /var/www/example -d example.com -d www.example.com -w /var/www/thing -d thing.is -d m.thing.is

The this will obtain a single cert for example.com, www.example.com, thing.is, and m.thing.is; it will place files below /var/www/example to prove control of the first two domains, and under /var/www/thing for the second pair.


Lire la suite…

Categories: Système Tags: ,

Connect to Blocked Ports with SSH Tunneling

13/06/2024 Comments off

SSH Tunneling – Get Through Your Firewall to Other Ports

http://www.uptimemadeeasy.com/wp-content/uploads/2014/02/SSH_Traffic_Only.jpg

Typical Scenario is that only the ssh port (tcp/22) and http (tcp/80) are allowed into a machine. All other traffic is blocked.

Do you have a server on the other side of a firewall that you can ssh to, but to which you cannot reach on other ports. Let’s imagine, for example, that your server has ports 80/tcp and 22/tcp open, but you want to be able to get to your database port (3306/tcp) or your vnc port (5901/tcp) which are blocked by the firewall. Grr. What can you do? Use ssh tunneling, of course.

SSH Tunneling is Similar to VPN

http://www.uptimemadeeasy.com/wp-content/uploads/2014/02/ssh_tunnel.jpg

Ssh allows you to tunnel traffic to other ports through the firewall using your ssh Connection

Ssh allows you to tunnel your communication to other ports and services on your server through your ssh connection to the server.  This means that traffic that would normally be blocked by your firewall or iptables can now reach its destination.  This of course, all assumes that you have a login to the server and are able to ssh to it from your network or internet location.

SSH Tunneling Uses a Local Port

The idea behind ssh tunneling is that you know which port(s) you want to access on the server and that you also setup a local port on your workstation for you to connect to on your side of the tunnel.  When using SSH Tunneling, you will direct your client applications, in this example case MySQL Workbench and VNC Viewer, to the local ports on your workstation which you configured in your ssh client.  SSH will then transport the traffic to the local port through its tunnel to the server port you are hoping to reach.

Ssh Command Line (CLI) Port Configuration

When using ssh from the command line in a linux, unix, OSX or other command line environment, you will use the -L option to map local ports to remote ports on the server.  In the example below, Mary is logging in to server1.uptimemadeeasy.com with ssh and is mapping local port 8675 on her workstation to the MySQL port (tcp/3306) on the server.  Note that the name localhost is in reference to server1.uptimemadeeasy.com.

ssh -l mary server1.uptimemadeeasy.com -L 8675:localhost:3306

Mary will then supply the password when requested and she will notice with netstat -an that port 8675 on her local workstation is now being used.  She can then point her MySQL Workbench client at her local machine (localhost) port 8675.  Her traffic to her local port 8675 will then be transported through her ssh tunnel to the server port 3306.
Mary can now verify that her local port (8675) is listening locally using netstat:

$ netstat -an | grep 8675
TCP 127.0.0.1:8675 0.0.0.0:0 LISTENING
TCP [::1]:8675 [::]:0 LISTENING

We get output telling us that the local workstation is now listening on port 8675 on both ipv4 and ipv6. Lire la suite…

Categories: Réseau, Système Tags: , ,

How to secure an Ubuntu 12.04 LTS server – Part 2 The GUI installer script

12/06/2024 Comments off

Source: The Fan Club

This guide is based on various community forum posts and webpages. Special thanks to all. All comments and improvements are very welcome as this is purely a personal experimental project at this point and must be considered a work in progress.

The Ubuntu Server Secure script:

  • The Ubuntu Server Secure script is set of GUI security administration tools to harden and audit the security on an Ubuntu 12.04 LTS server by using a GUI shell script to install and configure various security features found in How to secure an Ubuntu 12.04 LTS server – Part 1 The Basics.
  • This script was done as an experiment in using Zenity to create a interactive Gnome Gtk+ GUI installer.
  • Zenity is a great tool for creating a simple yet powerful GUI user interface on top of bash like shell script very quickly.

Requirements:

  • Ubuntu 12.04 LTS server with a standard LAMP stack installed.
  • Unity or Gnome Desktop installed.
  • Zenity installed. (Zenity installed by default in Ubuntu 12.04 LTS Desktop)

Lire la suite…

How to secure an Ubuntu 16.04 LTS server – Part 1 The Basics

12/06/2024 Comments off

Source: The Fan Club

This guide is based on various community forum posts and webpages. Special thanks to all. All comments and improvements are very welcome as this is purely a personal experimental project at this point and must be considered a work in progress.

This guide is intended as a relatively easy step by step guide to:

Harden the security on an Ubuntu 16.04 LTS server by installing and configuring the following:

  1. Install and configure Firewall – ufw
  2. Secure shared memory – fstab
  3. SSH – Key based login, disable root login and change port
  4. Apache SSL – Disable SSL v3 support
  5. Protect su by limiting access only to admin group
  6. Harden network with sysctl settings
  7. Disable Open DNS Recursion and Remove Version Info  – Bind9 DNS
  8. Prevent IP Spoofing
  9. Harden PHP for security
  10. Restrict Apache Information Leakage
  11. Install and configure Apache application firewall – ModSecurity
  12. Protect from DDOS (Denial of Service) attacks with ModEvasive
  13. Scan logs and ban suspicious hosts – DenyHosts and Fail2Ban
  14. Intrusion Detection – PSAD
  15. Check for RootKits – RKHunter and CHKRootKit
  16. Scan open Ports – Nmap
  17. Analyse system LOG files – LogWatch
  18. Apparmor –  Application Armor
  19. Audit your system security – Tiger and Tripwire

Requirements:

  • Ubuntu 16.04 LTS or later server with a standard LAMP stack installed.

1. Firewall – UFW

  • A good place to start is to install a Firewall.
  • UFW – Uncomplicated Firewall is a basic firewall that works very well and easy to configure with its Firewall configuration tool – gufw, or use  Shorewall, fwbuilder, or Firestarter.
  • Use Firestarter GUI to configure your firewall or refer to the Ubuntu Server Guide,  UFW manual pages or the Ubuntu UFW community documentation.
  • Install UFW and enable, open a terminal window and enter :
sudo apt-get install ufw
  • Allow SSH and Http services.
sudo ufw allow ssh
sudo ufw allow http
  • Enable the firewall.
sudo ufw enable
  • Check the status of the firewall.
sudo ufw status verbose

2. Secure shared memory.

  • Shared memory can be used in an attack against a running service. Modify /etc/fstab to make it more secure.
  • Open a Terminal Window and enter the following :
sudo vi /etc/fstab
  • Add the following line and save. You will need to reboot for this setting to take effect :
  • Note : This only is works in Ubuntu 12.10 or later – For earlier Ubuntu versions replace /run/shm with /dev/shm 
  • Save and Reboot when done
tmpfs     /run/shm     tmpfs     defaults,noexec,nosuid     0     0

3. SSH Hardening – key based login, disable root login and change port.

  • The best way to secure SSH is to use public/private key based login. See SSH/OpenSSH/Keys
  • If you have to use password authentication, the easiest way to secure SSH is to disable root login and change the SSH port to something different than the standard port 22.
  • Before disabling the root login create a new SSH user and make sure the user belongs to the admin group (see step 4. below regarding the admin group).
  • if you change the SSH port keep the port number below 1024 as these are priviledged ports that can only be opened by root or processes running as root.
  • If you change the SSH port also open the new port you have chosen on the firewall and close port 22.
  • Open a Terminal Window and enter :
sudo vi /etc/ssh/sshd_config
  • Change or add the following and save.
Port <ENTER YOUR PORT>
Protocol 2
PermitRootLogin no
DebianBanner no
  • Restart SSH server, open a Terminal Window and enter :
sudo service ssh restart

4. Apache SSL Hardening – disable SSL v2/v3 support.

  • The SSL v2/v3 protocol has been proven to be insecure.
  • We will disable Apache support for the protocol and force the use of the newer protocols.
  • Open a Terminal Window and enter :
sudo vi /etc/apache2/mods-available/ssl.conf
  • Change this line from :
SSLProtocol all -SSLv3
  • To the following and save.
SSLProtocol all -SSLv2 -SSLv3
  • Restart the Apache server, open a Terminal Window and enter :
sudo service apache2 restart

5. Protect su by limiting access only to admin group.

  • To limit the use of su by admin users only we need to create an admin group, then add users and limit the use of su to the admin group.
  • Add a admin group to the system and add your own admin username to the group by replacing <YOUR ADMIN USERNAME> below with your admin username.
  • Open a terminal window and enter:
sudo groupadd admin
sudo usermod -a -G admin <YOUR ADMIN USERNAME>
sudo dpkg-statoverride --update --add root admin 4750 /bin/su

6. Harden network with sysctl settings.

  • The /etc/sysctl.conf file contain all the sysctl settings.
  • Prevent source routing of incoming packets and log malformed IP’s enter the following in a terminal window:
sudo vi /etc/sysctl.conf
  • Edit the /etc/sysctl.conf file and un-comment or add the following lines :
# IP Spoofing protection
net.ipv4.conf.all.rp_filter = 1
net.ipv4.conf.default.rp_filter = 1

# Ignore ICMP broadcast requests
net.ipv4.icmp_echo_ignore_broadcasts = 1

# Disable source packet routing
net.ipv4.conf.all.accept_source_route = 0
net.ipv6.conf.all.accept_source_route = 0 
net.ipv4.conf.default.accept_source_route = 0
net.ipv6.conf.default.accept_source_route = 0

# Ignore send redirects
net.ipv4.conf.all.send_redirects = 0
net.ipv4.conf.default.send_redirects = 0

# Block SYN attacks
net.ipv4.tcp_syncookies = 1
net.ipv4.tcp_max_syn_backlog = 2048
net.ipv4.tcp_synack_retries = 2
net.ipv4.tcp_syn_retries = 5

# Log Martians
net.ipv4.conf.all.log_martians = 1
net.ipv4.icmp_ignore_bogus_error_responses = 1

# Ignore ICMP redirects
net.ipv4.conf.all.accept_redirects = 0
net.ipv6.conf.all.accept_redirects = 0
net.ipv4.conf.default.accept_redirects = 0 
net.ipv6.conf.default.accept_redirects = 0

# Ignore Directed pings
net.ipv4.icmp_echo_ignore_all = 1
  • To reload sysctl with the latest changes, enter:
sudo sysctl -p

7. Disable Open DNS Recursion and Remove Version Info  – BIND DNS Server.

  • Open a Terminal and enter the following :
sudo vi /etc/bind/named.conf.options
  • Add the following to the Options section :
recursion no;
version "Not Disclosed";
  • Restart BIND DNS server. Open a Terminal and enter the following :
sudo service bind9 restart

8. Prevent IP Spoofing.

  • Open a Terminal and enter the following :
sudo vi /etc/host.conf
  • Add or edit the following lines :
order bind,hosts
nospoof on

9. Harden PHP for security.

  • Edit the php.ini file :
sudo vi /etc/php5/apache2/php.ini
  • Add or edit the following lines an save :
disable_functions = exec,system,shell_exec,passthru
register_globals = Off
expose_php = Off
display_errors = Off
track_errors = Off
html_errors = Off
magic_quotes_gpc = Off
mail.add_x_header = Off
session.name = NEWSESSID
  • Restart Apache server. Open a Terminal and enter the following :
sudo service apache2 restart

10. Restrict Apache Information Leakage.

  • Edit the Apache2 configuration security file :
sudo vi /etc/apache2/conf-available/security.conf
  • Add or edit the following lines and save :
ServerTokens Prod
ServerSignature Off
TraceEnable Off
Header unset ETag
Header always unset X-Powered-By
FileETag None
  • Restart Apache server. Open a Terminal and enter the following :
sudo service apache2 restart

11. Web Application Firewall – ModSecurity.

12. Protect from DDOS (Denial of Service) attacks – ModEvasive

13. Scan logs and ban suspicious hosts – DenyHosts and Fail2Ban.

  • DenyHosts is a python program that automatically blocks SSH attacks by adding entries to /etc/hosts.deny. DenyHosts will also inform Linux administrators about offending hosts, attacked users and suspicious logins.
  • Open a Terminal and enter the following :
sudo apt-get install denyhosts
  • After installation edit the configuration file /etc/denyhosts.conf  and change the email, and other settings as required.
  • To edit the admin email settings open a terminal window and enter:
sudo vi /etc/denyhosts.conf
  • Change the following values as required on your server :
ADMIN_EMAIL = root@localhost
SMTP_HOST = localhost
SMTP_PORT = 25
#SMTP_USERNAME=foo
#SMTP_PASSWORD=bar
SMTP_FROM = DenyHosts nobody@localhost
#SYSLOG_REPORT=YES
  • Fail2ban is more advanced than DenyHosts as it extends the log monitoring to other services including SSH, Apache, Courier, FTP, and more.
  • Fail2ban scans log files and bans IPs that show the malicious signs — too many password failures, seeking for exploits, etc.
  • Generally Fail2Ban then used to update firewall rules to reject the IP addresses for a specified amount of time, although any arbitrary other action could also be configured.
  • Out of the box Fail2Ban comes with filters for various services (apache, courier, ftp, ssh, etc).
  • Open a Terminal and enter the following :
sudo apt-get install fail2ban
  • After installation edit the configuration file /etc/fail2ban/jail.local  and create the filter rules as required.
  • To edit the settings open a terminal window and enter:
sudo vi /etc/fail2ban/jail.conf
  • Activate all the services you would like fail2ban to monitor by changing enabled = false to enabled = true
  • For example if you would like to enable the SSH monitoring and banning jail, find the line below and change enabled from false to true. Thats it.
[sshd]

enabled  = true
port     = ssh
filter   = sshd
logpath  = /var/log/auth.log
maxretry = 3
  • If you have selected a non-standard SSH port in step 3 then you need to change the port setting in fail2ban from ssh which by default is port 22, to your new port number, for example if you have chosen 1234 then port = 1234
[sshd]

enabled  = true
port     = <ENTER YOUR SSH PORT NUMBER HERE>
filter   = sshd
logpath  = /var/log/auth.log
maxretry = 3
  • If you would like to receive emails from Fail2Ban if hosts are banned change the following line to your email address.
destemail = root@localhost
  • and change the following line from :
action = %(action_)s
  • to:
action = %(action_mwl)s
  • You can also create rule filters for the various services that you would like fail2ban to monitor that is not supplied by default.
sudo vi /etc/fail2ban/jail.local
  • Good instructions on how to configure fail2ban and create the various filters can be found on HowtoForge – click here for an example
  • When done with the configuration of Fail2Ban restart the service with :
sudo service fail2ban restart
  • You can also check the status with.
sudo fail2ban-client status

14. Intrusion Detection – PSAD.

  • Cipherdyne PSAD is a collection of three lightweight system daemons that run on Linux machines and analyze iptables log messages to detect port scans and other suspicious traffic.
  • To install the latest version from the source files follow these instruction : How to install PSAD Intrusion Detection on Ubuntu 12.04 LTS server
  • OR install the older version from the Ubuntu software repositories, open a Terminal and enter the following :
sudo apt-get install psad

15. Check for rootkits – RKHunter and CHKRootKit.

  • Both RKHunter and CHKRootkit basically do the same thing – check your system for rootkits. No harm in using both.
  • Open a Terminal and enter the following :
sudo apt-get install rkhunter chkrootkit
  • To run chkrootkit open a terminal window and enter :
sudo chkrootkit
  • To update and run RKHunter. Open a Terminal and enter the following :
sudo rkhunter --update
sudo rkhunter --propupd
sudo rkhunter --check

16. Scan open ports – Nmap.

  • Nmap (« Network Mapper ») is a free and open source utility for network discovery and security auditing.
  • Open a Terminal and enter the following :
sudo apt-get install nmap
  • Scan your system for open ports with :
nmap -v -sT localhost
  • SYN scanning with the following :
sudo nmap -v -sS localhost

17. Analyse system LOG files – LogWatch.

  • Logwatch is a customizable log analysis system. Logwatch parses through your system’s logs and creates a report analyzing areas that you specify. Logwatch is easy to use and will work right out of the package on most systems.
  • Open a Terminal and enter the following :
sudo apt-get install logwatch libdate-manip-perl
  • To view logwatch output use less :
sudo logwatch | less
  • To email a logwatch report for the past 7 days to an email address, enter the following and replace [email protected] with the required email. :
sudo logwatch --mailto [email protected] --output mail --format html --range 'between -7 days and today' 

18. Apparmor – Application Armor.

sudo apt-get install apparmor apparmor-profiles
  • Check to see if things are running :
sudo apparmor_status

19. Audit your system security – Tiger and Tripwire.

  • Tiger is a security tool that can be use both as a security audit and intrusion detection system.
  • Tripwire is a host-based intrusion detection system (HIDS) that checks file and folder integrity.
  • Open a Terminal and enter the following :
sudo apt-get install tiger tripwire
  • To setup Tripwire good installation guides can be found on Digital Ocean here and on Unixmen here
  • To run tiger enter :
sudo tiger
  • All Tiger output can be found in the /var/log/tiger
  • To view the tiger security reports, open a Terminal and enter the following :
sudo less /var/log/tiger/security.report.*

HOWTO : Linux FTP Server Setup

08/06/2024 Comments off

Source: linuxhomenetworking.com

Introduction

The File Transfer Protocol (FTP) is used as one of the most common means of copying files between servers over the Internet. Most web based download sites use the built in FTP capabilities of web browsers and therefore most server oriented operating systems usually include an FTP server application as part of the software suite. Linux is no exception.

This chapter will show you how to convert your Linux box into an FTP server using the default Very Secure FTP Daemon (VSFTPD) package included in Fedora.

FTP Overview

FTP relies on a pair of TCP ports to get the job done. It operates in two connection channels as I’ll explain:

FTP Control Channel, TCP Port 21: All commands you send and the ftp server’s responses to those commands will go over the control connection, but any data sent back (such as « ls » directory lists or actual file data in either direction) will go over the data connection.

FTP Data Channel, TCP Port 20: This port is used for all subsequent data transfers between the client and server.

In addition to these channels, there are several varieties of FTP.

Types of FTP

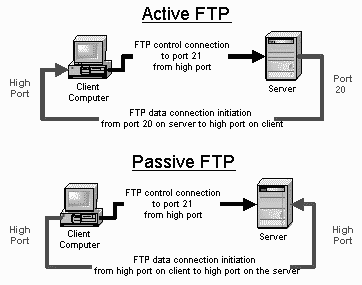
From a networking perspective, the two main types of FTP are active and passive. In active FTP, the FTP server initiates a data transfer connection back to the client. For passive FTP, the connection is initiated from the FTP client. These are illustrated in Figure 15-1.

Figure 15-1 Active And Passive FTP Illustrated

Ftp

From a user management perspective there are also two types of FTP: regular FTP in which files are transferred using the username and password of a regular user FTP server, and anonymous FTP in which general access is provided to the FTP server using a well known universal login method.

Take a closer look at each type.

Active FTP

The sequence of events for active FTP is:

  1. Your client connects to the FTP server by establishing an FTP control connection to port 21 of the server. Your commands such as ‘ls’ and ‘get’ are sent over this connection.
  2. Whenever the client requests data over the control connection, the server initiates data transfer connections back to the client. The source port of these data transfer connections is always port 20 on the server, and the destination port is a high port (greater than 1024) on the client.
  3. Thus the ls listing that you asked for comes back over the port 20 to high port connection, not the port 21 control connection.

FTP active mode therefore transfers data in a counter intuitive way to the TCP standard, as it selects port 20 as it’s source port (not a random high port that’s greater than 1024) and connects back to the client on a random high port that has been pre-negotiated on the port 21 control connection.

Active FTP may fail in cases where the client is protected from the Internet via many to one NAT (masquerading). This is because the firewall will not know which of the many servers behind it should receive the return connection.

Passive FTP

Passive FTP works differently:

  1. Your client connects to the FTP server by establishing an FTP control connection to port 21 of the server. Your commands such as ls and get are sent over that connection.
  2. Whenever the client requests data over the control connection, the client initiates the data transfer connections to the server. The source port of these data transfer connections is always a high port on the client with a destination port of a high port on the server.

Passive FTP should be viewed as the server never making an active attempt to connect to the client for FTP data transfers. Because client always initiates the required connections, passive FTP works better for clients protected by a firewall.

As Windows defaults to active FTP, and Linux defaults to passive, you’ll probably have to accommodate both forms when deciding upon a security policy for your FTP server.

Regular FTP

By default, the VSFTPD package allows regular Linux users to copy files to and from their home directories with an FTP client using their Linux usernames and passwords as their login credentials.

VSFTPD also has the option of allowing this type of access to only a group of Linux users, enabling you to restrict the addition of new files to your system to authorized personnel.

The disadvantage of regular FTP is that it isn’t suitable for general download distribution of software as everyone either has to get a unique Linux user account or has to use a shared username and password. Anonymous FTP allows you to avoid this difficulty.

Anonymous FTP

Anonymous FTP is the choice of Web sites that need to exchange files with numerous unknown remote users. Common uses include downloading software updates and MP3s and uploading diagnostic information for a technical support engineers’ attention. Unlike regular FTP where you login with a preconfigured Linux username and password, anonymous FTP requires only a username of anonymous and your email address for the password. Once logged in to a VSFTPD server, you automatically have access to only the default anonymous FTP directory (/var/ftp in the case of VSFTPD) and all its subdirectories.

As seen in Chapter 6, « Installing Linux Software« , using anonymous FTP as a remote user is fairly straight forward. VSFTPD can be configured to support user-based and or anonymous FTP in its configuration file which you’ll see later.

Lire la suite…

Categories: Logiciel, Système Tags: