Archive

Archives pour la catégorie ‘Réseau’

Monitor Network Connections in Mac OS X for Free with Private Eye

11/01/2024 Comments off

Source: OSXdaily

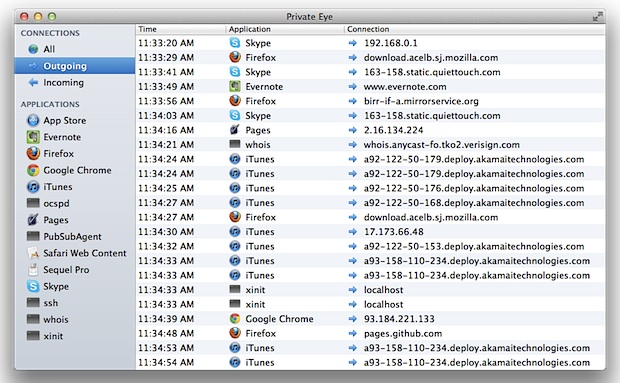
Private Eye is a free real-time network monitor app for Mac OS X that is extremely easy to use. Upon launching the app, you’ll start to see all open network connections by application and process, and you can then filter connections by app, monitor all open connections, or watch only incoming or outgoing transfer.

private-eye-network-connection-monitor-mac

Connections are reported by application, the time of the connection, and arguably the most useful, the IP address that is being connected to by the app, making it easy to see socket and routing data, letting you know exactly what app is communicating with what server or IP address, for both local and broader internet networks. If you have any interest in networking, privacy, security, or you just want to keep an eye on what apps are connecting to the internet and to where, you should download this app, but it’s also an amazingly useful tool for troubleshooting network problems and figuring out what is using the network.


Download and install Private Eye by putting it into your /Applications/ folder, then open PrivateEye to get started. The list of open network connections is easy to read, you’ll see a time stamp of the connection, the application name, and where the connection is going to by IP (or coming from, as determined by the arrow pointing left for in, or right for out).
private-eye-connections

Using the left side menu you can quickly break down connections to see them all, only show incoming transfers, outgoing connections, or display connections by specific application only. Apps are easy to identify in this list, as are daemons running in the background (like PubSubAgent), and command line processes belonging to the user are also visible (ssh, for example).

This is a simple yet powerful tool without the complexity or the learning curves related to compiling and using the command line tools lsof, watch, open_ports, or wireshark, and is therefore highly recommended for anyone who is interested in seeing this kind of information, whether it’s out of general curiosity, or to help troubleshoot and diagnose specific network activities.

Aria2 – L’outil de téléchargement ultra rapide

10/01/2024 Comments off

Source: korben.info

Les barbus du Linux le connaissent depuis longtemps, mais pour les autres, je vous explique rapidement. Tout d’abord Aria2 est sous licence GPL et tourne sans aucun souci sous Mac, Linux, Windows et même Android. L’outil est léger (il consomme peu de CPU et de mémoire), mais surtout très puissant puisqu’il gère en plus des liens classiques, les Metalink, ce qui lui permet de télécharger des fichiers en exploitant plusieurs connexions simultanées utilisant plusieurs sources et/ou protocoles différents.

Oui c’est fou ! Cela permet d’exploiter au maximum la bande passante que vous avez à votre disposition.

Aria2 supporte donc le HTTP, FTP, mais aussi Bittorrent avec toutes ses fonctionnalités (DHT, chiffrement PEX, URI magnétique, Web-Seeding, téléchargement sélectif, tracker UDP et le protocole Local Peer Discovery). Aria2 est aussi pilotable à distance (support RPC) et gère sans souci ce qui est droit d’accès, cookies, proxys…etc.

N’allez pas croire que Aria2 est un outil compliqué à prendre en main. Taratata, c’est au contraire très simple à piger, comme vous allez voir dans les exemples ci-dessous :

Pour télécharger simplement un fichier :

aria2c http://example.org/mylinux.iso

Pour télécharger un fichier à partir de 2 sources différentes (HTTP, FTP) :

aria2c http://a/f.iso ftp://b/f.iso

Pour télécharger un fichier à partir de 3 connexions de source différente (Torrent, FTP, HTTP) :

aria2c -Ttest.torrent "http://host1/file" "ftp://host2/file"

Si ça vous branche d’explorer un peu plus ses possibilités, la documentation est ici. Autrement, sachez aussi qu’il existe des interfaces graphiques pour Aria2 comme :

  • webui-aria2: Interface navigateur
  • uGet: Gestionnaire de téléchargement Linux

Aria2 est téléchargeable ici.

Categories: Réseau, Système Tags: , ,

Synchronizing folders with rsync

10/01/2024 Comments off

Source: Juan Valencia’s website

In this post I cover the basics of rsync, in preparation for a subsequent post that will cover backups and it’s use in conjunction with cronjobs to automatize the backup process. From the copying and synchronization of local files and folders, to it’s use for transfer information among computers. Itsuse as a daemon when SSH is unavailable was moved to it’s own section.

Topics
The basics of rsync
Copying local files and folders
Dealing with whitespace and rare characters
Update the contents of a folder
Synchronizing two folders with rsync
Compressing the files while transferring them
Transferring files between two remote systems
Excluding files and directories
Running rsync as a daemon (moved to it’s own section)
Some additional rsync parameters
Footnotes

The basics of rsync

rsync is a very versatile copying and backup tool that is included by default in almost every Linux distribution. It can be used as an advanced copying tool, allowing us to copy files both locally and remotely. It can also be used as a backup tool. It supports the creation of incremental backups.

rsync counts with a famous delta-transfer algorithm that allows us to transfer new files as well as recent changes to existent files, while ignoring unchanged files. Additionally to this, the behavior ofrsync can be throughly customized, helping us to automatize backups, it can also be run as a daemon to turn the computer into a host and allow rsync clients connect to it.

Besides the copying of local files and folders, rsync allow us to copy over SSH (Secure Shell), RSH (Remote Shell) and it can be run as a daemon in a computer and allow other computers to connect to it, when rsync is run as a daemon it listens to the port TCP 873.

When we use rsync as a daemon or when we use RSH, the data that is send between computers travels unencrypted, so, if you are transferring files between two computers in the same local network, this is useful, but this shouldn’t be used to transfer files over insecure networks, such as the Internet. For this purpose SSH is the way to go.

This is the main reason why I favor the use of SSH for my transfers, besides, since SSH is secure, many servers have the SSH daemon available. But the use of rsync as a daemon for transfers over fast connections, as is usually the case in a local network, is useful. I don’t have the RSH daemon running in my computers so you may find me a bit biased about SSH in the examples. The examples covering the transfer of files between two computers use SSH as the medium of transport, but in a separate post I cover the use of rsync as a daemon.

Lire la suite…

Categories: Réseau, Système Tags: , ,

Knockd : Sécuriser vos connexions

07/01/2024 Comments off
source: http://www.debianworld.org/securite.knockd

Knockd est un petit daemon qui autorise ou non une connexion à votre serveur. Pour cela il écoute les ports de votre machine et attend une séquence bien précise de connexions sur les ports que vous avez définis. Si la séquence définie est exécuté dans le bon ordre, le daemon va ouvrir le port et permettre une connexion pour un temps déterminé sur le port ssh par exemple. La séquence peut utiliser des connexions TCP ou UDP ou les deux.

Ainsi, d’un point de vue extérieur le serveur n’a aucun port d’ouverts exception faite pour les clients qui ont la séquence « magique ».

Lire la suite…

Astuce pour « ssh-copy-id » sur un port ssh différent

06/01/2024 Comments off

Bon, a priori vous connaissez la commande "ssh-copy-id" pour copier sa clé publique sur un serveur distant afin de s’identifier par clé et plus par mot de passe.

Le principe est d’avoir une paire de clés privée/publique, le plus souvent dans "~/.ssh/id_rsa(.pub)" et de la copier à l’intérieur du fichier "~/.ssh/authorized_keys" sur la machine distante.

$ ssh-copy-id -i ~/.ssh/id_rsa.pub user@host

Mais si la machine distante n’accepte pas les connexions sur le port 22 ou bien qu’il y a une redirection de ports sur le routeur, il faut lui indiquer ce port, par exemple :

$ ssh-copy-id -i ~/.ssh/id_rsa.pub -p 2222 user@host

Mais ça ne marche pas car ssh-copy-id ne comprend que 2 paramètres et si on met "-p 2222" en second, ça n’est pas un motif de type "[user@]host", et si on le met après, en troisième, il est ignoré.

Et bien il suffit d’entourer les infos de connexion ssh par des guillemets pour qu’ils soient vus comme un seul paramètre :

$ ssh-copy-id -i ~/.ssh/id_rsa.pub "-p 2222 user@host"


Source: Jérémy Lecour