Archive

Archives pour la catégorie ‘Réseau’

Watch iptables counters

05/03/2024 Comments off

How to check iptables traffic on the fly?

Here are a few commands that can help:

watch --interval 0 'iptables -nvL | grep -v "0 0"'

This will allow you to watch as matches occur in real-time. To filter out only ACCEPT, DROP, LOG..etc, then run the following command: watch ‘iptables -nvL | grep -v « 0 0 » && grep « ACCEPT »‘ The -v is used to do an inverted filter. ie. NOT « 0 0 »

watch 'iptables -vL'

Watch the number of packets/bytes coming through the firewall. Useful in setting up new iptables rules or chains. Use this output to reorder rules for efficiency.

while true; do iptables -nvL > /tmp/now; diff -U0 /tmp/prev /tmp/now > /tmp/diff; clear; cat /tmp/diff; mv /tmp/now /tmp/prev; sleep 1; done

this alternative shows the differences as they occur so that they are made plain

watch -d -n 2 iptables -nvL

This will highlight (with a box over it) any changes since the last refresh.

Standard Process for Restoring IPtables at Boot?

04/03/2024 Comments off

Source: Ubuntu Tutorials

I got to thinking about something the other day when I rebuilt my webserver using Debian 5.0. How does Debian/Ubuntu standardize on reloading the iptables rules at boot time?

I know that Red Hat and its variants use the /etc/sysconfig/iptables file as a save and restore point, and there is an init script, iptables, that starts at boot prior to the network script, but is there a similar standard on Debian/Ubuntu?

The solution I’ve come up with (and I’m very curious to hear what others have done) is the following:

First, I manually enter my base iptables rules…

iptables -A INPUT -i lo -j ACCEPT
iptables -A INPUT -m state --state RELATED,ESTABLISHED -j ACCEPT
iptables -A INPUT -s 17.88.115.150/32 -p tcp -m state --state NEW -m tcp --dport 22 -j ACCEPT
iptables -A INPUT -s 111.70.51.51/32 -p tcp -m state --state NEW -m tcp --dport 22 -j ACCEPT
iptables -A INPUT -s 16.10.111.177/32 -p tcp -m state --state NEW -m tcp --dport 22 -j ACCEPT
iptables -A INPUT -j REJECT --reject-with icmp-host-unreachable
...etc, etc.

*(ip addresses have been scrambled to protect their identity)

I then run:

iptables-save > /etc/default/iptables

From this point forward I manually update my ruleset by editing the file directly with a text editor.

To reload these rules at boot-time I have added a line to my /etc/network/interfaces configuration as follows:

auto eth0
iface eth0 inet static
address foo
netmask bar
gateway baz
dns-search domain.tld
dns-nameservers foo
pre-up iptables-restore < /etc/default/iptables

That last line tells the machine that, before you activate these network settings, run iptables-restore and read from the file /etc/default/iptables.  This seems to work well enough so far, but I’m still curious what others have done.  Do you simply write an init script on your own and maintain the ruleset within that file?  Do you use a file similar to what I’ve done, but source it via an init script?  I’m curious, as there does not seem to be a standard that I’m aware of.
Categories: Réseau Tags: ,

Filtrer les connexions ssh

03/03/2024 Comments off

Portier SSH

Si vous possédez un serveur avec ssh opérationnel, vous ne serez pas long à avoir des messages tels que ceux ci dans le fichier /var/log/auth.log:

...
Mar 11 12:48:21 serv sshd[12956]: Failed password for invalid user root from 64.71.148.162 port 47270 ssh2
Mar 11 15:45:04 serv sshd[6954]: Did not receive identification string from 210.21.30.72
Mar 11 15:46:48 serv sshd[7041]: Did not receive identification string from 81.93.188.5
Mar 11 15:47:50 serv sshd[7106]: User root from 210.21.30.72 not allowed because none of user s groups are listed in AllowGroups
Mar 11 15:47:50 serv sshd[7106]: pam_unix(sshd:auth): authentication failure; logname= uid=0 euid=0 tty=ssh ruser= rhost=210.21.30.72  user=root
Mar 11 15:47:52 serv sshd[7106]: Failed password for invalid user root from 210.21.30.72 port 54346 ssh2
Mar 11 15:49:33 serv sshd[7241]: User root from 81.93.188.5 not allowed because none of user s groups are listed in AllowGroups
Mar 11 15:49:33 serv sshd[7241]: pam_unix(sshd:auth): authentication failure; logname= uid=0 euid=0 tty=ssh ruser= rhost=81.93.188.5  user=root
Mar 11 15:49:35 serv sshd[7241]: Failed password for invalid user root from 81.93.188.5 port 44663 ssh2
Mar 12 00:51:18 serv sshd[22229]: User root from host.ongamemarketing.com not allowed because none of user s groups are listed in AllowGroups
Mar 12 00:51:18 serv sshd[22229]: pam_unix(sshd:auth): authentication failure; logname= uid=0 euid=0 tty=ssh ruser= rhost=host.ongamemarketing.com  user=root
Mar 12 00:51:20 serv sshd[22229]: Failed password for invalid user root from 174.133.12.130 port 48089 ssh2
Mar 12 00:51:22 serv sshd[22236]: User root from host.ongamemarketing.com not allowed because none of user s groups are listed in AllowGroups
Mar 12 00:51:22 serv sshd[22236]: pam_unix(sshd:auth): authentication failure; logname= uid=0 euid=0 tty=ssh ruser= rhost=host.ongamemarketing.com  user=root
Mar 12 00:51:24 serv sshd[22236]: Failed password for invalid user root from 174.133.12.130 port 48521 ssh2
Mar 12 01:47:10 serv sshd[30827]: Did not receive identification string from 114.200.199.144
Mar 12 01:53:17 serv sshd[31227]: Invalid user staff from 114.200.199.144
Mar 12 01:53:17 serv sshd[31227]: pam_unix(sshd:auth): check pass; user unknown
Mar 12 01:53:17 serv sshd[31227]: pam_unix(sshd:auth): authentication failure; logname= uid=0 euid=0 tty=ssh ruser= rhost=114.200.199.144
Mar 12 01:53:19 serv sshd[31227]: Failed password for invalid user staff from 114.200.199.144 port 35343 ssh2
Mar 12 01:53:27 serv sshd[31234]: Invalid user sales from 114.200.199.144
...

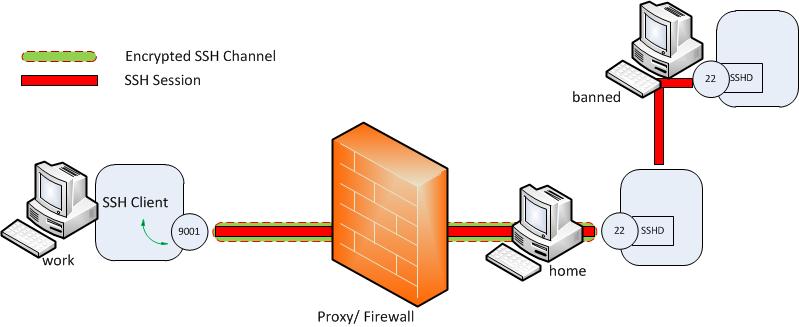
sshsessionforwardingVous avez besoin de pouvoir vous connecter en ssh depuis le réseau local, depuis l’extérieur, mais vous voulez limiter les risques. Il existe plusieurs solutions, qui peuvent être cumulées: Lire la suite…

Categories: Réseau Tags: , ,

Interdisez l’accès à votre serveur web par pays

26/02/2024 Comments off

Source: eric-couchelou.net

Linux-debian-300x145En annexe du paramétrage basique de votre serveur web, il se peut que vous soyez confronté à la nécessité ou l’envie de placer une interdiction d’accès Géolocalisée.

Mais avant de procéder à ce type d’installation, gardez à l’esprit plusieurs choses :

  • Si vous avez plusieurs sites sur le même serveur, tous seront concernés par vos règles, soyez donc sûr et certain qu’aucun d’entre eux n’ait pour cible l’un des pays que vous aller blacklister,
  • La très grande majorité des internautes des pays que vous pouvez considérer comme à risque (Russie, Chine, Taiwan, Roumanie, Brésil…) n’ont pas de mauvaises intentions, vous vous priverez donc volontairement d’une source de trafic potentiel.
  • Internet est ainsi fait que cette solution est loin d’être fiable à 100%, et les filtres géolocalisés facilement contournables

Bref, le jeu en vaut-il la chandelle? Si vous êtes convaincu que oui, alors ce petit tutoriel est fait pour vous. Je vous proposer d’installer le module de surveillance GEOIP.

1 – Installation du programme :

apt-get install libapache2-mod-geoip

2- Configuration du programme :

vi  etc/apache2/mods-available/geoip.conf

Et Mettre :

GeoIPEnable On
GeoIPDBFile /usr/share/GeoIP/GeoIP.dat
SetEnvIf GEOIP_COUNTRY_CODE CN BlockCountry=1
SetEnvIf GEOIP_COUNTRY_CODE RU BlockCountry=1
SetEnvIf GEOIP_COUNTRY_CODE RO BlockCountry=1
SetEnvIf GEOIP_COUNTRY_CODE TW BlockCountry=1

Deny from env=BlockCountry

Chaque ligne de type SetEnvIf GEOIP_COUNTRY_CODE XX BlockCountry=1 correspond à une restriction d’accès pour un pays où XX définit le code du pays concerné par la règle. Pour info vous trouverez les différents codes pays (FR, DE, etc.) à cette adresse:
http://www.maxmind.com/app/iso3166

Redémarrez Apache :

/etc/init.d/apache2 restart

C’est en place!

Pour la mise à jour, téléchargez les dernières définitions d’IPs (une fois par mois pour la version gratuite) à cette adresse :
http://www.maxmind.com/app/geolitecountry

et remplacer celles existantes dans

/usr/share/GeoIP/GeoIP.dat

J’attire votre attention sur le fait que le blacklistage géolocalisé présenté ci-dessus fonctionne pour Apache, c’est à dire que vous devrez faire des paramétrages supplémentaires si vous voulez interdire les accès aux serveurs email par exemple. Nous verrons cela plus tard…

System: fail2ban and iptables

26/02/2024 Comments off

source: http://www.the-art-of-web.com/system/fail2ban/

Around the beginning of 2005 we saw an increase in brute-force ssh attacks – people or robots trying different combinations of username and password to log into remote servers. A quick search on this topic returns many references to iptables and ipchains but noone really explained how they work.

Having just gone through this learning curve myself, and found a satisfactory solution in the fail2ban package, I’m going to try and explain how to achieve the simple goal of banning IP addresses that make repeated failed ssh login attempts.

If you want more technical information regarding firewalls and iptables in particular, see the References section at the bottom of this page. Lire la suite…