In this tutorial, I’ll show you the steps to create a simple failover cluster on Ubuntu using CARP. To make the things meaningful,we’ll create the cluster for Apache service but you can use it for any other service, which relay on IP.
Scenario:
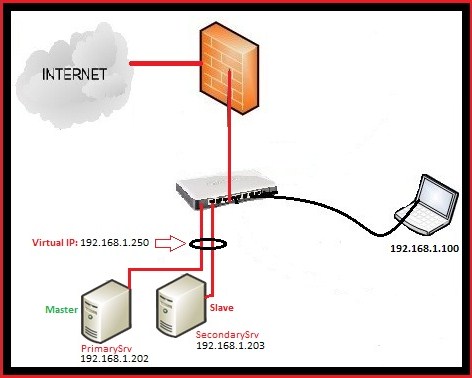
Here is my Setup:
PrimarySrv: This is the main server, where I configured the apache and which act as Master (IP: 192.168.1.202) SecondarySrv: 2nd Apache Server where I configured the apache exactly like on PrimarySrv (IP : 192.168.1.203) 192.168.1.250 : Virtual IP address,created using Ucarp.
Ucarp is really simple, it works like this,when the PrimarySrv is up,it will assign the virtual IP 192.168.1.250 to it, in case that PrimarySrv is down then it will assign virtual IP to the SeconadrySrv and when the PrimarySrv will come online, it will assign the virtual IP once again to it.
Do you need a simple open source cross-platform command line tool that converts web pages and HTML to a PDF file? Look no further, try wkhtmltopdf.
From the project home page:
Simple shell utility to convert html to pdf using the webkit rendering engine, and qt. Searching the web, I have found several command line tools that allow you to convert a HTML-document to a PDF-document, however they all seem to use their own, and rather incomplete rendering engine, resulting in poor quality. Recently QT 4.4 was released with a WebKit widget (WebKit is the engine of Apples Safari, which is a fork of the KDE KHtml), and making a good tool became very easy.
Software features
Cross platform.
Open source.
Convert any web pages into PDF documents using webkit.
You can add headers and footers.
TOC generation.
Batch mode conversions.
Can run on Linux server with an XServer (the X11 client libs must be installed).
Can be directly used by PHP or Python via bindings to libwkhtmltox.
A note about Debian / Ubuntu Linux user
You can install wkhtmltopdf using apt-get command: $ sudo apt-get install wkhtmltopdf $ sudo ln -s /usr/bin/wkhtmltopdf /usr/local/bin/html2pdf
Sample outputs:
[sudo] password for vivek:
Reading package lists... Done
Building dependency tree
Reading state information... Done
The following NEW packages will be installed:
  wkhtmltopdf
0 upgraded, 1 newly installed, 0 to remove and 10 not upgraded.
Need to get 116 kB of archives.
After this operation, 303 kB of additional disk space will be used.
Get:1 http://debian.osuosl.org/debian/ squeeze/main wkhtmltopdf amd64 0.9.9-1 [116 kB]
Fetched 116 kB in 2s (49.4 kB/s)
Selecting previously deselected package wkhtmltopdf.
(Reading database ... 274164 files and directories currently installed.)
Unpacking wkhtmltopdf (from .../wkhtmltopdf_0.9.9-1_amd64.deb) ...
Processing triggers for man-db ...
Setting up wkhtmltopdf (0.9.9-1) ...
Source: munin-monitoring.org There are a number of situations where you’d like to run munin-node on hosts not directly available to the Munin server. This article describes a few scenarios and different alternatives to set up monitoring. Monitoring hosts behind a non-routing server.
In this scenario, a *nix server sits between the Munin server and one or more Munin nodes. The server in-between reaches both the Munin server and the Munin node, but the Munin server does not reach the Munin node or vice versa.
To enable for Munin monitoring, there are several approaches, but mainly either using SSH tunneling or “bouncing” via the in-between server.
SSH tunneling
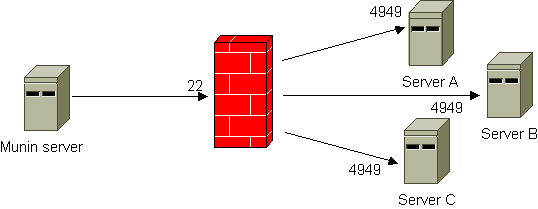
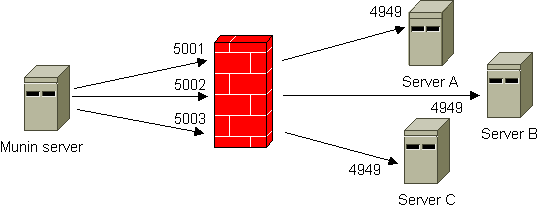
The illustration below shows the principle. By using SSH tunneling only one SSH connection is required, even if you need to reach several hosts on “the other side”. The Munin server listens to different ports on the localhost interface. A configuration example is included. Note that there is also a FAQ entry on using SSH that contains very useful information.
Bouncing
This workaround uses netcat and inetd/xinetd to forward the queries from the Munin server. All incoming connections to defined ports are automatically forwarded to the Munin node using netcat.
It doesn’t happen a lot but it does sometimes when the Gnome Panel freeze. If you are a former windows user you might be used to restart the computer when something in you desktop stuck. This is not the way with Linux. We can fix the problem by restarting the desktop session (restarting the X server) pressing the Ctrl+Alt+BackSpace but this will destroy everything we worked on so far. A more elegant way will be to restart only the Gnome Panel.
Getting access to the Linux command line shell
In order to restart the Gnome Panel we will need to execute the Linux kill command. Once the Gnome Panel process is killed Gnome will restart it automatically so the only thing left for us is to kill the Gnome Panel process. In order to execute the Linux kill command we will need to get access to the Linux shell. This can be done by one of the following:
Pressing Alt+F2
Using an opened console window using the Alt+Tab buttons to navigate to it.
Using a console session by pressing Ctrl+Alt+F1
Killing the Gnome Panel
In each of these options we will need to execute the Linux kill command in order to kill the Gnome Panel process. There are two ways to use the kill command:
Using the application name will kill all the applications with the same name
Using the process id (pid) will kill only the process with the specified id.
Back to our case with the Gnome Panel, we can use both of the options.