Archive

Articles taggués ‘Ubuntu’

How To Secure Nginx with Let’s Encrypt on Ubuntu 14.04

25/11/2023 Comments off

Introduction

nginx lets encrypt ubuntuLet’s Encrypt is a new Certificate Authority (CA) that provides an easy way to obtain and install free TLS/SSL certificates, thereby enabling encrypted HTTPS on web servers. It simplifies the process by providing a software client, letsencrypt, that attempts to automate most (if not all) of the required steps. Currently, as Let’s Encrypt is still in open beta, the entire process of obtaining and installing a certificate is fully automated only on Apache web servers. However, Let’s Encrypt can be used to easily obtain a free SSL certificate, which can be installed manually, regardless of your choice of web server software.

In this tutorial, we will show you how to use Let’s Encrypt to obtain a free SSL certificate and use it with Nginx on Ubuntu 14.04. We will also show you how to automatically renew your SSL certificate. If you’re running a different web server, simply follow your web server’s documentation to learn how to use the certificate with your setup.
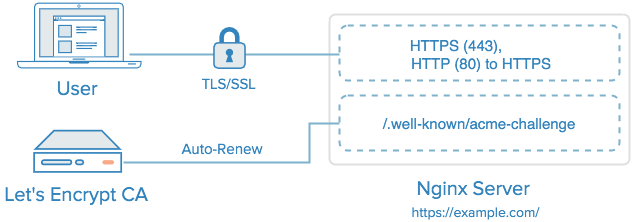
Nginx with Let's Encrypt TLS/SSL Certificate and Auto-renewal


Prerequisites

Before following this tutorial, you’ll need a few things.

You should have an Ubuntu 14.04 server with a non-root user who has sudo privileges. You can learn how to set up such a user account by following steps 1-3 in our initial server setup for Ubuntu 14.04 tutorial.

You must own or control the registered domain name that you wish to use the certificate with. If you do not already have a registered domain name, you may register one with one of the many domain name registrars out there (e.g. Namecheap, GoDaddy, etc.).

If you haven’t already, be sure to create an A Record that points your domain to the public IP address of your server. This is required because of how Let’s Encrypt validates that you own the domain it is issuing a certificate for. For example, if you want to obtain a certificate for example.com, that domain must resolve to your server for the validation process to work. Our setup will use example.com and www.example.com as the domain names, so both DNS records are required.

Once you have all of the prerequisites out of the way, let’s move on to installing the Let’s Encrypt client software.


Step 1 — Install Let’s Encrypt Client

The first step to using Let’s Encrypt to obtain an SSL certificate is to install the letsencrypt software on your server. Currently, the best way to install Let’s Encrypt is to simply clone it from the official GitHub repository. In the future, it will likely be available via a package manager.

Install Git and bc

Let’s install Git and bc now, so we can clone the Let’s Encrypt repository.

Update your server’s package manager with this command:

sudo apt-get update

Then install the git and bc packages with apt-get:

sudo apt-get -y install git bc

With git and bc installed, we can easily download letsencrypt by cloning the repository from GitHub.

Clone Let’s Encrypt

We can now clone the Let’s Encrypt repository in /opt with this command:

sudo git clone https://github.com/letsencrypt/letsencrypt /opt/letsencrypt

You should now have a copy of the letsencrypt repository in the /opt/letsencrypt directory.
Lire la suite…

Categories: Sécurité, Système Tags: ,

Securing your server with iptables

12/08/2021 Comments off

Securing your server with iptables

securing your server linuxIn the Getting Started guide, you learned how to deploy a Linux distribution, boot your Linode and perform some basic administrative tasks. Now it’s time to harden your Linode to protect it from unauthorized access.

Update Your System–Frequently

Keeping your software up to date is the single biggest security precaution you can take for any operating system–be it desktop, mobile or server. Software updates frequently contain patches ranging from critical vulnerabilities to minor bug fixes, and many software vulnerabilities are actually patched by the time they become public.

Automatic Security Updates

There are opposing arguments for and against automatic updates on servers. Nonetheless, CentOS, Debian, Fedora and Ubuntu can be automatically updated to various extents. Fedora’s Wiki has a good breakdown of the pros and cons, but if you limit updates to those for security issues, the risk of using automatic updates will be minimal.

The practicality of automatic updates must be something which you judge for yourself because it comes down to what you do with your Linode. Bear in mind that automatic updates apply only to packages sourced from repositories, not self-compiled applications. You may find it worthwhile to have a test environment which replicates your production server. Updates can be applied there and reviewed for issues before being applied to the live environment.

Add a Limited User Account

Up to this point, you have accessing your Linode as the root user. The concern here is that roothas unlimited privileges and can execute any command–even one that could accidentally break your server. For this reason and others, we recommend creating a limited user account and using that at all times. Administrative tasks will be done using sudo to temporarily elevate your limited user’s privileges so you can administer your server without logging in as root.

To add a new user, log in to your Linode via SSH.

CentOS / Fedora

  1. Create the user, replacing example_user with your desired username, and assign a password:
    useradd example_user && passwd example_user
  2. Add the user to the wheel group for sudo privileges:
    usermod -aG wheel example_user

Debian / Ubuntu

  1. Create the user, replacing example_user with your desired username. You’ll then be asked to assign the user a password.
    adduser example_user
  2. Add the user to the sudo group so you’ll have administrative privileges:
    adduser example_user sudo

With your new user assigned, disconnect from your Linode as root:

exit

Log back in to your Linode as your new user. Replace example_user with your username, and the example IP address with your Linode’s IP address:

ssh [email protected]

Now you can administer your Linode from your new user account instead of root. Superuser commands can now be prefaced with sudo; for example, sudo iptables -L. Nearly all superuser commands can be executed with sudo, and those commands will be logged to /var/log/auth.log.

Lire la suite…

How To Implement a Basic Firewall Template with Iptables on Ubuntu 14.04

04/07/2021 Comments off

Introduction

Implementing a firewall is an important step in securing your server. A large part of that is deciding on the individual rules and policies that will enforce traffic restrictions to your network. Firewalls like iptables also allow you to have a say about the structural framework in which your rules are applied.

In this guide, we will construct a firewall that can be the basis for more complex rule sets. This firewall will focus primarily on providing reasonable defaults and establishing a framework that encourages easy extensibility. We will be demonstrating this on an Ubuntu 14.04 server.

Prerequisites

Before you begin, you should have a basic idea of the firewall policies you wish to implement. You can follow this guide to get a better idea of some of the things you should be thinking about.

In order to follow along, you will need to have access to an Ubuntu 14.04 server. We will be using a non-root user configured with sudo privileges throughout this guide. You can learn how to configure this type of user in our Ubuntu 14.04 initial server setup guide.

When you are finished, continue below.

Installing the Persistent Firewall Service

To get started, you will need to install the iptables-persistent package if you have not done so already. This will allow us to save our rule sets and have them automatically applied at boot:

sudo apt-get update
sudo apt-get install iptables-persistent

During the installation, you’ll be asked whether you want to save your current rules. Say « yes » here. We will be editing the generated rules files momentarily.

A Note About IPv6 in this Guide

Before we get started, we should talk briefly about IPv4 vs IPv6. The iptables command only handles IPv4 traffic. For IPv6 traffic, a separate companion tool called ip6tables is used. The rules are stored in separate tables and chains. For iptables-persistent, the IPv4 rules are written to and read from /etc/iptables/rules.v4 and the IPv6 rules are kept in /etc/iptables/rules.v6.

This guide assumes that you are not actively using IPv6 on your server. If your services do not leverage IPv6, it is safer to block access entirely, as we will be doing in this article.

Implementing the Basic Firewall Policy (The Quick Way)

For the sake of getting up and running as quickly as possible, we’ll show you how to edit the rules file directly to copy and paste the finished firewall policy. Afterwards, we will explain the general strategy and show you how these rules could be implemented using the iptables command instead of modifying the file.

Lire la suite…

How To Create a High Availability Setup with Heartbeat and Floating IPs on Ubuntu 14.04

01/07/2021 Comments off

Source: Digital Ocean – Mitchell Anicas

Introduction

Heartbeat is an open source program that provides cluster infrastructure capabilities—cluster membership and messaging—to client servers, which is a critical component in a high availability (HA) server infrastructure. Heartbeat is typically used in conjunction with a cluster resource manager (CRM), such as Pacemaker, to achieve a complete HA setup. However, in this tutorial, we will demonstrate how to create a 2-node HA server setup by simply using Heartbeat and a DigitalOcean Floating IP.

If you are looking to create a more robust HA setup, look into using Corosync and Pacemaker or Keepalived.

Goal

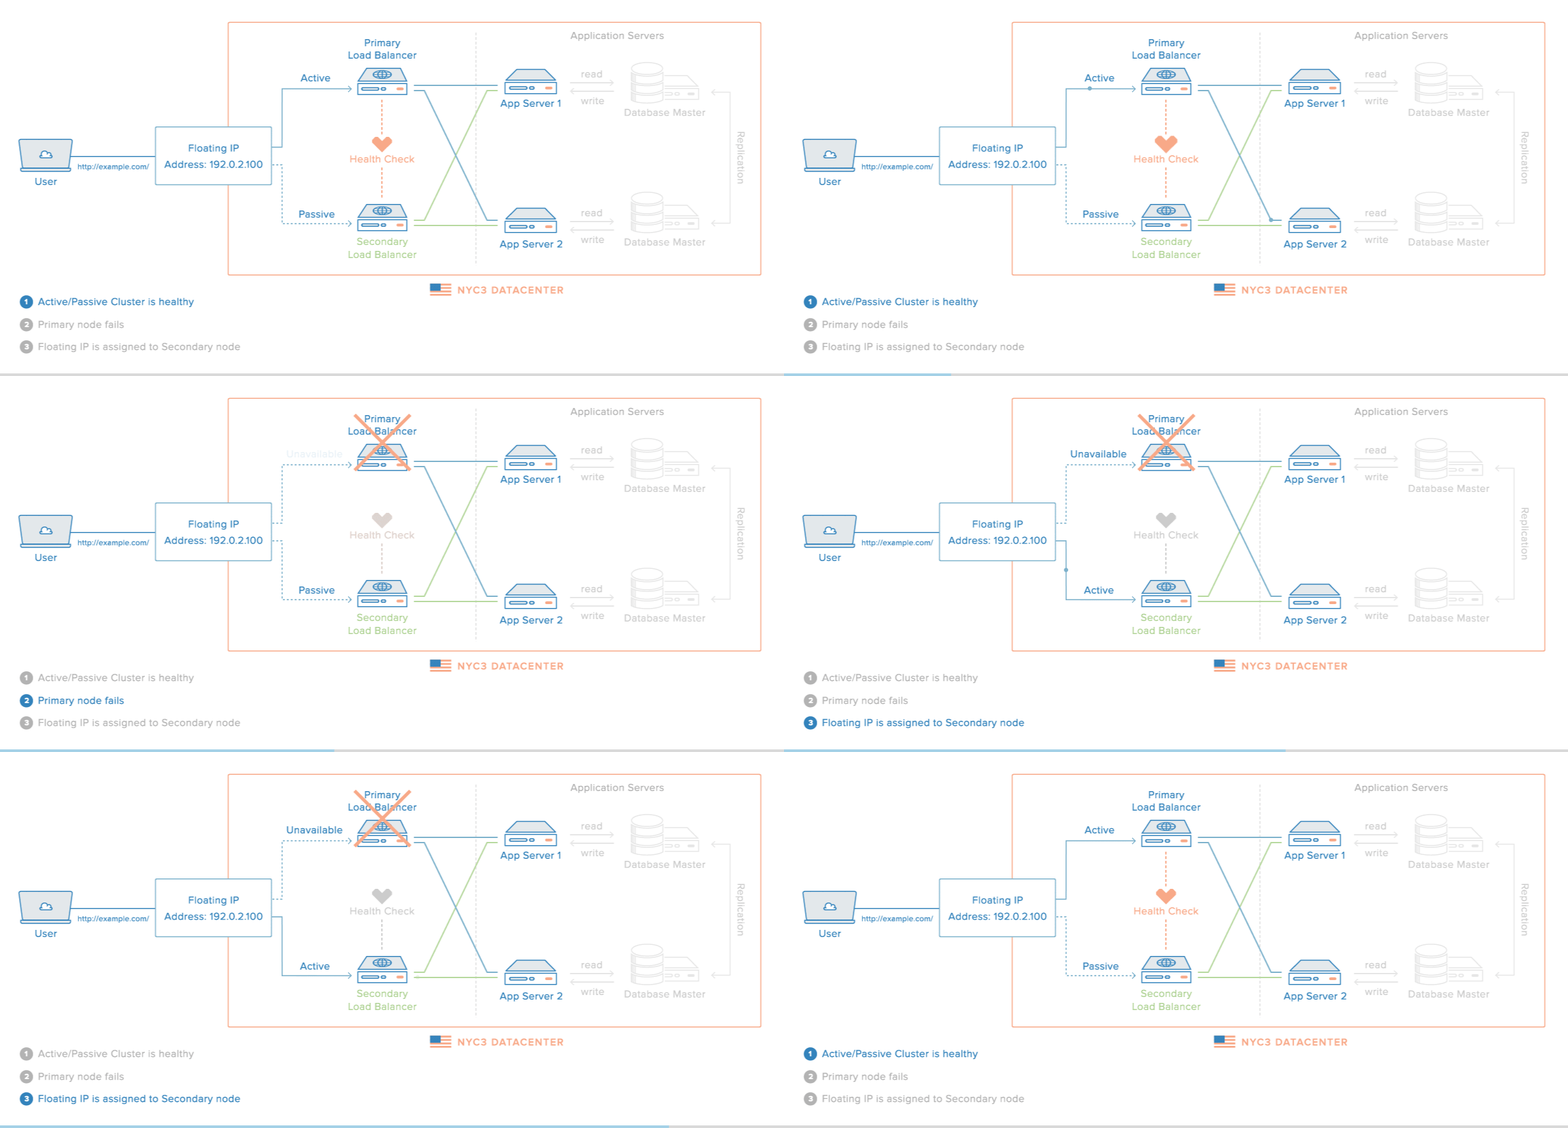
When completed, the HA setup will consist of two Ubuntu 14.04 servers in an active/passive configuration. This will be accomplished by pointing a Floating IP, which is how your users will access your services or website, to point to the primary, or active, server unless a failure is detected. In the event that the Heartbeat service detects that the primary server is unavailable, the secondary server will automatically run a script to reassign the Floating IP to itself via the DigitalOcean API. Thus, subsequent network traffic to the Floating IP will be directed to your secondary server, which will act as the active server until the primary server becomes available again (at which point, the primary server will reassign the Floating IP to itself).

ha-diagram-animated

Note: This tutorial only covers setting up active/passive high availability at the gateway level. That is, it includes the Floating IP, and the load balancer servers—Primary and Secondary. Furthermore, for demonstration purposes, instead of configuring reverse-proxy load balancers on each server, we will simply configure them to respond with their respective hostname and public IP address.

To achieve this goal, we will follow these steps:

  • Create 2 Droplets that will receive traffic
  • Create Floating IP and assign it to one of the Droplets
  • Create DNS A record that points to Floating IP (optional)
  • Install Heartbeat on Droplets
  • Configure Heartbeat to Run Floating IP Reassignment Service
  • Create Floating IP Reassignment Service
  • Test failover

Lire la suite…

HowTo: Uninstall MySQL Server in Ubuntu Linux

22/06/2021 Comments off

Source: nixCraft

I‘m a new Ubuntu Linux user and my cloud hosting company installed MySQL server by default. I need to remove it and delete it from my server as I have no use of MySQL server. How can I uninstall MySQL on a Ubuntu based systems?

Typically following Mysql packages are installed on the Debian or Ubuntu Linux systems:

  • mysql-client – The latest version of MySQL database client.
  • mysql-server – The latest version of MySQL database server.
  • mysql-common – MySQL database common files.

How do I uninstall Mysql server?

Just use the apt-get command as follows remove both MySQL server and client in Ubuntu Linux:

sudo apt-get --purge remove mysql-client mysql-server mysql-common
sudo apt-get autoremove

Sample outputs (pay attention to package names):

Reading package lists... Done
Building dependency tree
Reading state information... Done
The following packages were automatically installed and are no longer required:
  linux-headers-3.2.0-31-virtual linux-headers-3.2.0-31
Use 'apt-get autoremove' to remove them.
The following packages will be REMOVED:
  libdbd-mysql-perl* libmysqlclient18* mysql-client* mysql-client-5.5* mysql-common* mysql-server*
  mysql-server-5.5*
0 upgraded, 0 newly installed, 7 to remove and 0 not upgraded.
After this operation, 67.5 MB disk space will be freed.
Do you want to continue [Y/n]? y
(Reading database ... 105097 files and directories currently installed.)
Removing mysql-server ...
Removing mysql-server-5.5 ...
mysql stop/waiting
Purging configuration files for mysql-server-5.5 ...
Removing mysql-client ...
Removing mysql-client-5.5 ...
Removing libdbd-mysql-perl ...
Removing libmysqlclient18 ...
Purging configuration files for libmysqlclient18 ...
Removing mysql-common ...
Purging configuration files for mysql-common ...
dpkg: warning: while removing mysql-common, directory '/etc/mysql' not empty so not removed.
Processing triggers for ureadahead ...
Processing triggers for man-db ...
Processing triggers for libc-bin ...
ldconfig deferred processing now taking place

Delete /etc/mysql/ directory using rm command:
$ sudo rm -rf /etc/mysql/

Understanding apt-get command options

  • --purge : Remove given packages and config files.
  • remove : Uninstall packages.
  • autoremove : Force to remove packages that were automatically installed to satisfy dependencies for other packages and are now no longer needed.