Archive

Articles taggués ‘database’

How to Optimize MySQL Tables and Defragment to Recover Space

16/11/2023 Comments off

MySQL OPTIMIZE TABLE command

If your application is performing lot of deletes and updates on MySQL database, then there is a high possibility that your MySQL data files are fragmented.

This will result in lot of unused space, and also might affect performance.

So, it is highly recommended that you defrag your MySQL tables on an ongoing basis.

This tutorial explains how to optimize MySQL to defrag tables and reclaim unused space.

1. Identify Tables for Optimization

The first step is to identify whether you have fragmentation on your MySQL database.

Connect to your MySQL database, and execute the following query, which will display how much unused space are available in every table.

mysql> use thegeekstuff;

mysql> select table_name,
round(data_length/1024/1024) as data_length_mb, 
round(data_free/1024/1024) as data_free_mb 
 from information_schema.tables 
 where round(data_free/1024/1024) > 500 
 order by data_free_mb;

+------------+----------------+--------------+
| table_name | data_length_mb | data_free_mb |
+------------+----------------+--------------+
| BENEFITS   |           7743 |         4775 |
| DEPARTMENT |          14295 |        13315 |
| EMPLOYEE   |          21633 |        19834 |
+------------+----------------+--------------+

In the above output:

  • This will display list of all tables that has minimum of 500MB of unused space. As we see above, in this example, there are 3 tables that has more than 500MB of unused space.
  • data_length_mb column displays the total table size in MB. For example, EMPLOYEE table size is around 21GB.
  • data_free_mb column displays the total unused space in that particular table. For example, EMPLOYEE table has around 19GB of unused space in it.
  • All these three tables (EMPLOYEE, DEPARTMENT AND BENEFITS) are heavily fragmented and it needs to be optimized to reclaim the unused space.

From the filesystem level, you can see the size of the individual table files as shown below.

The file size will be the same as what you see under “data_length_mb” column in the above output.

# ls -lh /var/lib/mysql/thegeekstuff/
..
-rw-rw----. 1 mysql mysql  7.6G Apr 23 10:55 BENEFITS.MYD
-rw-rw----. 1 mysql mysql   14G Apr 23 12:53 DEPARTMENT.MYD
-rw-rw----. 1 mysql mysql   22G Apr 23 12:03 EMPLOYEE.MYD
..

In this example, the EMPLOYEE.MYD file is taking up around 22GB at the filesystem level, but it has lot of unused space in it. If we optimize this table, the size of this file should go down dramatically.
Lire la suite…

How to enable SSL for MySQL server and client with ssh

14/11/2023 Comments off

MySQL secure SSH

When users want to have a secure connection to their MySQL server, they often rely on VPN or SSH tunnels. Yet another option for securing MySQL connections is to enable SSL wrapper on an MySQL server. Each of these approaches has its own pros and cons. For example, in highly dynamic environments where a lot of short-lived MySQL connections occur, VPN or SSH tunnels may be a better choice than SSL as the latter involves expensive per-connection SSL handshake computation. On the other hand, for those applications with relatively few long-running MySQL connections, SSL based encryption can be reasonable. Since MySQL server already comes with built-in SSL support, you do not need to implement a separate security layer like VPN or SSH tunnel, which has their own maintenance overhead.

The implementation of SSL in an MySQL server encrypts all data going back and forth between a server and a client, thereby preventing potential eavesdropping or data sniffing in wide area networks or within data centers. In addition, SSL also provides identify verification by means of SSL certificates, which can protect users against possible phishing attacks.

In this article, we will show you how to enable SSL on MySQL server. Note that the same procedure is also applicable to MariaDB server.

Creating Server SSL Certificate and Private Key

We have to create an SSL certificate and private key for an MySQL server, which will be used when connecting to the server over SSL.

First, create a temporary working directory where we will keep the key and certificate files.

$ sudo mkdir ~/cert
$ cd ~/cert

Make sure that OpenSSL is installed on your system where an MySQL server is running. Normally all Linux distributions have OpenSSL installed by default. To check if OpenSSL is installed, use the following command.

$ openssl version
OpenSSL 1.0.1f 6 Jan 2014

Now go ahead and create the CA private key and certificate. The following commands will create ca-key.pem and ca-cert.pem.

$ openssl genrsa 2048 > ca-key.pem
$ openssl req -sha1 -new -x509 -nodes -days 3650 -key ca-key.pem > ca-cert.pem

The second command will ask you several questions. It does not matter what you put in these field. Just fill out those fields.

The next step is to create a private key for the server.

$ openssl req -sha1 -newkey rsa:2048 -days 730 -nodes -keyout server-key.pem > server-req.pem

This command will ask several questions again, and you can put the same answers which you have provided in the previous step.

Next, export the server’s private key to RSA-type key with this command below.

$ openssl rsa -in server-key.pem -out server-key.pem

Finally, generate a server certificate using the CA certificate.

$ openssl x509 -sha1 -req -in server-req.pem -days 730 -CA ca-cert.pem -CAkey ca-key.pem -set_serial 01 > server-cert.pem

Lire la suite…

How to replicate a MySQL database on Linux

13/11/2023 Comments off

Database replication is a technique where a given database is copied to one or more locations, so that the reliability, fault-tolerance or accessibility of the database can be improved. Replication can be snapshot-based (where entire data is simply copied over to another location), merge-based (where two or more databases are merged into one), or transaction-based (where data updates are periodically applied from master to slaves).

How to replicate a MySQL database on Linux

MySQL replication is considered as transactional replication. To implement MySQL replication, the master keeps a log of all database updates that have been performed. The slave(s) then connect to the master, read individual log entries, and perform recorded updates. Besides maintaining a transaction log, the master performs various housekeeping tasks, such as log rotation and access control.

When new transactions occur and get logged on the master server, the slaves commit the same transactions on their copy of the master database, and update their position in the master server’s transaction log. This master-to-slave replication process is done asynchronously, which means that the master server doesn’t have to wait for the slaves to catch up. If the slaves are unable to connect to the master for a period of time, they will download and execute all pending transactions when connectivity is re-established.

Database replication allows one to have an exact copy of a live database of a master server at another remote server (slave server) without taking the master server offline. In case the master server is down or having any trouble, one can temporarily point database clients or DNS resolver to the slave server’s IP address, achieving transparent failover. It is must be noted that MySQL replication is not a backup solution. For example, if an unintended DELETE command gets executed in the master server by accident, the same transaction will mess up all slave servers.

In this article, we will demonstrate master-slave based MySQL replication on two Linux computers. Let’s assume that the IP addresses of master/slave servers are 192.168.2.1 and 192.168.2.2, respectively.

Setting up a Master MySQL Server

This part will explain the steps needed on the master server. First, log in to MySQL, and create test_repl database.

$ mysql -u root -p
mysql> CREATE DATABASE test_repl;

Next, create a table inside test_repl database, and insert three sample records.

mysql> USE test_repl;
mysql> CREATE TABLE employee (EmployeeID int, LastName varchar(255), FirstName varchar(255), Address varchar(255), City varchar(255));
mysql> INSERT INTO employee VALUES(1,"LastName1","FirstName1","Address1","City1"),(2,"Lastname2","FirstName2","Address2","City2"),(3,"LastName3","FirstName3","Address3","City4");

After exiting the MySQL server, edit my.cnf file using your favorite text editor. my.cnf is found under /etc, or /etc/mysql directory.

# nano /etc/my.cnf

Add the following lines under [mysqld] section.

[mysqld]
server-id=1
log-bin=master-bin.log
binlog-do-db=test_repl
innodb_flush_log_at_trx_commit=1
sync_binlog=1

The server-id option assigns an integer ID (ranging from 1 to 2^23) to the master server. For simplicity, ID 1 and 2 are assigned to the master server and the slave server, respectively. The master server must enable binary logging (with log-bin option), which will activate the replication. Set the binlog-do-db option to the name of a database which will be replicated to the slave server. The innodb_flush_log_at_trx_commit=1 and sync_binlog=1 options must be enabled for the best possible durability and consistency in replication. After saving the changes in my.cnf, restart mysqld daemon.

# systemctl restart mysqld

or:

# /etc/init.d/mysql restart

Log in to the master MySQL server, and create a new user for a slave server. Then grant replication privileges to the new user.

mysql> CREATE USER [email protected];
mysql> GRANT REPLICATION SLAVE ON *.* TO [email protected] IDENTIFY BY 'repl_user_password';
mysql> FLUSH PRIVILEGES;

A new user for the slave server is repl_user, and its password is repl_user_password. Note that the master MySQL server must not bind to the loopback interface since a remote slave server needs to log in to the master server as repl_user. Check this tutorial to change MySQL server’s binding interface. Finally, check the master server status by executing the following command on the server.

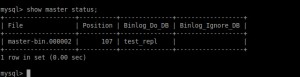
mysql> SHOW MASTER STATUS;

Please note that the first and second columns (e.g., master-bin.000002 and 107) will be used by the slave server to perform master-to-slave replication.

Lire la suite…

Réplication MySql avec PhpMyAdmin sur 2 serveurs distincts

12/11/2023 Comments off

Source: Tutoriels Web Linux MySql

I : sur le serveur Maître, configurez la réplication comme suit :

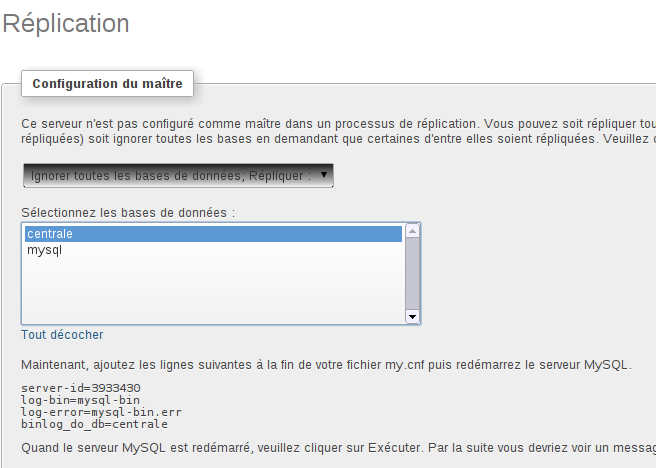
  • Dans l’onglet réplication, choisissez l’option configurer le serveur maître.

Capture1

Editer le fichier /etc/mysql/my.cnf

  • Redémarrez mysql : /etc/init.d/mysql restart
  • Puis faites exécuter dans phpMyAdmin
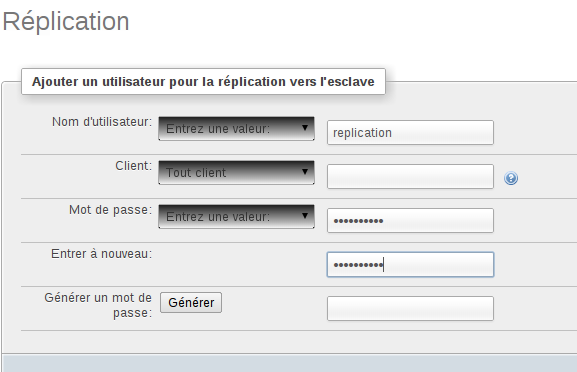
  • Ajouter un nouvel utilisateur pour la réplication et donner lui tous les privilèges nécessaires

Capture2

CREATE USER ‘replicant’@'localhost’ IDENTIFIED BY ‘***’;
GRANT REPLICATION SLAVE , REPLICATION CLIENT ON * . * TO ‘replicant’@'localhost’ IDENTIFIED BY ‘***’;

II : sur le serveur esclave, configurez la réplication comme suit :

  • Dans l’onglet réplication, configurez :
  • Vous devrez ajouter le server-id proposé par phpMyAdmin dans /etc/mysql/my.cnf et redémarrez mysql (pensez à ajouter slave-skip-errors=1062,1053 !)
  • puis faire éxécuter dans phpMyAdmin
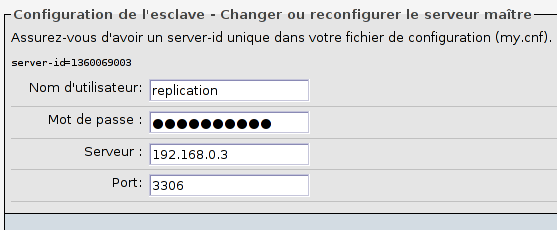
  • Faites reconfigurer le serveur maître en saisissant les informations du serveur maître

Capture0

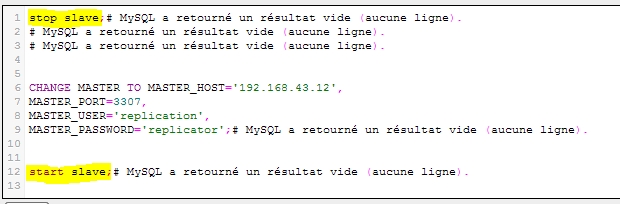
Ceci revient à faire en ligne de commande : et qui éditera au final le fichier master.info qui se trouve sur le serveur esclave :

Capture17

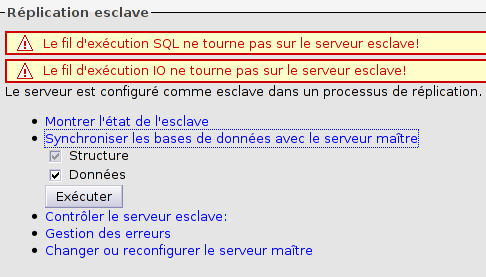
  • On obtient alors cet écran :

Capture3


On pourra synchroniser les données afin de copier toute la base de données vers le serveur esclave et ensuite démarrer complètement le serveur esclave (ce qui correspond à démarrer d’abord le fil I/O qui lit les requêtes du maître et le splace dans le relay-lo et ensuite le fil mysql qui lit le relay-log et éxécute le sql).

Lire la suite…

MySQL Performance Tuning Scripts and Know-How

12/11/2023 Comments off

mysql performance tuningUnless you are a MySQL performance tuning expert, it can be enormously challenging and somewhat overwhelming to locate and eliminate MySQL bottlenecks. While many DBAs focus on improving the performance of the queries themselves, this post will focus on the highest-impact non-query items: MySQL Server Performance and OS Performance for MySQL.

MySQL Performance Tuning

This post is a « best-of » compilation of the tricks and scripts I have found to be the most effective over the past decade. I’d like to write a 50 page article but am limiting this to 1 page.

For anyone serious about High Performance MySQL, I would highly highly recommend the fantastic book: « High Performance MySQL: Optimization, Backups, Replication, and more » – O’Reilly. I have spent many hours poring over it’s wisdom-filled pages and gaining much practical know-how.


MySQL Server Software

Each new MySQL server release contains ENORMOUS performance enhancements over previous versions. That is the absolute very first thing you should do: Upgrade your MySQL Server and Client libraries and keep them updated.

There are several « flavors » of MySQL believe it or not.. Most people use the stock MySQL Server. I, along with WikiPedia, Arch-Linux, and others, use MariaDB. MariaDB is a greatly enhanced 100% compatible replacement for the stock MySQL Server. It is based on the excellent work by the Percona project. The percona flavor of MySQL is the other truly improved version of MySQL to consider. I personally have spent a couple years using Percona, then I upgraded from Percona to MariaDB (which has a lot of Percona juju built in) and am no longer thinking about which version to go with. MariaDB is the bomb-diggity.

MySQL Engine

InnoDB not MyISAM. InnoDB may be surpassed by in-development engines like TokuDB. I ONLY use InnoDB, for everything.

Types of MySQL Servers to optimize

Seriously? Optimize EVERYTHING! The screenshots below are actual from one of my live servers. That server used to be 8GB RAM, but now as you may see in the screenshots, it is now only 2GB of RAM. I was able to save some serious $$$ by optimizing my server, without sacrificing speed… In fact I gained some speed in many instances.

I’ve used these optimization techniques on monster servers with 32GB of ram and many slaves, and also on a machine with 1GB of ram (running arch-linux).

Lire la suite…