Don’t like iOS 11 on your iPhone or iPad? You can downgrade to iOS 10.3.3 if you act quickly. Maybe you don’t like the update, maybe you find iOS 11 battery life to be poor, or app compatibility to be a problem, or perhaps you think the performance is subpar. Whatever the reason, you can easily downgrade iOS 11 if you need to, but the ability to downgrade is only available for a limited time while Apple continues to sign the prior operating system release of iOS 10.3.3.
We’ll walk through how you can downgrade iOS 11 back to iOS 10 on an iPhone or iPad.
This guide requires iTunes and a computer, internet access, an iOS 10.3.3 ISPW file, and a USB cable. There is no way to downgrade iOS 11 without iTunes and a computer.
Important note: downgrading iOS 11 to iOS 10.3.3 can cause data loss, including the removal of important data or everything on your iPhone or iPad. Thus it is critical to have a backup that is compatible with iOS 10 available before downgrading (one should have been made prior to updating to iOS 11 in the first place), this is because iOS 11 backups are not compatible with iOS 10 or other prior releases. If you only have a backup for iOS 11, then downgrading to iOS 10 may require you to update again to iOS 11 in order to restore from that iOS 11 backup. If you don’t know what you are doing and do not have adequate backups, do not attempt to downgrade or you may experience permanent data loss on the iPhone or iPad.
We’ll cover two ways to downgrade, a simple way that should work for most users, and an approach that requires Recovery Mode if the first downgrade method fails.
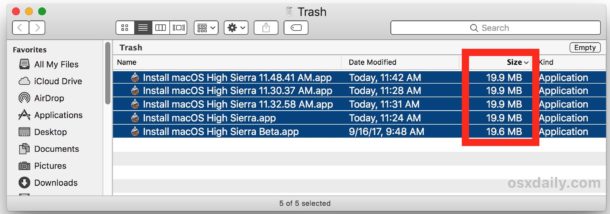
Many Mac users who are attempting to download macOS High Sierra from the Mac App Store will find that a small 19 MB version of “Install macOS High Sierra.app” downloads to the /Applications folder of the target Mac, rather than the complete 5.2 GB Installer application for macOS High Sierra. This is annoying because it prevents a single download from being used on multiple computers, plus the small installer requires an internet connection during usage to download the rest of the High Sierra update files. Additionally, the tiny 19 MB incomplete installer prevents users from being able to create a macOS High Sierra USB installer drive or other custom update options available through the command line, like skipping the APFS update.
This tutorial will show you a workaround trick that allows Mac users to download the full macOS High Sierra “Install macOS High Sierra.app” file at 5.2 GB with the complete installer tool set and all dmg files and associated Install macOS High Sierra.app/Contents/Resources/ tools, rather than the tiny incomplete truncated installer at 19 MB.
How to Download the Full “Install macOS High Sierra.app” Application
Warning: this method relies on a third party tool from an unverified third party source, if you are not comfortable with using unvetted and unverified software, and if you do not understand the risks associated with using potentially dubious software, do not follow this process. This is for advanced users only.
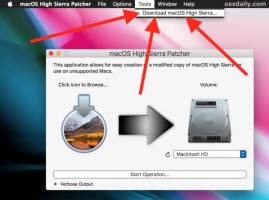
Launch “MacOS High Sierra Patcher” and ignore everything about patching, instead pull down the “Tools” menu and choose “Download MacOS High Sierra”
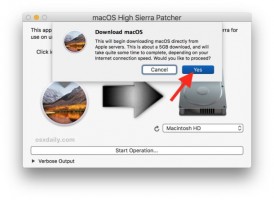
Confirm that you want to download the complete macOS High Sierra install application, and then point it to a location to save on the local hard drive
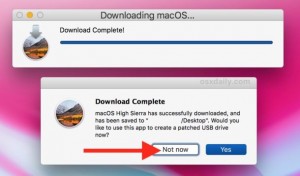
The patcher app will notify you when the download is complete, when it is done downloading quit out of the patcher app
Locate the “Install macOS High Sierra.app” file you downloaded, it will be the complete installer application with the full Contents/Resources/ toolkit available
* The “macOS High Sierra Patcher” application is intended for those with unsupported Macs and Hackintosh users, but any Mac user can use the app to be able to download the complete installer file from Apple servers. The source of this patcher application is a MacRumors Forums
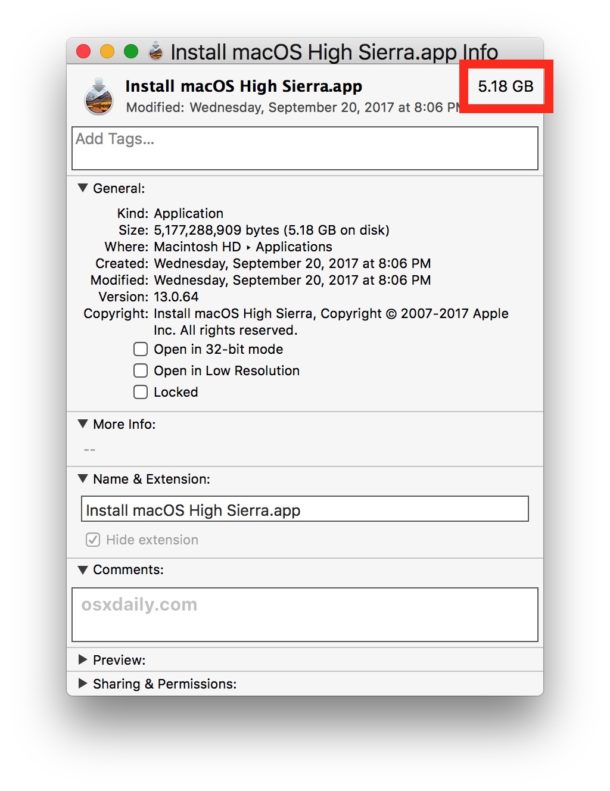
You can confirm that you have the complete Install macOS High Sierra.app application by getting info on the file, the complete installer should be around 5.2 GB rather than the tiny 19 MB incomplete installer that requires additional downloads.
Why do some users get a small incomplete version of macOS High Sierra installer from the App Store?
This is not yet known, but it happens with the final version of macOS High Sierra installer as well as with some of the beta versions.
It is unclear why some users will get a 19MB version of “Install macOS High Sierra.app” when downloaded from the App Store, while others users will get the complete 5.2GB version of “Install macOS High Sierra.app” when downloading from the App Store. Interestingly, once a user ends up with the 19 MB version of the incomplete installer, that seems to be the only thing that will download for that user regardless of how many times the incomplete installer app is deleted and re downloaded.
The installer size and completeness inconsistency appears random, and has no relation to disk space, beta enrollment, software catalog, and other theories seem to be incorrect as well.
Auto-Brightness is a screen setting on the iPhone and iPad which causes the device to automatically adjust the display brightness depending on ambient lighting conditions. For example, if you’re outdoors or in bright lighting, the screen would adjust to be brighter so that it is more visible, and if you’re in a dim room or outdoors at night, the screen would adjust to lower the brightness so that the screen isn’t as glaringly bright. Auto-brightness in iOS also can improve battery life by adjusting the brightness of the iPhone or iPad display down as the ambient lighting permits.
Advanced Mac users may find it useful to run macOS or Mac OS X in a virtual machine atop their existing Mac operating system. Creating a virtual machine for Mac OS is now easier than ever before, and we’ll show you how to set up easy Mac virtual machines on a Mac.
For some quick background, virtualization allows you to run another operating system in a confined virtual machine atop an existing operating system through an application layer. This means there is no disk partitioning involved, the virtualized operating system runs just like any other application on your computer. We have covered this broad topic many times before for purposes like running Windows 10 on a Mac with a VM, to running Ubuntu Linux in VirtualBox, to Snow Leopard in a VM, and others. In the guide here, we will be creating a Macintosh virtual machine for running Mac OS on top of Mac OS, which can be helpful for testing out different apps and operating system versions, amongst other purposes.
Apple uses its App Store to distribute its software, like new Mac operating systems. It’s convenient, but sometimes it can take a while for a download to finish. And if you have multiple Macs, it’s inefficient to download the new OS to each and every Mac.
That’s why I like to make a bootable external drive for the sole purpose of installing the Mac operating system. When I need to tend to a bunch of Macs, it’s much faster to use a bootable drive instead of going to each Mac, launching the App Store, searching for the operating system, downloading it (after entering my Apple ID), and then running the installer.
You can create a bootable USB flash drive with the macOS Sierra installer that’s now available. The installer software will take up nearly 5GB of storage space. Here’s how to create a bootable macOS Sierra installer drive.
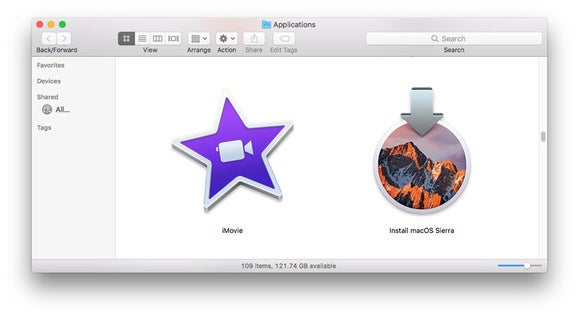
Launch the App Store app, then look for macOS Sierra in the store. (Here’s a link.) Click on the Download button, and your Mac will download the installer to your Applications folder. If it automatically launches after download, quit the installer.
Keep the installer in the Applications folder.
If you’ve already upgraded your Mac to Sierra, the installer is removed from the Applications folder. You can download it again if you go to Purchased in the App Store. Look for macOS Sierra in the list of apps that you’ve bought, and click on the Download button. If it automatically launches after download, quit the installer.