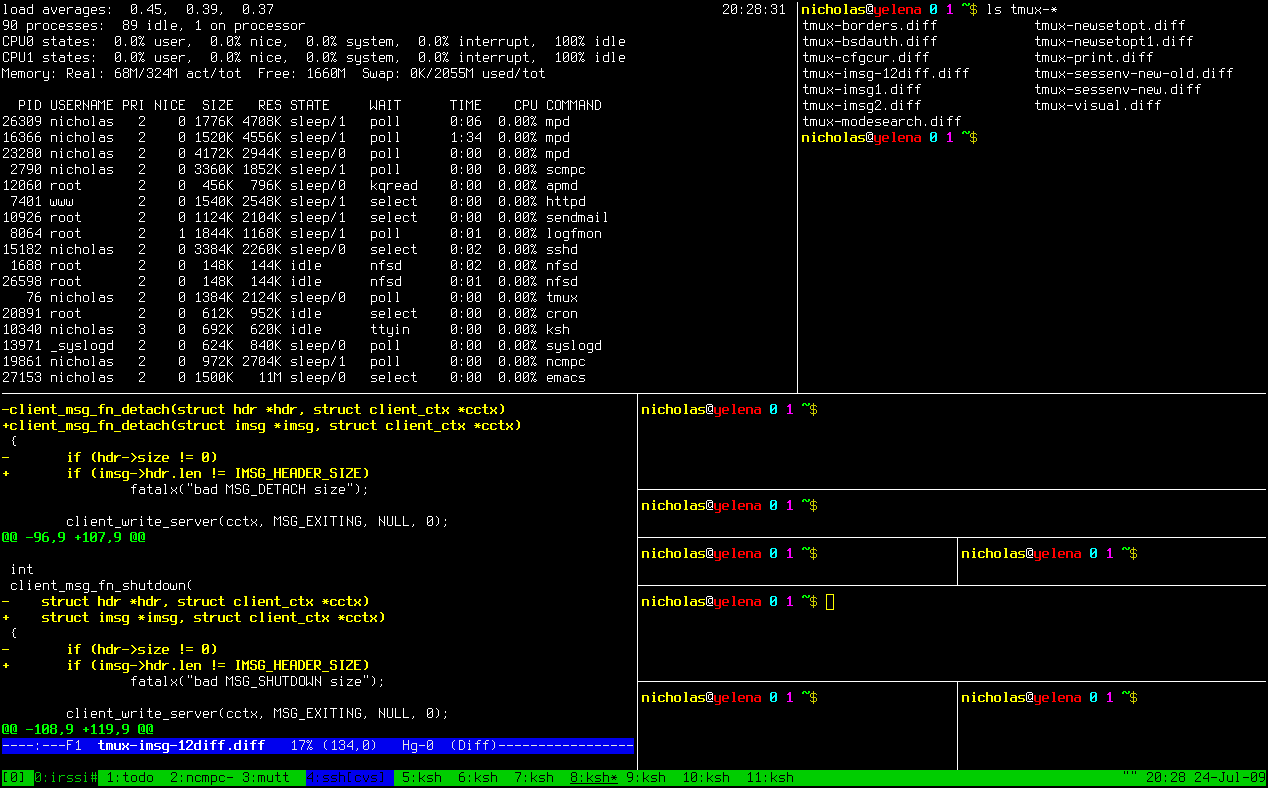
Tmux, à l’instar de Screen, est un multiplexeur de terminaux, outil permettant d’exploiter plusieurs terminaux au sein d’un seul et même affichage.
Installation
Tmux n’est pas installé par défaut. Pour l’installer à l’aide d’un utilitaire graphique il suffit d’Installer le paquetstmux. Par l’installer avec apt-get depuis un terminal, il suffit de saisir la commande suivante :
Many system administrators seem to have problems with the concepts of pipes and redirection in a shell. A coworker recently asked me how to deal with log files. How to find the information he was looking for. This article tries to shed some light on it.
Input / Output of shell commands
Many of the basic Linux/UNIX shell commands work in a similar way. Every command that you start from the shell gets three channels assigned:
STDIN (channel 0): Where your command draws the input from. If you don’t specify anything special this will be your keyboard input.
STDOUT (channel 1): Where your command’s output is sent to. If you don’t specify anything special the output is displayed in your shell.
STDERR (channel 2): If anything wrong happens the command will send error message here. By default the output is also displayed in your shell.
Try it yourself. The most basic command that just passes everything through from STDIN to STDOUT is the ‘cat’ command. Just open a shell and type ‘cat’ and press Enter. Nothing seems to happen. But actually ‘cat’ is waiting for input. Type something like “hello world”. Every time you press ‘Enter’ after a line ‘cat’ will output your input. So you will get an echo of everything you type. To let ‘cat’ know that you are done with the input send it an ‘end-of-file’ (EOF) signal by pressing Ctrl-D on an empty line.
The pipe(line)
A more interesting application of the STDIN/STDOUT is to chain commands together. The output of the first command becomes the input of the second command. Imagine the following chain:
The contents of the file /var/log/syslog are sent (as input) to the grep command. grep will filter the stream for lines containing the word ‘postfix’ and output that. Now the next grep picks up what was filtered and filter it further for the word ‘removed’. So now we have only lines containing both ‘postfix’ and ‘removed’. And finally these lines are sent to ‘wc -l’ which is a shell command counting the lines of some input. In my case it found 27 of such lines and printed that number to my shell. In shell syntax this reads:
The ‘|’ character is called pipe. A sequence of such commands joined together with pipes are called pipeline.
Useless use of ‘cat’
Actually ‘cat’ is supposed to be used for concatenating files. Like “cat file1 file2”. But some administrators abuse the command to put something into a pipeline. That’s bad style and the reason why Randal L. Schwartz (a seasoned programmer) used to hand out virtual “Useless use of cat” awards. Shell commands usually can take a filename as the last argument as an input. So this would be right:
grep something /var/log/syslog | wc -l
While this works but is considered bad style:
cat /var/log/syslog | grep something | wc
Or if you knew that grep even has a “-c” option to count lines the whole task could be done with just grep:
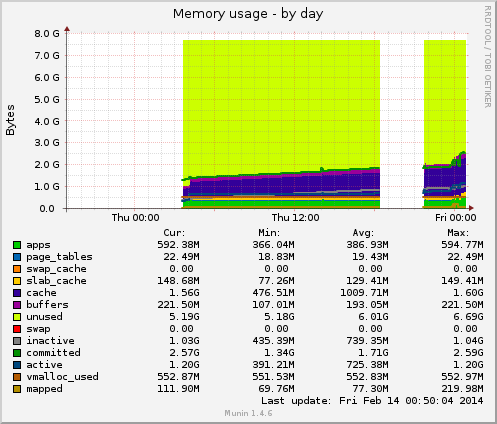
Graphs are added and removed via symlinks in the /etc/munin/plugins/ directory of the node.
To remove a graph you must remove the symlink and restart the node:
rm /etc/munin/plugins/diskstats
service munin-node restart
To add a graph you must add a symlink in the plugins directory to an executable. eg:
ln -s /usr/share/munin/plugins/diskstats /etc/munin/plugins/diskstats
service munin-node restart
When you restart munin-node it runs immediately and any issues with the plugins appears in /var/log/munin/munin-node.log. If all is going well you’ll see a CONNECT logged every cycle; this records the fact that the master connected to collect the latest data.
Process Backgrounded
2014/03/10-15:59:47 Munin::Node::Server (type Net::Server::Fork) starting! pid(32231)
Resolved [*]:4949 to [::]:4949, IPv6
Not including resolved host [0.0.0.0] IPv4 because it will be handled by [::] IPv6
Binding to TCP port 4949 on host :: with IPv6
2014/03/10-16:00:04 CONNECT TCP Peer: "[::ffff:203.28.51.227]:45965" Local: "[::ffff:50.23.111.122]:4949"
2014/03/10-16:05:04 CONNECT TCP Peer: "[::ffff:203.28.51.227]:46109" Local: "[::ffff:50.23.111.122]:4949"
2014/03/10-16:10:04 CONNECT TCP Peer: "[::ffff:203.28.51.227]:46109" Local: "[::ffff:50.23.111.122]:4949"
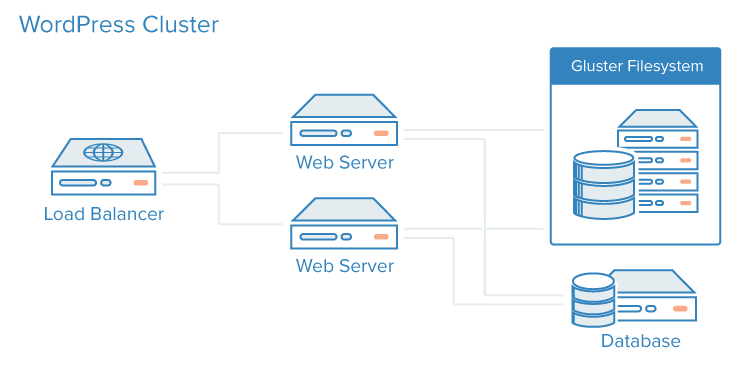
In this guide we will create and deploy a scalable WordPress instance consisting of a MySQL database server, a GlusterFS distributed filesystem, Nginx web servers and an Nginx load balancer. By using user-data and droplet meta-data we will automate the deployment of our site. Finally we will provide a Ruby script which will automate this entire process and ease the creation of scalable WordPress sites. Through this tutorial you will learn about the power and flexibility of user-data and droplet meta-data in deploying services on DigitalOcean.
Step One – Planning our Deployment
The deployment we create in this tutorial will consist of a single MySQL database server, multiple GlusterFS servers in a cluster, multiple Nginx web servers and a single Nginx load balancer.
Before we begin we should know:
What size droplet we will use for our MySQL server
How many GlusterFS nodes we will create
What size our GlusterFS nodes will be
How many web server nodes we will need
What size droplets we will use for our web servers
What size droplet we will use for our load balancer
The domain name we will use for our new site
We can add additional nodes or scale up the nodes we created if we need to later. Once we have decided on these details we can begin deploying our site.
Q. Can you explain how to setup network parameters such as IP address, subnet, dhcp etc using /etc/network/interfaces file?
A. /etc/network/interfaces file contains network interface configuration information for the both Ubuntu and Debian Linux. This is where you configure how your system is connected to the network.
Defining physical interfaces such as eth0
Lines beginning with the word « auto » are used to identify the physical interfaces to be brought up when ifup is run with the -a option. (This option is used by the system boot scripts.) Physical interface names should follow the word « auto » on the same line. There can be multiple « auto » stanzas. ifup brings the named inter faces up in the order listed. For example following example setup eth0 (first network interface card) with 192.168.1.5 IP address and gateway (router) to 192.168.1.254:
 , à l’instar de Screen, est un multiplexeur de terminaux, outil permettant d’exploiter plusieurs terminaux au sein d’un seul et même affichage.