How to Backup Linux? 15 rsync Command Examples

30/10/2023 Categories: Réseau, Système Tags: , Comments off

rsync stands for remote sync.

rsync is used to perform the backup operation in UNIX / Linux.

rsync utility is used to synchronize the files and directories from one location to another in an effective way. Backup location could be on local server or on remote server.

Important features of rsync

  • Speed: First time, rsync replicates the whole content between the source and destination directories. Next time, rsync transfers only the changed blocks or bytes to the destination location, which makes the transfer really fast.
  • Security: rsync allows encryption of data using ssh protocol during transfer.
  • Less Bandwidth: rsync uses compression and decompression of data block by block at the sending and receiving end respectively. So the bandwidth used by rsync will be always less compared to other file transfer protocols.
  • Privileges: No special privileges are required to install and execute rsync

Syntax

$ rsync options source destination

Source and destination could be either local or remote. In case of remote, specify the login name, remote server name and location.

Example 1. Synchronize Two Directories in a Local Server

To sync two directories in a local computer, use the following rsync -zvr command.

$ rsync -zvr /var/opt/installation/inventory/ /root/temp
building file list ... done
sva.xml
svB.xml
.
sent 26385 bytes  received 1098 bytes  54966.00 bytes/sec
total size is 44867  speedup is 1.63
$

In the above rsync example:

  • -z is to enable compression
  • -v verbose
  • -r indicates recursive

Now let us see the timestamp on one of the files that was copied from source to destination. As you see below, rsync didn’t preserve timestamps during sync.

$ ls -l /var/opt/installation/inventory/sva.xml /root/temp/sva.xml
-r--r--r-- 1 bin  bin  949 Jun 18  2009 /var/opt/installation/inventory/sva.xml
-r--r--r-- 1 root bin  949 Sep  2  2009 /root/temp/sva.xml

Example 2. Preserve timestamps during Sync using rsync -a

rsync option -a indicates archive mode. -a option does the following,

  • Recursive mode
  • Preserves symbolic links
  • Preserves permissions
  • Preserves timestamp
  • Preserves owner and group

Now, executing the same command provided in example 1 (But with the rsync option -a) as shown below:

$ rsync -azv /var/opt/installation/inventory/ /root/temp/
building file list ... done
./
sva.xml
svB.xml
.
sent 26499 bytes  received 1104 bytes  55206.00 bytes/sec
total size is 44867  speedup is 1.63
$

As you see below, rsync preserved timestamps during sync.

$ ls -l /var/opt/installation/inventory/sva.xml /root/temp/sva.xml
-r--r--r-- 1 root  bin  949 Jun 18  2009 /var/opt/installation/inventory/sva.xml
-r--r--r-- 1 root  bin  949 Jun 18  2009 /root/temp/sva.xml

Lire la suite…

Categories: Réseau, Système Tags: ,

Mass-blocking IP addresses with ipset

30/10/2023 Categories: Réseau, Sécurité Tags: , , , Comments off

Using ipset to block many IP addresses

I was sponsoring an upload of ipset to Debian the other day. This reminded me of ipset, a very cool program as I am going to show. It makes administering related netfilter (that is: firewall) rules easy along with a good performance. This is achieved by changing how rules match in iptables. Traditionally, an iptables rule matches a single network identity, for example a single IP address or a single network only. With ipsets you can operate on a bunch of (otherwise unrelated) addresses at once easily. If you happen to need bulk actions in your firewall, for example you want to blacklist a long list of IP addresses at once, you will love IP sets. I promise.

Drawbacks of netfilter

IP sets do exist for a longer time, however they made it into the upstream Linux kernel as of version 2.6.39. That means Debian Wheezy will support it as is; for Debian Squeeze you can either use a backported kernel or compile yourself the module shipped in the ipset-source package. In any case you additionally need the command line utilities named ipset. Thus, install that package before you can start. Having that said, Squeeze users should note the ipset syntax I am demonstrating below slightly differs from the syntax supported by the Squeeze utilities. The big picture remains the same, though.

IP utils do not conflict with iptables, but extend it in a useful way. You can combine both as you like. In fact, you still need iptables to turn IP sets into something really useful. Nonetheless you will be hitting iptables‘ limitation soon if you exceed a certain number of rules. You can combine as many conditions within a filter rule as you like, however you can only specify a single pattern for each condition. You figure, this does not scale very well if a pattern to match against does not follow a very tight definition such as a CIDR pattern.

This means you can happily filter whole network blocks such as 192.168.0.0/24 (which translates to 255 hosts) in iptables, but there is no way to specify a particular not specially connected set of IP addresses within this range if it cannot be expressed with a CIDR prefix. For example, there is no way to block, say, 192.168.0.5, 192.168.0.100 and 192.168.0.220 in a single statement only. You really need to declare three rules which only differ by the IP address. Pretend, you want to prevent these three addresses from accessing your host. You would probably do something like this:

iptables -A INPUT -s 192.168.0.5 -p TCP -j REJECT
iptables -A INPUT -s 192.168.0.100 -p TCP -j REJECT
iptables -A INPUT -s 192.168.0.220 -p TCP -j REJECT

Alternatively you could do

iptables -A INPUT -s 192.168.0.0/24 -p TCP -j REJECT

but this would block 251 unrelated hosts, too. Not a good deal I’d say. Now, while the former alternative is annoying, what’s the problem with it? The problem is: It does not scale. Netfilter rules work like a fall-through trapdoor. This means whenever a packet enters the system, it passes through several chains and in each of these chains, netfilter checks all rules until either one rule matches or there are no rules left. In the latter case the default action applies. In netfilter terminology a chain determines when an interception to the regular packet flow occurs. In the example above the specified chain is INPUT, which applies to any incoming packet.

In the end this means every single packet which is sent to your host needs to be checked whether it matches the patterns specified in every rule of yours. And believe me, in a server setup, there are lots of packets flowing to your machine. Consider for example a single HTTP requests, which requires at very least four packets sent from a client machine to your web server. Thus, each of these packets is passing through your rules in your INPUT chain as a bare minimum, before it is eventually accepted or discarded.

This requires a substantial computing overhead for every rule you are adding to your system. This isn’t so much of a problem if you haven’t many rules (for some values of “many” as I am going to show). However, you may end up in a situation where you end up with a large rule set. For example, if you suffer from a DDoS attack, you may be tempted to block drone clients in your firewall (German; Apache2. Likewise: for Lighttpd). In such a situation you will need to add thousands of rules easily.

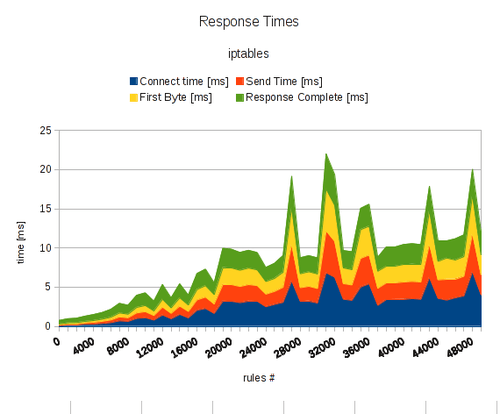
Being under attack, the performance of your server is poor already. However, by adding many rules to your firewall you are actually further increasing computing overhead for every request significantly. To illustrate my point, I’ve made some benchmarks. Below you find the response times of a HTTP web server while doing sequential requests for a single file of 10 KiB in size. I am explaining my measurement method in detail further below. For now, look the graph. It shows the average response time of an Apache 2 web server, divided into four parts:

  • connect time: this is the time passed by until the server completed the initial TCP handshake
  • send time: this is the time passed by which I needed to reliably send a HTTP request over the established TCP connection reliably (that means: one packet sent and waiting for acknowledged by the server)
  • first byte: this is time passed by until the server sent the first byte from the corresponding HTTP response
  • response complete: this is time passed by until the server sent all of the remaining bytes of the corresponding HTTP response (remaining HTTP header + 10 KiB of payload)
ipset2

Lire la suite…

MySQL: Setting Account Resource Limits

29/10/2023 Categories: Bases de données Tags: , , Comments off

mysql account resource limitsOne means of restricting client use of MySQL server resources is to set the global max_user_connections system variable to a nonzero value. This limits the number of simultaneous connections that can be made by any given account, but places no limits on what a client can do once connected. In addition, settingmax_user_connections does not enable management of individual accounts. Both types of control are of interest to MySQL administrators.

To address such concerns, MySQL permits limits for individual accounts on use of these server resources:

  • The number of queries an account can issue per hour
  • The number of updates an account can issue per hour
  • The number of times an account can connect to the server per hour
  • The number of simultaneous connections to the server by an account

Any statement that a client can issue counts against the query limit, unless its results are served from the query cache. Only statements that modify databases or tables count against the update limit.

An “account” in this context corresponds to a row in the mysql.user table. That is, a connection is assessed against the User and Host values in the user table row that applies to the connection. For example, an account 'usera'@'%.example.com' corresponds to a row in the user table that has User and Host values of usera and %.example.com, to permit usera to connect from any host in the example.com domain. In this case, the server applies resource limits in this row collectively to all connections by usera from any host in the example.com domain because all such connections use the same account.

Before MySQL 5.0.3, an “account” was assessed against the actual host from which a user connects. This older method of accounting may be selected by starting the server with the --old-style-user-limits option. In this case, if usera connects simultaneously from host1.example.com andhost2.example.com, the server applies the account resource limits separately to each connection. If usera connects again from host1.example.com, the server applies the limits for that connection together with the existing connection from that host.

To establish resource limits for an account at account-creation time, use the CREATE USER statement. To modify the limits for an existing account, use ALTER USER. (Before MySQL 5.7.6, use GRANT, for new or existing accounts.) Provide a WITH clause that names each resource to be limited. The default value for each limit is zero (no limit). For example, to create a new account that can access the customer database, but only in a limited fashion, issue these statements:

mysql> CREATE USER 'francis'@'localhost' IDENTIFIED BY 'frank'
    ->     WITH MAX_QUERIES_PER_HOUR 20
    ->          MAX_UPDATES_PER_HOUR 10
    ->          MAX_CONNECTIONS_PER_HOUR 5
    ->          MAX_USER_CONNECTIONS 2;

The limit types need not all be named in the WITH clause, but those named can be present in any order. The value for each per-hour limit should be an integer representing a count per hour. For MAX_USER_CONNECTIONS, the limit is an integer representing the maximum number of simultaneous connections by the account. If this limit is set to zero, the global max_user_connections system variable value determines the number of simultaneous connections. Ifmax_user_connections is also zero, there is no limit for the account.

Lire la suite…

Collect & visualize your logs with Logstash, Elasticsearch & Redis

28/10/2023 Categories: Système Tags: , , , Comments off

Source: michael.bouvy.net

Update of December 6th : although Logstash does the job as a log shipper, you might consider replacing it with Lumberjack / Logstash Forwarder, which needs way less resources, and keep Logstash on your indexer to collect, transform and index your logs data (into ElasticSearch) : check out my latest blog post on the topic.

Kibana_medium

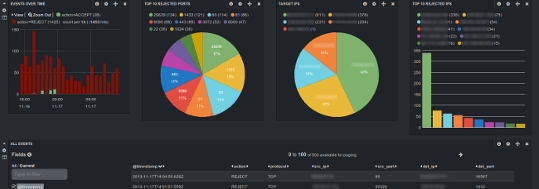
Kibana Dashboard


Even if you manage a single Linux server, you probably already know how hard it is to keep an eye on what’s going on with your server, and especially tracking logs data. And this becomes even worse when you have several (physical or virtual) servers to administrate.


Although Munin is very helpful monitoring various informations from my servers / VMs, I felt the need of something more, and bit less static / more interactive.

There are 3 kind of logs I especially wanted to track :

  • Apache 2 access logs
  • iptables logs
  • Syslogs

After searching arround on the internet for a great tool that would help me, I read about the open source log management tool Logstash which seems to perfectly suit a (major) part of my needs : logs collecting / processing.

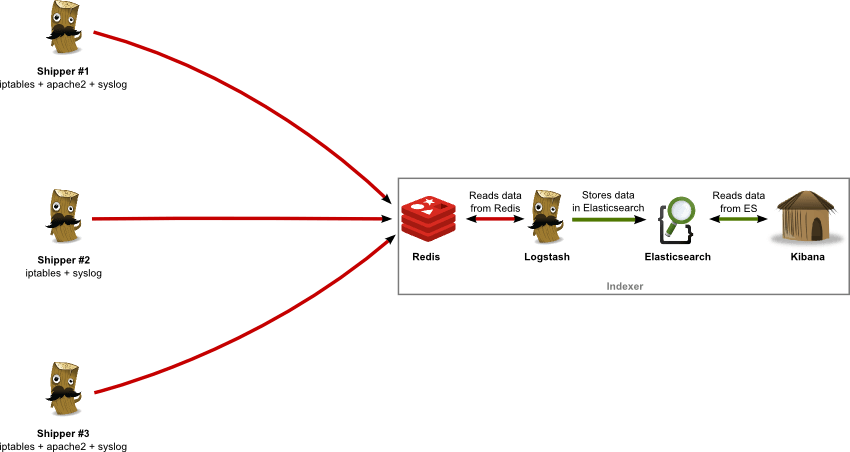
For the purpose of this post, I will take the following network architecture and assume and I want to collect my Apache, iptables, system logs from servers 1/2/3 (“shippers”) on server 4 (“indexer”) and visualize them :

logstach-archi1

As you can see, I am using 4 complementary applications, the role of each one being :

  • Logstash : logs collector, processor and shipper (to Redis) on log “shippers” 1-3 ; logs indexer on server 4 (reads from Redis, writes to Elasticsearch)
  • Redis : logs data broker, receiving data from log “shippers” 1-3
  • Elasticsearch : logs data persistent storage
  • Kibana : (time-based) logs data visualization (graphs, tables, etc.)

Lire la suite…

Categories: Système Tags: , , ,

Alimentation laboratoire 0-30v/0-10A Velleman-kit K7200

28/08/2022 Categories: Bricolage, Électronique Tags: , , Comments off

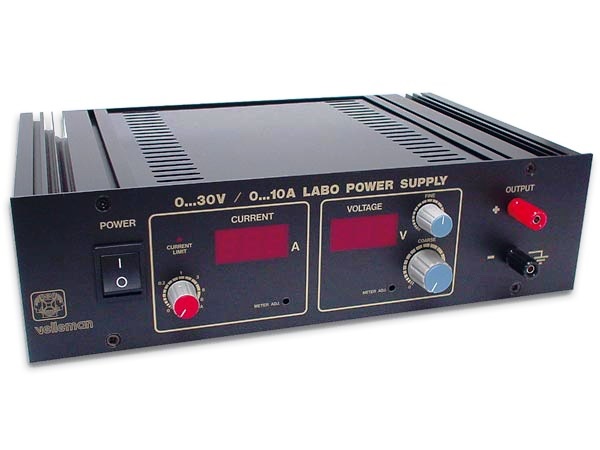
Alimentation de laboratoire Velleman 7200Une alimentation de laboratoire est un appareil indispensable pour un radioamateur, qu’il soit professionnel ou amateur. Cette alimentation est protégée contre les courts-circuits et se règle graduellement de 0 à 30 V et de 0 à 10 A.

DONNÉES TECHNIQUES

  • Tension de sortie réglable graduellement de 0 à 30 V.
  • Réglage fin au-delà de 1 V.
  • Limitation de courant de sortie réglable graduellement de 0 à 10 A.
  • Réglage fin entre 0 et 1 A.
  • Indication LED de la limitation de courant.
  • Courant de sortie: 8 A courant continu / 10 A courant de pointe.
  • Protégé contre les courts-circuits.
  • Pulsation maximale: 0.5 mV RMS.
  • Consommation: max. 300 W

Lire la suite…