Disjoncteur

20/08/2022 Categories: Bricolage, Matériel Tags: , , Comments off

Un disjoncteur est un dispositif électromécanique, voire électronique, de protection dont la fonction est d’interrompre le courant électrique en cas d’incident sur un circuit électrique. Il est capable d’interrompre un courant de surcharge ou un courant de court-circuit dans une installation. Suivant sa conception, il peut surveiller un ou plusieurs paramètres d’une ligne électrique. Sa principale caractéristique par rapport au fusible est qu’il est réarmable (il est prévu pour ne subir aucune avarie lors de son fonctionnement).

Différentes techniques utilisées par les disjoncteurs

Thermique

Ce type de disjoncteur se déclenche quand un courant excessif traverse un bilame, créant un échauffement par effet Joule et provoquant sa déformation. Ce bilame déclenche mécaniquement un contact, qui ouvre le circuit électrique protégé. Ce système électromécanique est assez simple et robuste mais n’est pas très précis et son temps de réaction est relativement lent. Il permet donc d’éviter de mettre le circuit en surintensité prolongée. La protection thermique a pour principale fonction la protection des conducteurs contre les échauffements excessifs pouvant générer des risques d’incendies, dus aux surcharges prolongées de l’installation électrique.

Il remplit la même fonction qu’un fusible, lequel doit être remplacé après avoir coupé le courant.

Magnétique

La forte variation d’intensité passe au travers des spires d’une bobine (repère 7 sur la photographie « Éclaté d’un disjoncteur »). Elle produit, selon les règles de l’électromagnétisme, une forte variation du champ magnétique. Le champ ainsi créé déclenche le déplacement d’un noyau de fer doux qui va mécaniquement ouvrir le circuit et ainsi protéger la source et une partie de l’installation électrique, notamment les conducteurs électriques entre la source et le court-circuit.

L’interruption est « instantanée » dans le cas d’une bobine rapide ou « contrôlée » par un fluide dans la bobine qui permet des déclenchements retardés. Il est généralement associé à un interrupteur de très haute qualité qui autorise des milliers de manœuvres.

  • Ce fonctionnement peut remplacer le fusible sur les courts-circuits.
  • Suivant le type de disjoncteur, la valeur d’intensité de consigne va de 3 à 15 fois l’intensité nominale (pour les modèles courants).
  • De nombreuses autres possibilités existent, déclenchement par bobine tension (consigne provenant de capteurs), interrupteur/disjoncteur pour montage face avant, compatible bitension 100/220 volts, bobine sous voltage (disjoncteur maintenu à partir d’une consigne tension), déclenchement à distance, réarmement à distance.
  • Nombreuses courbes de déclenchement pour CC, CA 50/60 Hz et 400 Hz.
  • Une option étanche est généralement disponible, soit version face avant étanche, soit entièrement (IP67).

C’est la fonction remplie par un fusible aM (accompagnement moteurs). Pour démarrer, un moteur demande, pendant quelques instants, une brève surintensité pouvant aller jusqu’à dix fois son intensité normale de fonctionnement. Cette surintensité, normale, ne doit toutefois pas déclencher le dispositif de protection. Ainsi, les fusibles de type aM sont conçus pour pouvoir absorber pendant un court instant un pic d’intensité supérieur à la valeur de protection. En revanche, en cas de surintensité (d’une valeur inférieure mais plus longue) : le dispositif coupera logiquement l’alimentation électrique.

La protection magnétique a pour principale fonction la protection des équipements contre les défauts (surcharge de l’équipement, court-circuit, panne…). Il est choisi par l’ingénieur qui a le souci de protéger son équipement avec une très grande précision.


Lire la suite…

HP-41C/CV/CX

16/06/2022 Categories: Matériel Tags: Comments off

HP 41C front viewAround the time of the HP-67, an article in the Hewlett-Packard Journal, stated that electronic technology was no longer the only limitation of pocket calculator progress. The human interface was becoming an even greater barrier to adding more functionality. The HP-67 was an excellent example of the problem. It had three shift keys and most of its other keys had four functions. HP was running out of keyboard space for new functions, and many users found it difficult write and use numeric-only programs.

The HP-41C overcame these limitations by adding alphanumeric capabilities to both the display and keyboard. The keyboard had an « Alpha » key that toggled the keyboard between alpha and the normal calculator mode. (The alpha characters were printed on the slanted faces of the keys.) If the user needed a function not printed on a key, the name of the function could be typed in and executed. (About half of the HP-41Cs functions were preassigned to keys.)

Because typing out the name of a function could be cumbersome, the HP-41C added another toggle key called « user ». The user could assign any built-in function or user program to any key. Once the keyboard was placed in user mode, any assignments made by the user overrode the label on the key. (With the gold shift key, this allowed two user functions per key.) The user toggle state remained set even when the calculator was turned off allowing true keyboard customization.

To make it easy to remember keyboard assignments, HP provided keyboard overlays along with preprinted labels for all built-in functions and blank labels for user functions. In addition, whenever a key was held down, its function name was displayed. If it was the wrong key, the user could continue to hold it until the display showed « NULL » when meant the function was canceled.

Of course, HP didn’t just improve the human interface. The HP-41C had more memory (now non-volatile) than its predecessor, more functions, improved programming, and could be expanded with both RAM and ROM modules.

From The Introduction:

« The HP-41C represents a totally new concept in the design of Hewlett-Packard calculators. In fact, because of the advanced capabilities of the HP-41C, it can even be called a personal computing system. The HP-41C is the first Hewlett-Packard handheld calculator offering an exciting array of alphanumeric capabilities.With so many different kinds of calculator uses and applications in the world, we at Hewlett-Packard decided we could provide a significant contribution by designing and building you aquality calculator with expandable and flexible capability. The alphanumeric HP-41C is just the calculator. »

Alphanumeric Implementation

The HP-41C used a low power LCD display with 7 more segments than previous calculators. This allowed a full range of alphabetic characters. The characters were not as fully formed as a dot matrix display, but they had better contrast.

There was a special register on the HP-41C called the Alpha Register. It allowed up to 24 characters. This register was separate from the stack and the other storage registers. Alpha strings could be stored in normal registers or the stack but they were truncated to 6 characters when this was done. A function that shifted strings by 6 characters was included to make it easy to store long strings in multiple registers.

Expansibility

Cassette readerThe HP-41C came with 63 « registers » of memory. Memory could be dynamically reassigned between storage registers and program memory. (63 registers was equal to 200-400 fully merged lines of program memory.)

Four ports at the top end of the machine allowed the user to plug in 4 more RAM modules which would increase the maximum register space to 319 or allow 1000-2000 lines of program space. (Or any compromise between those.) Later, the entire register space could be provided via a single « Quad Memory » module and Extended Memory was added to allow even more space..

The Optional Card Reader/Writer (82104A)

Card reader, ROM module and faceplateBecause the HP-41C had continuous memory and because its application pacs came on ROM modules, a card reader was omitted. However, one could be plugged into the top end. (In less time then it takes to read this sentence.) The HP-41C was obviously not code compatible HP-67, however, a sophisticated translator was built into the card reader which translated programs to HP-41C code on the fly.

Lire la suite…

Categories: Matériel Tags:

MySQL database replication with Linux

22/10/2021 Categories: Bases de données, Tutoriel Tags: , , Comments off

MySQL database replication with Linux

Database replication is a technique where a given database is copied to one or more locations, so that the reliability, fault-tolerance or accessibility of the database can be improved. Replication can be snapshot-based (where entire data is simply copied over to another location), merge-based (where two or more databases are merged into one), or transaction-based (where data updates are periodically applied from master to slaves).

MySQL replication is considered as transactional replication. To implement MySQL replication, the master keeps a log of all database updates that have been performed. The slave(s) then connect to the master, read individual log entries, and perform recorded updates. Besides maintaining a transaction log, the master performs various housekeeping tasks, such as log rotation and access control. When new transactions occur and get logged on the master server, the slaves commit the same transactions on their copy of the master database, and update their position in the master server’s transaction log. This master-to-slave replication process is done asynchronously, which means that the master server doesn’t have to wait for the slaves to catch up. If the slaves are unable to connect to the master for a period of time, they will download and execute all pending transactions when connectivity is re-established.

Database replication allows one to have an exact copy of a live database of a master server at another remote server (slave server) without taking the master server offline. In case the master server is down or having any trouble, one can temporarily point database clients or DNS resolver to the slave server’s IP address, achieving transparent failover. It is must be noted that MySQL replication is not a backup solution. For example, if an unintended DELETE command gets executed in the master server by accident, the same transaction will mess up all slave servers.

In this article, we will demonstrate master-slave based MySQL replication on two Linux computers. Let’s assume that the IP addresses of master/slave servers are 192.168.2.1 and 192.168.2.2, respectively.

Setting up a Master MySQL Server

This part will explain the steps needed on the master server.

First, log in to MySQL, and create test_repl database.

$ mysql -u root -p
mysql> CREATE DATABASE test_repl;

Next, create a table inside test_repl database, and insert three sample records.

mysql> USE test_repl;
mysql> CREATE TABLE employee (EmployeeID int, LastName varchar(255), FirstName varchar(255), Address varchar(255), City varchar(255));
mysql> INSERT INTO employee VALUES(1,"LastName1","FirstName1","Address1","City1"),(2,"Lastname2","FirstName2","Address2","City2"),(3,"LastName3","FirstName3","Address3","City4");

After exiting the MySQL server, edit my.cnf file using your favorite text editor. my.cnf is found under /etc, or /etc/mysql directory.

# nano /etc/my.cnf

Add the following lines under [mysqld] section.

[mysqld]
id=1
log-bin=master-bin.log
do-db=test_repl
innodb_flush_log_at_trx_commit=1
sync_binlog=1

The server-id option assigns an integer ID (ranging from 1 to 2^23) to the master server. For simplicity, ID 1 and 2 are assigned to the master server and the slave server, respectively. The master server must enable binary logging (with log-bin option), which will activate the replication. Set the binlog-do-db option to the name of a database which will be replicated to the slave server. The innodb_flush_log_at_trx_commit=1 and sync_binlog=1options must be enabled for the best possible durability and consistency in replication.

After saving the changes in my.cnf, restart mysqld daemon.

# systemctl restart mysqld

or:

# /etc/init.d/mysql restart

Log in to the master MySQL server, and create a new user for a slave server. Then grant replication privileges to the new user.

mysql> CREATE USER [email protected];
mysql> GRANT REPLICATION SLAVE ON *.* TO [email protected] IDENTIFY BY 'repl_user_password';
mysql> FLUSH PRIVILEGES;

A new user for the slave server is repl_user, and its password is repl_user_password. Note that the master MySQL server must not bind to the loopback interface since a remote slave server needs to log in to the master server as repl_user. Check this tutorial to change MySQL server’s binding interface.

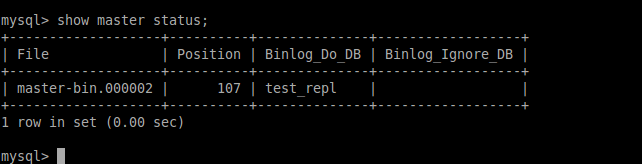
Finally, check the master server status by executing the following command on the server.

mysql> SHOW MASTER STATUS;

18157192466_b3cc2d5ced_o

Please note that the first and second columns (e.g., master-bin.000002 and 107) will be used by the slave server to perform master-to-slave replication.

Lire la suite…

Sauvegarde MySQL

12/10/2021 Categories: Bases de données, Tutoriel Tags: , , , , Comments off

sauvegarde mysqlSauvegarde MySQL

Pour sauvegarder une base de données (sans et avec compression) :

# mysqldump NOM_BASE > NOM_FICHIER
# mysqldump NOM_BASE | gzip > NOM_FICHIER

Pour restaurer une base de données (sans et avec compression) :

# mysqladmin create NOM_BASE
# mysql NOM_BASE < NOM_FICHIER
# gunzip < NOM_FICHIER | mysql NOM_BASE

Sauvegarder toutes les bases :

# mysqldump --opt --all-databases > NOM_FICHIER

Pour sauvegarder uniquement certaines tables :

# mysqldump NOM_BASE NOM_TABLE0 [NOM_TABLE1...] > NOM_FICHIER

Pour presque faire un « –exclude » (qui manque cruellement à mysqldump):

mysql -B -N -e 'show databases' | 
  perl -ne 'print unless /b(?:phpmyadmin|mysql|information_schema)b/' | 
  xargs echo mysqldump -B

Et pour sauvegarder des tables correspondant à un motif (préfixe le plus souvent) :

# mysqldump NOM_BASE $(mysql NOM_BASE -B --column-names=False -e "show tables like 'exemple_%'") > NOM_FICHIER

Pour dumper avec une condition particulière :

mysqldump -t <base> <table> --where="my_id='66666666'"

Ce qui permet de réinjecter des données résultantes d’un SELECT * FROM base.table WHERE my_id='66666666'.

Il est évidement possible de faire toutes ces opération sur une instance en précisant son port avec l’option –port (valable pour mysqldump et mysql).

Pour obtenir une liste des utilisateurs mysql, on peut utiliser cette fonction (glanée sur serverfault) :

mygrants()
{
  mysql -B -N -e "SELECT DISTINCT CONCAT(
    'SHOW GRANTS FOR ''', user, '''@''', host, ''';'
    ) AS query FROM mysql.user" | 
  mysql | 
  sed 's/(GRANT .*)/1;/;s/^(Grants for .*)/## 1 ##/;/##/{x;p;x;}'
}

Lire la suite…

MySQL – Gestion des binlogs

12/10/2021 Categories: Bases de données, Tutoriel Tags: , , Comments off

mysql binlogsPar défaut, MySQL stocke chaque requête en écriture dans des fichiers appelés binlogs.

Configuration des binlogs

Par défaut les binlogs sont conservés sur 10 jours, avec des fichiers n’excédant pas 100 Mo :

#log_bin                        = /var/log/mysql/mysql-bin.log
expire_logs_days        = 10
max_binlog_size         = 100M
#binlog_do_db           = include_database_name
#binlog_ignore_db       = include_database_name
binlog_format           = mixed

Format

http://dev.mysql.com/doc/refman/5.5/en/binary-log-setting.html

On peut choisir 3 types de format pour les binlogs :

  • statement : les requêtes INSERT / UPDATE sont conservées
  • row : les modifications de chaque ligne sont conservées (via une sorte de code « binaire » propre à MySQL)
  • mixed : en mode statement… sauf dans certains cas où cela passe en mode row

Avantages et inconvénients :

Le mode statement est utile pour conserver en clair toutes les requêtes. Il permet aussi de meilleures performances quand des UPDATE contiennent des clauses WHERE qui modifient de nombreuses lignes. Pour de la réplication, il peut être non fiable car le résultat d’un UPDATE peut donner des résultats différents sur un serveur SLAVE. Cela peut aussi poser des soucis avec les transactions InnoDB.

Le mode row a l’inconvénient de rendre illisibles toutes les requêtes. Dans certains cas particuliers (UPDATE contiennent des clauses WHERE qui modifient de nombreuses lignes), il peut être moins performant. Il a l’avantage d’être plus fiable pour de la réplication.

Le mode mixed est un bon compromis pour de la réplication : il permet de voir la plupart des requêtes en clair, mais évite le problème de fiabilité en passant en mode row quand c’est nécessaire.

Suppression

Pour supprimer les binlogs antérieurs à mysql-bin.00NNNN :

mysql> PURGE BINARY LOGS TO 'mysql-bin.00NNNN';

ou par rapport à une date :

mysql> PURGE BINARY LOGS BEFORE "2011-12-07 00:00:00";

Désactivation

Pour désactiver les binlogs, on ajoutera l’option suivante dans la configuration :

disable-log-bin

Lecture

On pourra lire en ligne de commande le contenu d’un binlog via la commande :

# mysqlbinlog /var/log/mysql/mysql-bin.001789 | less

Note : si vous obtenez une erreur mysqlbinlog: unknown variable 'default-character-set=utf8' c’est que la directive default-character-set a été placée dans la configuration MySQL (/etc/mysql ou .my.cnf) dans la mauvaise section : [client] au lieu de [mysql] (ou [mysqldump]).

Replay

ATTENTION, CES MANIPULATIONS PEUVENT ÊTRE DANGEREUSES POUR VOS DONNÉES, BIEN SAVOIR CE QUE L’ON FAIT.

On pourra ainsi injecter le contenu d’un binlog dans une base… tout simplement avec une commande du type :

# mysqlbinlog /var/log/mysql/mysql-bin.001789 | mysql -P3307

À noter que si une partie des données étaient déjà présentes (cas d’un binlog corrompu lors d’incident lors d’une réplication), on pourra procéder ainsi :

# mysqlbinlog /var/log/mysql/mysql-bin.001789 > mysql-bin.001789.txt
# sed -i 's/INSERT INTO/INSERT IGNORE INTO/gi' mysql-bin.001789.txt
# cat mysql-bin.001789.txt | mysql -P3307

Log des requêtes lentes

Pour débugger les applications lentes, c’est une fonctionnalité intéressante de trouver quel requête est longue. Pour cela on peut spécifier quand une requêtes est considéré comme longue, le chemin où stocker les requêtes, et l’activation des logs.

long_query_time = 2 #Default 10 !
slow_query_log = 1
slow_query_log_file = /var/log/mysql/slow.log

Source: Evolix