MySQL – Chargement d’un fichier texte dans une table

25/01/2024 Categories: Bases de données Tags: , Comments off

Pour charger une fichier texte défini comme suit :

$ tail /home/user1/test.txt
   'nom1',1,9
   'nom2',2,3
   'nom3',3,54
   'nom4',4,2
   'nom5',5,9

Dans une table définie comme suit :

CREATE TABLE chargertest (
                cle_prim int(11) NOT NULL auto_increment,
                nom varchar(20),
                x integer,
                y integer,
                z timestamp(14),
                Constraint pk_chargertest PRIMARY KEY  (cle_prim)
);

A noter que le champ ‘z’ n’est pas défini au niveau du fichier texte et que le séparateur utilisé est ‘,’.

mysql> load data infile '/home/user1/test.txt' into table chargertest fields terminated by ',' (nom,x,y);


Categories: Bases de données Tags: ,

Increase upload size in your php.ini

25/01/2024 Categories: Logiciel Tags: , , Comments off

note: increasing PHP upload size is different from increasing PHP memory limit. You can learn to increase memory limit here.

Drupal’s limits on upload file size are determined by your server’s PHP settings (as well as Drupal specified settings that can be set at Admin > Site Configuration > File Upload). The default values for PHP will restrict you to a maximum 2 MB upload file size.

On the settings page for the upload module, Drupal calculates and displays the maximum file size that you can set based upon two PHP settings: ‘post_max_size’ and ‘upload_max_filesize’. Since ‘post_max_size’ is the limit for all the content of your post, many people choose ‘post_max_size’ to be a multiple of ‘upload_max_filesize’ to allow multiple files to be uploaded, but this is not essential. The upload module limits the size of a single attachment to be less than either post_max_size, or upload_max_filesize, whichever is smaller. The default PHP values are 2 MB for upload_max_filesize, and 8 MB for post_max_size.
Lire la suite…

Categories: Logiciel Tags: , ,

How to find out Router MAC address

24/01/2024 Categories: Réseau Tags: , Comments off

Source: nixCraft

MAC is acronym for for Media Access Control address. It is a unique identifier attached to almost most all networking equipment such as Routers, Ethernet cards and other devices.

If you do not have access to router admin interface (via telnet or webbased), use following method to find out router MAC address.

You need to use arp command (available on both Windows, Linux/Unixish systems).

arp manipulates the kernel’s ARP cache in various ways. The primary options are clearing an address mapping entry and manually setting up one. For debugging purposes, the arp program also allows a complete dump of the ARP cache.

arp shows the entries of the specified hosts. If the hostname parameter is not used, all entries will be displayed.

Task: Find out router Mac Address

To find out your router MAC address, use arp command as follows:

$ /usr/sbin/arp -a
OR
$ arp -a
Output:

router (192.168.1.254) at 00:08:5C:00:00:01 [ether] on eth0
fbsd6 (192.168.1.16) at 00:0F:EA:91:04:07 [ether] on eth0

In above example 00:08:5C:00:00:01 is MAC address of my router. If you cannot find MAC address then just ping to your router once (my router had 192.168.1.254 IP)
$ ping 192.168.1.254
And then run (type arp -a) above arp command again. If you have telnet access to router then you can just telnet into router and find out MAC address:
$ telnet 192.168.1.254

Output:

Welcome to nixCraft Router!
Login: admin
Password:

Once logged in type ifconfig command:

$ ifconfig br0

Output:

br0             Link encap:Ethernet  HWaddr 00:08:5C:00:00:01
        inet addr:192.168.1.254  Bcast:192.168.1.255  Mask:255.255.255.0
        UP BROADCAST RUNNING MULTICAST  MTU:1500  Metric:1
        RX packets:48574 errors:0 dropped:0 overruns:0 frame:0
        TX packets:61329 errors:0 dropped:0 overruns:0 carrier:0
        collisions:0 txqueuelen:0
        RX bytes:9146189 (8.7 MiB)  TX bytes:74456679 (71.0 MiB)

Please note that your interface name (br0) could be different. You can also use ifconfig -a command.

Windows XP/NT/2003 find out Router Mac address

If you are using Microsoft Windows XP then you need to open MS-DOS shell prompt first. Click on Start > Run > Type cmd command followed by ENTER key. Then at C:\> prompt, type arp command as follows:

C:\> arp -a
Categories: Réseau Tags: ,

Protéger ses images contre le Hotlinking

24/01/2024 Categories: Système Tags: , , , , Comments off
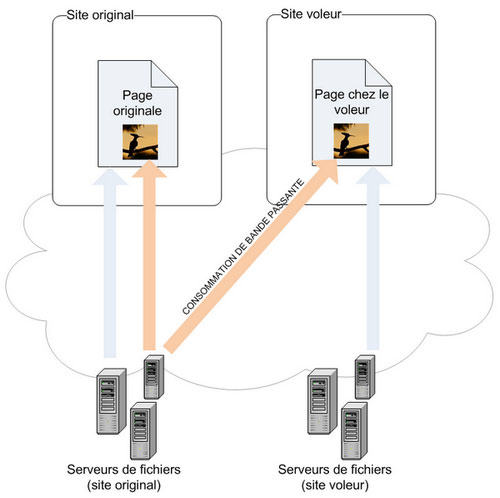
fonctionnement-hotlinkLe hotlinking est une pratique courante qui consiste, le plus souvent, à afficher une image en utilisant l’adresse URL en provenance d’un autre site où elle est publiée. En fait, au lieu de stocker l’image sur son serveur, le hotlinkeur crée un lien direct vers le serveur d’origine.Principe du Hotlinking en schéma.Cette méthode est totalement illégale puisqu’il s’agit d’un vol de bande passante. En effet, à chaque fois que l’image est visionnée par un internaute, une requête HTTP est envoyée vers le serveur qui l’héberge. Cela ralentit le serveur qui doit fournir les images hotlinkées en plus des images du site d’origine. De plus, cela peut engendrer un coût financier supplémentaire puisque certains hébergeurs prennent en compte le trafic mensuel de données afin d’éviter les abus et de préserver la bande passante.

Pour lutter contre le hotlinking, il suffit de copier le code suivant dans le fichier .htaccess présent à la racine de votre projet. Il permet de remplacer l’image volée par une autre destinée à dissuader le hotlinkeur (par ex: http://p7.storage.canalblog.com/78/13/603253/75105879.jpg).

RewriteEngine On
# Remplacer mywebsite\.com/ par l'adresse de votre site
RewriteCond %{HTTP_REFERER} !^http://(.+\.)?mywebsite\.com/ [NC]
RewriteCond %{HTTP_REFERER} !^$
# Remplacer /images/nohotlink.jpg par le chemin de l'image affichée chez les voleurs
RewriteRule .*\.(jpe?g|gif|bmp|png)$ /images/nohotlink.jpg [L]

Fail2ban – Block unwanted attacks

23/01/2024 Categories: Logiciel, Réseau, Sécurité Tags: , Comments off

source: Paul’s blog

Up until now i have been manually blocking ip’s that attack my server but by the time i see them the attacks have normally finished but after the last big attack on my email server (some 35,000 attempts) i decided to find a way to automate the blocking. After a bit of research i decided to setup Fail2ban and here’s how i did it.

As i use a 3rd party repostories – EPEL (how to add repositories) i can just use yum to install it

yum install fail2ban

once installed i just needed to change the configuration to my liking, the config files can be found at « /etc/fail2ban »

first i edit « /etc/fail2ban/fail2ban.conf » and ensure the « logtarget » is set correctly

logtarget = /var/log/fail2ban.log

The default behaviour of fail2ban is configured in the file « /etc/fail2ban/jail.conf ». There’s a [DEFAULT] section that applies to all other sections unless the default options are overridden in the other sections. Lire la suite…