Archive

Archives pour la catégorie ‘Logiciel’

How To Configure Secure Updates and Installations in WordPress on Ubuntu

11/05/2024 Comments off

Source: DigitalOcean – Justin Ellingwood

Introduction

WordPress is the most popular CMS (content management system) used on the internet today. While many people use it because it is powerful and simple, sometimes people make a trade-off for convenience at the expense of security.

This is the case in how you choose to assign directory ownership and permissions, and how you choose to perform upgrades. There are a variety of different methods to do this. We will choose what we consider a relatively secure way of upgrading and installing themes and plugins.

In this guide, we assume that you have gone through your initial server setup. You will also need to install a LAMP stack on your VPS.

We will also assume that you have installed WordPress on Ubuntu 12.04. You can follow our guide on how to install WordPress on Ubuntu 12.04 here.

Once you have the user and required software, you can start following this guide.

Set Up Secure Updates with SSH

If you do not have key-based updates and installations configured, you will get a prompt for connection information whenever you attempt to do either of these tasks.

It will ask you to provide FTP credentials, such as a hostname, FTP username, and FTP password:
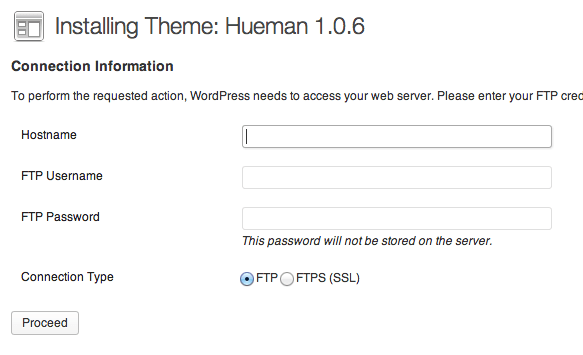
ftp

FTP is an inherently insecure protocol, so we do not recommend you using it in most cases. We will be configuring our installation to use a secure alternative.

Changing Permissions

If you followed the guide on installing WordPress above, you will notice that you gave permission of the web directory to the Apache web user. This is a very quick way to get started, but can potentially be a security risk. In an ideal situation, you would separate the content owner from the web process. We will do this as part of our preparation for allowing SSH updates.

We will create a user called wp-user to own our WordPress installation.

sudo adduser wp-user

You will be asked a lot of question, including the password you want to set. We do not want to set a password, so press « ENTER » through all of the prompts, including the repeated password questions.

Next, change to the /var/www/html directory, where our WordPress files are being served.

cd /var/www/html

We will give our new user ownership over everything under this directory, changing it from the www-data Apache web user that we configured during installation.

sudo chown -R wp-user:wp-user /var/www/html
Lire la suite…

Categories: Logiciel Tags: , , ,

How To Optimize WordPress Performance With MySQL Replication On Ubuntu 14.04

10/05/2024 Comments off

Introduction

In this tutorial, we will teach you how to scale up your WordPress MySQL database server setup using master-slave database replication and the HyperDB plugin for WordPress. Adding more database servers to your environment in this manner allows your WordPress application to read from multiple database servers, increasing read performance.

MySQL replication reaps the most performance benefits for a system that processes frequent reads and infrequent writes, like most WordPress installations. By using a single-master with multiple-slave setup, you can add more slaves to scale your system, until you run out of network bandwidth or your master cannot handle the update load. If you wish, you can add more than one slaves by repeating the « slave » portions of the replication sections of this tutorial.

We are assuming that your setup includes two load balanced WordPress application servers that connect to a separate MySQL database server (see the prerequisites for a tutorial on how to set that up). It is not strictly necessary to have load balanced application servers to follow this tutorial, but your MySQL database server should be separate from your application servers.

Prerequisites

Before continuing with this tutorial, you should have completed two tutorials or have a similar environment:

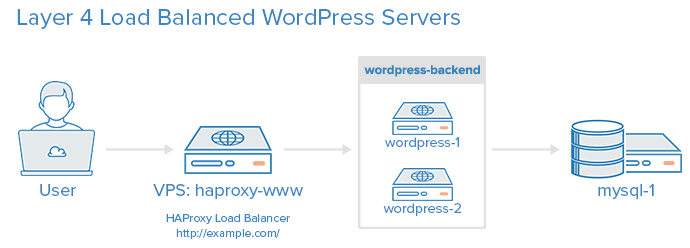
After following those tutorials, to set up WordPress with two load balanced web application servers and a separate database server, you should have four VPSs. Because we will be dealing with several VPSs, for reference purposes, we will call your four existing VPSs the following:

  • haproxy-www: Your HAProxy server for layer 4 load balancing your WordPress web application servers. This is the entry point into your website
  • wordpress-1: Your first WordPress web application server
  • wordpress-2: Your second WordPress web application server
  • mysql-1: Your MySQL server for WordPress

That is, your environment should look something like this:

WordPress and Separate MySQL Database Server

In addition to your current environment, we will require one additional VPS during this tutorial. We will call it:

  • mysql-2: Your slave MySQL database server

Lire la suite…

How to Protect Yourself from NSA Attacks on 1024-bit DH

03/05/2024 Comments off

nsa attacksWhen NSA gets you worrying

In a post on Wednesday, researchers Alex Halderman and Nadia Heninger presented compelling research suggesting that the NSA has developed the capability to decrypt a large number of HTTPS, SSH, and VPN connections using an attack on common implementations of the Diffie-Hellman key exchange algorithm with 1024-bit primes. Earlier in the year, they were part of a research group that published a study of the Logjam attack, which leveraged overlooked and outdated code to enforce « export-grade » (downgraded, 512-bit) parameters for Diffie-Hellman. By performing a cost analysis of the algorithm with stronger 1024-bit parameters and comparing that with what we know of the NSA « black budget » (and reading between the lines of several leaked documents about NSA interception capabilities) they concluded that it’s likely NSA has been breaking 1024-bit Diffie-Hellman for some time now.

The good news is, in the time since this research was originally published, the major browser vendors (IE, Chrome, and Firefox) have removed support for 512-bit Diffie-Hellman, addressing the biggest vulnerability. However, 1024-bit Diffie-Hellman remains supported for the forseeable future despite its vulnerability to NSA surveillance. In this post, we present some practical tips to protect yourself from the surveillance machine, whether you’re using a web browser, an SSH client, or VPN software.

Disclaimer: This is not a complete guide, and not all software is covered.

Web Browser

To make sure you’re using the strongest crypto, you have to look at the encryption algorithms (or cipher suites) that your browser supports. There’s an excellent tool, How’s My SSL?, that will test your browser’s cipher suite support. The relevant area of the page is the bottom, Given Cipher Suites. You want to make sure that you don’t see the text « _DHE_ » in the list of ciphersuites – although the Elliptic Curve variant of Diffie-Hellman, represented by suites with « _ECDHE_ » is okay. It is important to note that there is a trade-off here: removing your clients support for « _DHE_ » ciphers will eliminate the risk of this attack, but it may also remove Forward Secrecy support altogether for some sites. Here’s how to remove those « _DHE_ » cipher suites if you still have them:

Firefox

(tested with 40.0.3)

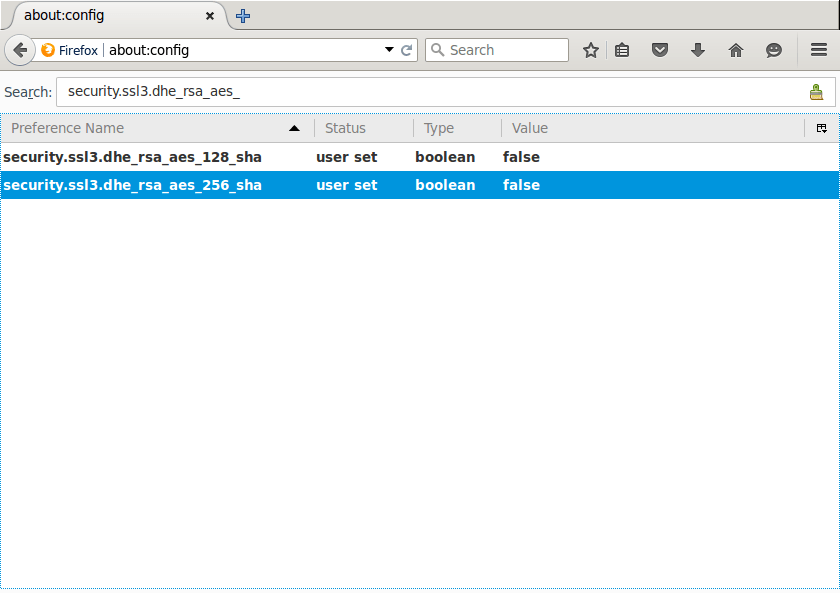
Open a new tab, enter « about:config » into the location bar and hit the « Enter » key. If you get a warning page, click « I’ll be careful, I promise! » This will bring you to the Firefox configuration settings. In the search bar up top, type « .dhe_ » and hit the « Enter » key. This should result in two settings being displayed: « security.ssl3.dhe_rsa_aes_128_sha » and « security.ssl3.dhe_rsa_aes_256_sha ». Double-click both of them to change the value from « true » to « false ».

ff

Now, if you refresh the How’s My SSL page, the « _DHE_ » ciphersuites should be gone!

Lire la suite…

Administration réseau sous Linux: Apache

29/04/2024 Comments off

Source: Wikilivres

Apache est un serveur HTTP libre. Un serveur HTTP permet d’héberger des sites web qui seront accessibles avec un navigateur tel que Mozilla Firefox, Internet Explorer ou encore Chrome.

Un site web peut fournir tout type de contenu (des fichiers textes, HTML, Flash, zip…). Ce contenu peut être statique (le serveur transmet un fichier au navigateur) ou dynamique (le contenu est généré par un programme exécuté par le serveur). Les sites web contiennent généralement plusieurs types de documents, certains étant statiques et d’autres dynamiques.

Nous traiterons ici d’Apache 2.2 sur un système Debian (et ses dérivés, comme Ubuntu).

Fichiers log

Par défaut sous Debian, Apache enregistre les erreurs dans le fichier /var/log/apache2/error.log. Quand quelque chose ne fonctionne pas, ce fichier fournit souvent des pistes pour trouver la solution.

Il enregistre également toutes les requêtes dans /var/log/apache2/access.log.

Configuration de base

Sous Debian, Apache se lance automatiquement lorsqu’on l’installe et à chaque démarrage du système. Lorsqu’on modifie sa configuration, il faut lui faire prendre connaissance des changements avec la commande

/etc/init.d/apache2 reload

Pour l’arrêter, le lancer ou le relancer on utilisera la même commande avec stop, start ou restart.

Pour d’autres systèmes il faudra consulter la documentation du système ou celle d’Apache [archive].

Configuration du serveur

La configuration [archive] du serveur se trouve dans /etc/apache2/apache2.conf. Ce fichier contient des instructions Include [archive] qui permettent de déplacer certaines parties de la configuration dans d’autres fichiers. Debian utilise cette fonctionnalité pour les modules [archive] (comme PHP) et la gestion des serveurs virtuels [archive] :

Configuration des modules

Le répertoire /etc/apache2/mods-available contient les modules installés. Le répertoire /etc/apache2/mods-enabled contient les modules activés. Les modules activés sont des liens symboliques vers les modules installés.

Pour activer ou désactiver un module, on peut manipuler directement les liens ou utiliser les commandes a2enmod et a2dismod (voir les pages de man).

Configuration des sites

De la même manière, le répertoire /etc/apache2/sites-available contient les sites web disponibles et /etc/apache2/sites-enabled les sites activés. Il en existe un préinstallé : le site default.

Les sites peuvent s’activer ou se désactiver en manipulant les liens dans sites-enabled ou en utilisant a2ensite et a2dissite. Lire la suite…

Categories: Logiciel Tags: , ,

Use a classic menu in Unity

28/04/2024 Comments off

Source: WebUpd8

If you find Dash to be confusing and want to use a classic menu in Unity, you have at least two alternatives: Cardapio or a new ClassicMenu Indicator.

ClassicMenu Indicator

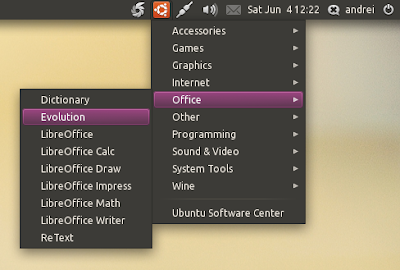
Classic Menu Indicator Ubuntu
While the idea is great, there are a few annoyances: you can’t move indicators in Ubuntu so you can’t move the menu to the position you want on the panel and also, ClassicMenu AppIndicator doesn’t display icons for the menu items. You can get it to display icons by using the commands posted here.
Still, ClassicMenu Indicator is a great menu alternative for those who don’t like Dash and I’m sure it will improve in the future (this is the first public release).

Update: there’s now a PPA too:

sudo add-apt-repository ppa:diesch/testing
sudo apt-get update
sudo apt-get install classicmenu-indicator

Cardapio

Cardapio Unity launcher

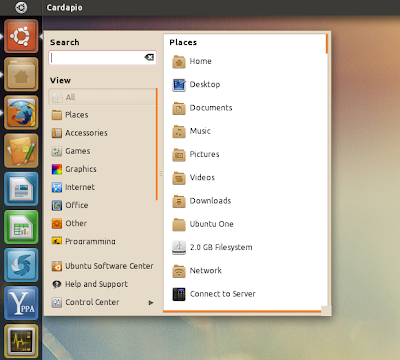
Cardapio is a main menu alternative with quite a few cool features: it comes with Zeitgeist integration, includes plugins for performing inline searches of Files (via Tracker), Software Center, Google, Wikipedia, and much more.

A long time ago, when Cardapio didn’t have an Avant Window Navigator applet, we posted about adding Cardapio to AWN using a feature that displays Cardapio near your mouse using a command (« cardapio show-near-mouse« ). Well, using the same command you can create an Unity panel launcher to run Cardapio, like you can see in the screenshot above.

To use the launcher, firstly install Cardapio:

sudo add-apt-repository ppa:cardapio-team/unstable
sudo apt-get update
sudo apt-get install cardapio
To make things easier, I’ve created the Unity launcher so all you have to do is download it and drag it to the Unity Launcher.
So download the Cardapio launcher from HERE, extract it and place the file under~/.local/share/applications/ (important: if you don’t place it here, it will disappear once you restart your computer). « .local » is a hidden folder in your home directory so press CTRL + H to see it. Then drag the file to the Unity Launcher.

This is an AppIndicator (so it’s displayed in the AppIndicator area) that behaves like a regular GNOME menu.


Categories: Logiciel, Système Tags: