Archive

Archives pour la catégorie ‘Logiciel’

Why Image Optimization is an Absolute Necessity for SEO?

13/11/2023 Comments off

image optimizationWhen content for a webpage is created and published, image optimization is probably the last thing an author knows about. Well, it is an acceptable mistake if an author’s example is taken into consideration in this context. But, it should be in the “Absolutely-To-Do” list of an SEO Vancouver specialist before posting the graphical parts of web based content.

According to the SERP feature history of Mozcast Feature Graph, Google images search ranking is 3rd in the list with 32.4% of organic search results following Adwords – Side of 42.6% search results (2nd in the list) and Adwords – Top of 58.3% search results (1st in the list) respectively.

In this post, I’ll try and explain certain small SEO steps which can improve the visibility of your webpage with the help of image optimization:

  1. Naming of the Image Files: Even if it sounds absurd, a proper image file name plays a generous role in image optimization. According to google, a file name of “Testing Audi A8” does well than “IMG_909”.
  1. Character size of File-name: 3-5 words file name is optimal for an image file.
  1. Format of Image Files: When it boils down to the format of an image, JPEG steals the show. Instead of putting a PNG file in your webpage, try putting JPEG for better results.
  1. ALT Text: ALTernate Text is a great visibility influencer. Generally, every image should have an ALT text with it which should be descriptive enough for the crawlers.
  1. Do Not Stuff your image’s ALT Text with keywords. It is considered as a bad practice nowadays. Keyword stuffing is being target by google and everyone should avoid this dangerous habit.
  1. User Experience should be the primary concern of every SEO activities we do. Google has become user centric and it is always better to perform the activities taking the requirements of random potential user in the mind. This part should be taken care of carefully. The quality of images should be good yet it should not take more than 2-3 seconds to get loaded in a decent internet connection.
  1. Placement of Images: yes, the placement of images in a web page also decides the faith of the page. It is talked about and a proven fact that if the text surrounding the image is matching or, of relevance, it has a greater chance to get pumped up in the search ranking.

After performing above given steps, the changes of your webpage getting visible in google search results get higher than ever. Please the context of this article in mind. It is also very possible that image optimization does not yield you expected results but for this to happen, you might blame the content associating it as well. Image optimization should be your only way to get ahead but it surely gives you an admirable edge over the others.

Factors such as Image metadata, Dimensions of images and, such things are also said to be crucial factors for SEO Vancouver purposes but there is no definite proof of it. However, it is always advisable to keep an account on all of the relevant factors for better results.

Source: sotra.ca

Categories: Logiciel Tags:

Email notifications using Gmail SMTP server on Linux

07/11/2023 Comments off

Send email notifications using Gmail SMTP

email notifications gmailUsing Gmail SMTP: Suppose you want to configure a Linux app to send out email messages from your server or desktop. The email messages can be part of email newsletters, status updates (e.g., Cachet), monitoring alerts (e.g., Monit), disk events (e.g., RAID mdadm), and so on. While you can set up your own outgoing mail server to deliver messages, you can alternatively rely on a freely available public SMTP server as a maintenance-free option.

One of the most reliable free SMTP servers is from Google’s Gmail service. All you have to do to send email notifications within your app is to add Gmail’s SMTP server address and your credentials to the app, and you are good to go.

One catch with using Gmail’s SMTP server is that there are various restrictions in place, mainly to combat spammers and email marketers who often abuse the server. For example, you can send messages to no more than 100 addresses at once, and no more than 500 recipients per day. Also, if you don’t want to be flagged as a spammer, you cannot send a large number of undeliverable messages. When any of these limitations is reached, your Gmail account will temporarily be locked out for a day. In short, Gmail’s SMTP server is perfectly fine for your personal use, but not meant for commercial bulk emails.

With that being said, let me demonstrate how to use Gmail’s SMTP server in Linux environment.

Google Gmail SMTP Server Setting

If you want to send emails from your app using Gmail’s SMTP server, you need to adjust the security setting of the Gmail account to be used. Go to the Google account settings, and enable the option to allow less secure apps, which is off by default.

Then you will need to provide your app with the following details.

  • Outgoing mail server (SMTP server): smtp.gmail.com
  • Use authentication: yes
  • Use secure connection: yes
  • Username: your Gmail account ID (e.g., « alice » if your email is [email protected])
  • Password: your Gmail password
  • Port: 587 (TLS) or 465 (SSL)

Exact configuration syntax may vary depending on apps. In the rest of this tutorial, I will show you several useful examples of using Gmail SMTP server in Linux.

Send Emails from the Command Line

As the first example, let’s try the most basic email functionality: send an email from the command line using Gmail SMTP server. For this, I am going to use a command-line email client called Mutt.

First, install Mutt as follows.

For Debian-based system:

$ sudo apt-get install mutt

For Red Hat based system:

$ sudo yum install mutt

Create a mutt configuration file (~/.muttrc) and specify in the file Gmail SMTP server information as follows. Replace <gmail-id> with your own Gmail ID. Note that this configuration is for sending emails only (not receiving emails).

$ vi ~/.muttrc

set from = "<gmail-id>@gmail.com"
set realname = "Dan Nanni"
set smtp_url = "smtp://<gmail-id>@smtp.gmail.com:587/"
set smtp_pass = "<gmail-password>"

Now you are ready to send out an email using mutt:

$ echo "This is an email body." | mutt -s "This is an email subject" [email protected]

To attach a file in an email, use « -a » option:

$ echo "This is an email body." | mutt -s "This is an email subject" [email protected] -a ~/test_attachment.jpg

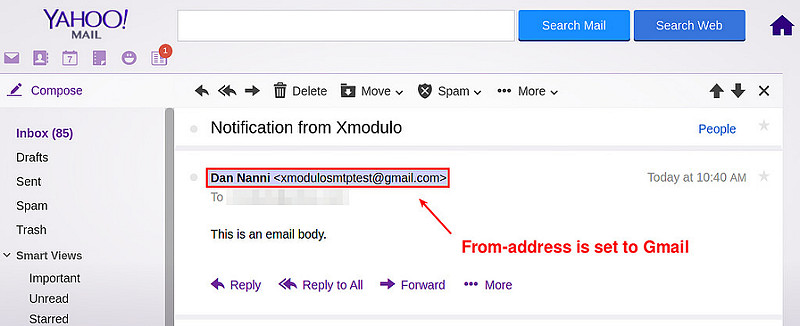
22239850784_5fb0988075_c

Using Gmail SMTP server means that the emails appear as sent from your Gmail account. In other words, a recipient will see your Gmail address as the sender’s address. If you want to use your domain as the email sender, you need to use Gmail SMTP relay service instead.

Another note is that if you are concerned about placing your SMTP password in the plain-text .muttrc file, you can encrypt the password using GnuPG.

Lire la suite…

Categories: Logiciel Tags: , ,

How to Restrict IP Addresses from Accessing your Web Server using .htaccess

01/11/2023 Comments off

If you are running the Apache Web Server or your web hosting provider running Apache based web server, you can use .htaccess configuration file to restrict access to your website. This could be a very important issue from security stand point of view especially if your server is being attacked or hacked from any specific or range of IP addresses.

Now, restricting access method works in two ways. First, you can restrict access to certain IP addresses and allow others. Second, you can restrict access to everyone but few IP addresses only. On this post, I will focus on both method and will try to explain as much as I can.

Restrict Certain IP Addresses

If you want to restrict specific IP addresses from accessing your site, you can use the following lines on your .htaccess file.

order deny,allow
deny from 123.4.5.6
deny from 654.3.2.1
allow from all

These lines above will block “123.4.5.6” and “654.3.2.1” IP addresses from accessing your site. You can add as many IP addresses as you want on this “deny from” list. One interesting fact is, Apache web server gives you lot more flexibility in terms of blocking IP addresses. Take a look at the following lines.

order deny,allow
deny from 123.4.5.
allow from all

If you observe it carefully, you will see that the fourth set of digit is missing on this IP address. It means, if any IP address that matches the first three set of digits will be blocked. So basically anyone with IP address like “123.4.5.1” or “123.4.5.244” won’t be able to access your site as in both IP address matches with the first three (123.4.5.) sets of digits blocked by the Apache web server.

Allow Specific IP Addresses

Think of about a site that you built for a very specific purpose and for very few people, where you do not want everyone to show up. Apache allows you to do that as well.

For an example, lets assume that you built a site that you want one of your friend to be able to access and his IP address is “123.4.5.12”. Simply write the following line on your .htaccess file and you are good to go.

order allow,deny
allow from 123.4.5.12
deny from all

In this case Apache will block all IP addresses except your friends IP address. This is as simple as it can get and I hope you got the basic idea.

Note: On all of my example I used either “allow from all” or “deny from all” at the bottom, this is very important. You must declare either one of these line based on your requirement or things might get little more complicated.

Also remember that all blocked IP addresses would be forwarded or shown an “403 Forbidden” error message. You can definitely customize this message as well but that’s something I will talk about in another post.

Source: iftekhar.net

Categories: Logiciel Tags: , , ,

Guide to rsnapshot and incremental backups on Linux

14/08/2021 Comments off

1. Introduction

rsnapshot is a backup tool written in Perl that utilizes rsync as its back-end. rsnapshot allows users to create customized incremental backup solutions. This article will discuss the following: the benefits of an incremental backup solution, rsnapshot’s installation, its configuration, and usage examples.

2. Back-it up!

I was recently discussing with a colleague the benefits of backing up your data. My colleague was telling me how one of her customers had recently lost a rather lengthy article that they had been working on. I decided that this may be a good chance to experiment with my netbook and rsnapshot. For this tutorial, I’ll assume you have have 2 pieces of hardware: your host computer, and your destination equipment. I’ll be using an external hard drive for the majority of this post. However, I will briefly cover usage for backing up files over a LAN.

Backing up your data should not be the question to ask but rather how should I backup my stuff? What’s the best way? Well there are many different backup pathways you can take, including block level (dd, partimage), partition level (RAID and all its variations), file level (rsyncand its children applications). I’ll discuss two types of backups in the context of file-based backups.

Normal backups, or full backups, are self explanatory. Normal backups are one way of backing up ALL your files every time you perform a backup. One issue with utilizing a multiple normal backup scheme is that a normal backup takes up a considerable amount of space. For example, if you perform a full backup of a 250gig hard drive at 20% capacity, everyday for just one week (assuming that the amount of data does not fluctuate) will mean that you already have used 350gigs for only one week’s worth of backups. As you can see, that is not feasible in the long run. The other method that I prefer is the incremental backup method. An incremental backup consists of one full backup and then performing additional backups. These additional backups will only backup files that  have changed since the last backup. Instead of backing up your entire hard drive, only the specific files that have changed since the last backup are backed up. As you can probably imagine this is a much more efficient process. One tool that does this on *nix is rsnapshot.

3. What is rsnapshot?

rsnapshot, as mentioned earlier, is an incremental backup utility. In this tutorial, I will show you how to create a seven day rotation backup scheme using rsnapshot. Essentially, rsnapshot will create 1 full backup and then subsequent backups will backup only files that have changed. The true power of rsnapshot is its ability to utilize hard-links between each backup. Each backup will appear to be a full backup. In reality each new backup consists of newly created or updated files. rsnapshot can be used over a LAN and can also be ran from cron. In this tutorial, I’ll show both usage examples.

4. Installation

Installation of rsnapshot is pretty straightforward, simply run the following command:

On Debian (or Ubuntu):

apt-get install rsnapshot

On Fedora:

yum install rsnapshot

On ArchLinux:

pacman -S rsnapshot

Now let’s configure rsnapshot.

Lire la suite…

Categories: Logiciel, Système, Tutoriel Tags:

Rsnapshot

13/08/2021 Comments off

Introduction

Vous le savez maintenant, les sauvegardes sont indispensables… Sauvegardes. Nécessaires, mais facile à oublier, sauf si elles sont effectuées automatiquement.

Voici un tutorial qui décrit la procédure pour mettre en place une solution de sauvegarde automatique simple basée sur rsnapshot.

Rsnapshot est un script écrit en perl.

Il utilise Rsync (et ssh si vous le souhaitez) pour effectuer des sauvegardes à intervalle régulier.

Il est capable de réaliser des sauvegardes d’un systèmes de fichier ou bien de bases de données par l’intermédiaire de scripts.

Un des principaux avantages de rsnapshot est son extrême simplicité.

rsnapshot utilise les « hard link unix » pour :

  • Éviter de dupliquer inutilement les fichiers.
  • Faciliter la restauration.

rsnapshot crée l’illusion de plusieurs sauvegardes complètes, alors qu’il n’y a sur le système de fichier que la première et les différences éventuelles apparues entre cette dernière et les suivantes. Il s’agit d’une méthode de sauvegarde différentielle.

Dans ce tuto nous allons vous expliquer comment mettre en place la sauvegarde différentielle sécurisée d’un répertoire d’une machine distante.

Prérequis: Configuration de SSH et des clefs

Vous devez pouvoir vous connecter aux machines auxquelles vous allez vous connecter sans mot de passe:

Tout d’abord, il faut configurer ssh et importer la clef du serveur distant.

Je vais procéder comme dans ce tuto

Testez:

root@nas:~# ssh -p 10122 vanille
Linux vanille.zehome.org 2.6.32-5-amd64 #1 SMP Tue Jun 14 09:42:28 UTC 2011 x86_64

The programs included with the Debian GNU/Linux system are free software;
the exact distribution terms for each program are described in the
individual files in /usr/share/doc/*/copyright.

Debian GNU/Linux comes with ABSOLUTELY NO WARRANTY, to the extent
permitted by applicable law.
Last login: Thu Aug 11 08:07:48 2011 from nas.zehome.org
root@vanille:~#

Installation de rsnapshot

root@nas:~# apt-get install rsnapshot

Qui vous installera par la même occasion Rsync…

Sauvegarde du fichier de configuration:

root@nas:~# cp /etc/rsnapshot.conf /etc/rsnapshot.conf.sos

Lire la suite…