One of the irritating feature for me in WordPress 2.6 is the post revision. I am the only author of my blog and hence this feature is useless to me.
Just in case you are wondering how post revision works, whenever a post is edited, a new row will be created in wp_posts table. Hence if your posts or pages got edited 10 times, you will have 10 new rows in wp_posts table.
In no time your wp_posts table will be filled up and the post ID will be huge.
To turn off this feature, add this following code to wp-config.php:
define('WP_POST_REVISIONS', false);
You can also delete all post revisions by running this query in phpMyAdmin:
DELETE a,b,c
FROM wp_posts a
LEFT JOIN wp_term_relationships b ON (a.ID = b.object_id)
LEFT JOIN wp_postmeta c ON (a.ID = c.post_id)
WHERE a.post_type = 'revision'
Be sure to backup your database first before performing any queries in phpMyAdmin.
*UPDATE* Auto Saves does not create a revision of the post.
*UPDATE 2* Updated SQL query from Andrei Neculau as the previous query does not delete from wp_postmeta and wp_term_relationships tables.
Vous avez changé votre blog WordPress de serveur et de domaine et là plus rien ne marche?
Vous voulez faire le ménage dans votre base de données ?
Et bien voici quelques exemples de requêtes SQL qui vous aiderons à faire tout ça rapidement et sans prise de tête.
Sauvegarde:
Avant de commencer la chose la plus importante à faire c’est de sauvegarder votre base de donnée.
Pour cela, plusieurs solutions s’offre à vous.
Soit vous utilisez directement une extensions WordPress tel que WP-DB-Backup ou WP-DBManager, ou alors vous pouvez le faire manuellement depuis l’interface de phpMyAdmin en suivant la procédure suivante:
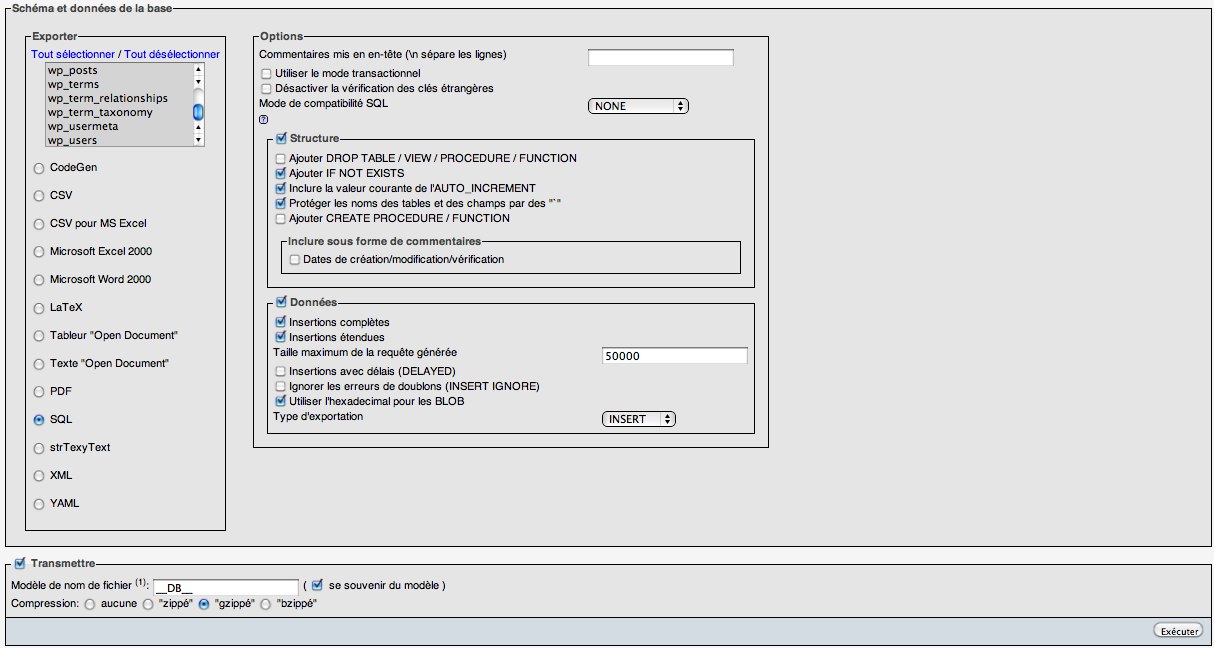
Connectez vous sur phpMyAdmin.
Sélectionnez votre base WordPress.
Cliquez sur « exporter » dans le menu en haut de la page.
Sélectionnez les tables à sauvegarder.
Sélectionnez SQL pour avoir un fichier de sortie en .sql.
Cochez la case « Transmettre«
Vous pouvez choisir un type de compression afin de réduire la taille de votre fichier.
Cliquez sur « Exécuter » et le fichier devrait se télécharger.
The File Transfer Protocol (FTP) is used as one of the most common means of copying files between servers over the Internet. Most web based download sites use the built in FTP capabilities of web browsers and therefore most server oriented operating systems usually include an FTP server application as part of the software suite. Linux is no exception.
This chapter will show you how to convert your Linux box into an FTP server using the default Very Secure FTP Daemon (VSFTPD) package included in Fedora.
FTP Overview
FTP relies on a pair of TCP ports to get the job done. It operates in two connection channels as I’ll explain:
FTP Control Channel, TCP Port 21: All commands you send and the ftp server’s responses to those commands will go over the control connection, but any data sent back (such as « ls » directory lists or actual file data in either direction) will go over the data connection.
FTP Data Channel, TCP Port 20: This port is used for all subsequent data transfers between the client and server.
In addition to these channels, there are several varieties of FTP.
Types of FTP
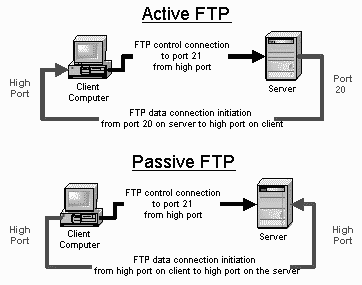
From a networking perspective, the two main types of FTP are active and passive. In active FTP, the FTP server initiates a data transfer connection back to the client. For passive FTP, the connection is initiated from the FTP client. These are illustrated in Figure 15-1.
Figure 15-1 Active And Passive FTP Illustrated
From a user management perspective there are also two types of FTP: regular FTP in which files are transferred using the username and password of a regular user FTP server, and anonymous FTP in which general access is provided to the FTP server using a well known universal login method.
Take a closer look at each type.
Active FTP
The sequence of events for active FTP is:
Your client connects to the FTP server by establishing an FTP control connection to port 21 of the server. Your commands such as ‘ls’ and ‘get’ are sent over this connection.
Whenever the client requests data over the control connection, the server initiates data transfer connections back to the client. The source port of these data transfer connections is always port 20 on the server, and the destination port is a high port (greater than 1024) on the client.
Thus the ls listing that you asked for comes back over the port 20 to high port connection, not the port 21 control connection.
FTP active mode therefore transfers data in a counter intuitive way to the TCP standard, as it selects port 20 as it’s source port (not a random high port that’s greater than 1024) and connects back to the client on a random high port that has been pre-negotiated on the port 21 control connection.
Active FTP may fail in cases where the client is protected from the Internet via many to one NAT (masquerading). This is because the firewall will not know which of the many servers behind it should receive the return connection.
Passive FTP
Passive FTP works differently:
Your client connects to the FTP server by establishing an FTP control connection to port 21 of the server. Your commands such as ls and get are sent over that connection.
Whenever the client requests data over the control connection, the client initiates the data transfer connections to the server. The source port of these data transfer connections is always a high port on the client with a destination port of a high port on the server.
Passive FTP should be viewed as the server never making an active attempt to connect to the client for FTP data transfers. Because client always initiates the required connections, passive FTP works better for clients protected by a firewall.
As Windows defaults to active FTP, and Linux defaults to passive, you’ll probably have to accommodate both forms when deciding upon a security policy for your FTP server.
Regular FTP
By default, the VSFTPD package allows regular Linux users to copy files to and from their home directories with an FTP client using their Linux usernames and passwords as their login credentials.
VSFTPD also has the option of allowing this type of access to only a group of Linux users, enabling you to restrict the addition of new files to your system to authorized personnel.
The disadvantage of regular FTP is that it isn’t suitable for general download distribution of software as everyone either has to get a unique Linux user account or has to use a shared username and password. Anonymous FTP allows you to avoid this difficulty.
Anonymous FTP
Anonymous FTP is the choice of Web sites that need to exchange files with numerous unknown remote users. Common uses include downloading software updates and MP3s and uploading diagnostic information for a technical support engineers’ attention. Unlike regular FTP where you login with a preconfigured Linux username and password, anonymous FTP requires only a username of anonymous and your email address for the password. Once logged in to a VSFTPD server, you automatically have access to only the default anonymous FTP directory (/var/ftp in the case of VSFTPD) and all its subdirectories.
As seen in Chapter 6, « Installing Linux Software« , using anonymous FTP as a remote user is fairly straight forward. VSFTPD can be configured to support user-based and or anonymous FTP in its configuration file which you’ll see later.
Plex Media Server is amazing and fantastic in so many ways! It’s got a better interface, better streaming capabilities, and better library scraping. It’s completely replaced XBMC for my media needs. The biggest drawback is there isn’t quite as much documentation out there for it. I noticed that my Plex Server was out of date, and a quick search didn’t give any exact results for upgrading on Ubuntu.
With enough research, I found how easy an upgrade actually is. For those trying to do the same, I’ll share the exact commands with you.
Grab the latest version
Go to Plex’s site and look for the latest version. You ned the link for the ‘.deb’ file. For me, I was upgrading to 0.9.8.10.215.
That’s it! It will upgrade the latest version and your library will be completely in-tact. Just do a quick clean up to get rid of that ‘.deb’ file and you’ll be done:
A comparison of the features (or more-so just a table of notes for accessing some of those features) for GNU screen and BSD-licensed tmux.
The formatting here is simple enough to understand (I would hope). ^ means ctrl+, so ^x is ctrl+x. M- means meta (generally left-alt or escape)+, so M-x is left-alt+x
It should be noted that this is no where near a full feature-set of either group. This – being a cheat-sheet – is just to point out the most very basic features to get you on the road.
Trust the developers and manpage writers more than me. This document is originally from 2009 when tmux was still new – since then both of these programs have had many updates and features added (not all of which have been dutifully noted here).
Action
tmux
screen
start a new session
tmux OR tmux new OR tmux new-session
screen
re-attach a detached session
tmux attach OR tmux attach-session
screen -r
re-attach an attached session (detaching it from elsewhere)
tmux attach -d OR tmux attach-session -d
screen -dr
re-attach an attached session (keeping it attached elsewhere)
tmux attach OR tmux attach-session
screen -x
detach from currently attached session
^b d OR ^b :detach
^a ^d OR ^a :detach
rename-window to newname
^b , <newname> OR ^b :rename-window <newn>
^a A <newname>
list windows
^b w
^a w
list windows in chooseable menu
^a «
go to window #
^b #
^a #
go to last-active window
^b l
^a ^a
go to next window
^b n
^a n
go to previous window
^b p
^a p
see keybindings
^b ?
^a ?
list sessions
^b s OR tmux ls OR tmux list-sessions
screen -ls
toggle visual bell
^a ^g
create another window
^b c
^a c
exit current shell/window
^d
^d
split window/pane horizontally
^b «
^a S
split window/pane vertically
^b %
^a |
switch to other pane
^b o
^a <tab>
kill the current pane
^b x OR (logout/^D)
collapse the current pane/split (but leave processes running)
^a X
close other panes except the current one
^b !
cycle location of panes
^b ^o
swap current pane with previous
^b {
swap current pane with next
^b }
show time
^b t
show numeric values of panes
^b q
toggle zoom-state of current pane (maximize/return current pane
^b z
break the current pane out of its window (to form new window)