Archive

Archives pour 02/2024

How to convert .rmvb to .avi (on PowerPC and Intel Macs)?

06/02/2024 Comments off

The good news is it’s very easy. The bad news is you’ll need a PowerPC Mac.A big thank you to Bluemint for pointing out an Universal Binaries version of the Real Codec is actually available, making the conversion possible on both PowerPC and Intel Mac. The instructions below are herewith updated.

What you’ll need:

  1. ffmpegX – It’s a Mac OS X graphic user interface designed to easily operate more than 20 powerful Unix open-source video and audio processing tools
  2. mpeg2enc – Download to your Downloads folder.
  3. mencoder & mplayer – Download and decompress the zip file.

Setup:

The first time you launch ffmpegX it’ll ask you to locate three components (items 2 & 3 above). Click on the respective “Locate” buttons to tell ffmpegX where they are. After that, enter your Mac OS X login password (ffmpegX won’t work if your login password is empty) and click the “Install” button.

Download and Install the Real Codec (Universal Binaries)

  1. Download the “Mac OS X x86″ binary codec package from one of these links on this page.
  2. Unzip the downloaded zip file and install the codec package.
  3. Select “Go to folder …” from Finder’s “Go” menu.
  4. Type “/usr/local/lib/” in the input text field and click “Go”
  5. You should see a “codecs” folder in the new window.
  6. Drag the “codecs” folder to your Desktop, and rename it to “reallib”.
  7. Move the “reallib” folder to “/Library/Applications Support/ffmpegx/”.

Performing the conversion to .avi

UB Rockz on any valid unicode Path/Filename.

ffmpegx-rmvb
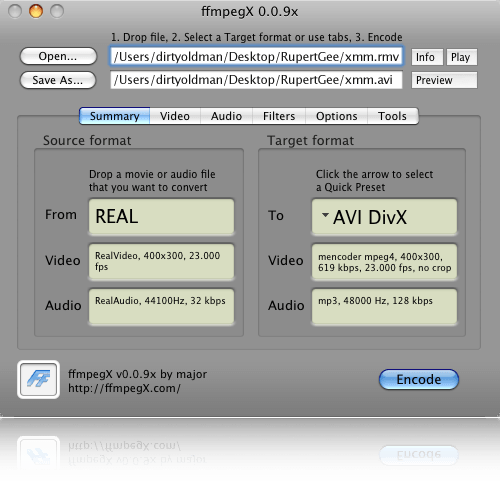
Drag and drop your rmvb file into the “From” well and just click the “Encode” button to start encoding. Unless you’re an expert user, do not be tempted to change any settings when converting a .rmvb file.

In other words, for a successful run, just drag, drop, and click Encode. What more can you ask for?

Footnotes:

  • Re-launch ffmpegX if you messed up the default settings.
  • You can close ffmpegX’s main window after clicking Encode; a new stand-alone Progress window shows you the progress.
  • Repeat the process to convert more files.
  • The “Play” button plays the .rmvb.
  • The “Preview” button plays the (partially) converted .avi file.
  • Press the Return key to stop playback.
  • You can download and install MPlayer to play your .rmvb files. However, it has a bug whereby it only plays video and totally ignores embedded links and other wonderful added features Real is famous for.
Categories: Logiciel, Système Tags: , ,

How to Bulk Rename Files in Linux (Terminal or GUI)

06/02/2024 Comments off

Source: Webmaster tips

There are several ways to bulk rename files in Linux. If you want to bulk rename files with a GUI tool, try Thunar file manager, or Krename.

Tip: To install Thunar on Ubuntu/Debian, type sudo apt-get install thunar in a terminal. To install Krename, type sudo apt-get install krename.
How to bulk rename files from the terminal

If you have a directory of files that you would like to bulk rename, you can use the rename command from the terminal.
UPDATE: I believe the Perl-based rename command is only available on Debian-based Linux distros, but there are instructions on adding it to other distros below.

The syntax for the rename command is:

rename [ -v ] [ -n ] [ -f ] perlexpr [ files ]

-v means « verbose » and it will output the names of the files when it renames them. It is a good idea to use this feature so you can keep track of what is being renamed. It is also a good idea to do a test run with -n which will do a test run where it won’t rename any files, but will show you a list of files that would be renamed.

The « perlexpr » part of the command is a Perl expression. Don’t panic yet…
The « rename » command in action

Here is an example of the rename command:

rename -n ’s/\.htm$/\.html/’ *.htm

The -n means that it’s a test run and will not actually change any files. It will show you a list of files that would be renamed if you removed the -n. In the case above, it will convert all files in the current directory from a file extension of .htm to .html.

If the output of the above test run looked ok then you could run the final version:

rename -v ’s/\.htm$/\.html/’ *.htm

The -v is optional, but it’s a good idea to include it because it is the only record you will have of changes that were made by the rename command as shown in the sample output below:

$ rename -v 's/\.htm$/\.html/' *.htm
 3.htm renamed as 3.html
 4.htm renamed as 4.html
 5.htm renamed as 5.html

The tricky part in the middle is a Perl substitution with regular expressions, highlighted below:

rename -v ’s/\.htm$/\.html/’ *.htm

Tip: There is an intro to Perl regular expressions here.

Basically the « s » means substitute. The syntax is s/old/new/ — substitute the old with the new.

A . (period) has a special meaning in a regular expression — it means « match any character ». We don’t want to match any character in the example above. It should match only a period. The backslash is a way to « escape » the regular expression meaning of « any character » and just read it as a normal period.

The $ means the end of the string. \.htm$ means that it will match .htm but not .html.

It’s fairly basic — substitute .htm with .html:

's/\.htm$/\.html/'

The last part of the command, highlighted below, means to apply the rename command to every file that ends with .htm (the * is a wildcard).

rename -v ’s/\.htm$/\.html/’ *.htm

Other Examples

Maybe you have a digital camera that takes photos with filenames something like 00001234.JPG, 00001235.JPG, 00001236.JPG. You could make the .JPG extension lowercase with the following command executed from the same directory as the images:

rename -v 's/\.JPG$/\.jpg/' *.JPG

Here is the output of the above command:

$ rename -v 's/\.JPG$/\.jpg/' *.JPG
 00001111.JPG renamed as 00001111.jpg
 00001112.JPG renamed as 00001112.jpg
 00001113.JPG renamed as 00001113.jpg

That is simple enough, as it is similar to the .html example earlier. You could also bulk rename them with something descriptive at the beginning like this:

Tip: Before trying more complicated renaming like in the example below, do a test run with the -n option as described at the beginning of this tutorial.

rename -v 's/(\d{8})\.JPG$/BeachPics_$1\.jpg/' *.JPG

That will change filenames that have the pattern ########.JPG (8 numbers and capital .JPG) to something like BeachPics_########.jpg (the same 8 numbers and changing the extension to lowercase .jpg). Here is a test run with the -n option:

$ rename -n 's/(\d{8})\.JPG$/BeachPics_$1\.jpg/' *.JPG
 00001111.JPG renamed as BeachPics_00001111.jpg
 00001112.JPG renamed as BeachPics_00001112.jpg
 00001113.JPG renamed as BeachPics_00001113.jpg

Here’s a quick breakdown of the Perl substitution with the regular expression above.

The highlighted section below means to count 8 digits. The parentheses mean to save those 8 digits for later because they are going to be used again in the second half of the substitution:

's/(\d{8})\.JPG$/BeachPics_$1\.jpg/'

In the highlighted section below, it adds the string BeachPics, and underscore, and then the text in parentheses from the first half of the substitution. $1 will insert the string from the first set of parentheses that it finds — in this case the 8 digits. If you have more than one set of parentheses you can access the second set with the Perl variable $2 and so on.

's/(\d{8})\.JPG$/BeachPics_$1\.jpg/'

Final Refinement

The following variation would make even cleaner-looking filenames. See if you can figure out how it works:

$ rename -n 's/\d{5}(\d{3})\.JPG$/BeachPics_$1\.jpg/' *.JPG
 00000123.JPG renamed as BeachPics_123.jpg
 00000124.JPG renamed as BeachPics_124.jpg
 00000125.JPG renamed as BeachPics_125.jpg

Learning Perl Regular Expressions

You can learn more about Perl regex here and in the Perl regular expression documentation, and the quickstart. Also check out this regex cheatsheet. You can learn more about the rename command by typing man rename in the terminal.
Adding the Rename Command to Non-Debian Distros

The following information was provided by Dan Fego on how to add the Perl-based rename command to non-Debian Linux distros:
I did the following [on Gentoo], though I’m aware there’s both more concise and generic ways to do it. This was just my path of discovery.

[the following commands are from Ubuntu]

# which rename
 /usr/bin/rename
 # ls -l /usr/bin/rename
 lrwxrwxrwx 1 root root 24 Dec 2 02:13 /usr/bin/rename ->
 /etc/alternatives/rename
 # ls -l /etc/alternatives/rename
 lrwxrwxrwx 1 root root 16 Dec 6 00:29 /etc/alternatives/rename ->
 /usr/bin/prename
 # ls -l /usr/bin/prename
 -rwxr-xr-x 1 root root 2987 Dec 4 04:18 /usr/bin/prename

Once I had the final link in the chain [on Ubuntu], I knew which file to copy [to Gentoo], though really I didn’t need to follow it all that way. The reason I did to begin with was because I tried to copy it with the filesystem mounted, and it referred to absolute paths which didn’t exist outside of the Ubuntu environment. The prename script is fully self-contained, assuming you’ve got Perl on your system (which just about any self-respecting Linux distro does).

The code from Ubuntu’s rename/prename is here (Gutsy Gibbon).
Categories: Système Tags: ,

Postfix + fail2ban = win

05/02/2024 Comments off
source: http://blog.dp.cx/25/postfix-fail2ban-win

Recently, I had to lease a new server. My old one was ok, but it was 5 years old, and showing it’s age. The most recent bout of problems was due to postfix, and a specific domain that I host mail for.

I had previously set up Policyd in an attempt to stop the influx of spam before it ever hit the server, but it wasn’t doing anything at this point. So approximately 800 messages per minute were getting directly to Postfix, and then running queries against MySQL (I use virtual maps for users, aliases, domains, etc). 99% of these messages were to non-existant users, so Postfix would bounce them. But the little 2.0GHz Celeron couldn’t handle it. The load shot up to 8 for around 3 weeks, and stayed there. I wish the fail2ban idea had come to me sooner… Lire la suite…

Auto-hébergement: YunoHost Bêta 1 est disponible

05/02/2024 Comments off

Source: linuxfr.org

La distribution home-serveur YunoHost, basée sur Debian, a sortie le 31/05/12 sa première version publique. Encore en développement intensif, la Bêta 1 nous donne un avant-goût de ce qui a pour but de devenir une distribution serveur grand public.

Au programme de cette version : Un serveur mail, XMPP et LAMP auto-configuré à base de LDAP, ainsi qu’une installation simplifiée par rapport au standard Debian.

Un développement expéditif

C’est lors d’un constat alarmant de l’état de l’auto-hébergement en France que les deux développeurs du projet ont décidé de réagir: L’auto-hébergement peut être bénéfique au plus grand nombre mais reste très difficile d’accès, et des initiatives comme Beedbox ou Freedombox peinent à voir le jour.

Ainsi, 3 mois de développement auront suffit à l’administrateur système et au développeur web en charge du projet pour sortir cette première Bêta. Bien sûr, beaucoup de travail reste à faire avant que Madame Michu ne relève ses mails sur son propre serveur, mais l’idée était avant tout de proposer un support sur lequel baser une communauté de contributeurs motivés.

Techniquement

La distribution inclut par défaut les composants standards Debian suivant :

  • Apache 2
  • MySQL
  • PHP
  • Postfix
  • Dovecot
  • Ejabberd
  • OpenLDAP

Elle utilise LemonLDAP::NG comme SSO, et le reste sont des paquets YunoHost disponible par un dépôt Debian dédié.

Lors de l’installation, tous les services sont configurés pour fonctionner avec l’annuaire LDAP, et une interface d’administration Web (« admin.mondomaine.fr ») permet de gérer, entre autre, les utilisateurs de celui-ci.

Les développeurs ont également mis en place un système d’installation automatique d’applications web, sous forme de paquets Debian également, et installables depuis l’interface web. Un portail d’application devient ensuite accessible par l’URL « apps.mondomaine.fr », et bénéficie de l’authentification unique de LemonLDAP.

Encore des lacunes

Toujours dans un souci de « Release early, release often » (sortir tôt, sortir souvent), l’équipe a concédé plusieurs lacunes importantes techniquement :

D’une part, l’interface web d’administration est codée en PHP et permet un large choix d’opérations serveurs (installation de paquet, redémarrage de services, consultation de logs), ce qui peut et pourra présenter de conséquentes failles de sécurité.
D’autre part, certains composants intégrés sont assez gourmand en ressources (Apache, Ejabberd et MySQL en particulier), ce qui oblige un utilisateur modeste à disposer d’un minimum de 512Mo de mémoire vive pour faire tourner correctement la distribution.
Enfin, le SSO LemonLDAP::NG – bien que très fonctionnel – restreint l’architecture requise aux processeurs x86 uniquement, ce qui empêche pour le moment la distribution de s’installer sur des NAS ou autres boîtiers ARM.

Categories: Logiciel, Système Tags: , , ,

Surveillance système des machines sur un réseau avec Munin

04/02/2024 Comments off

I. Introduction

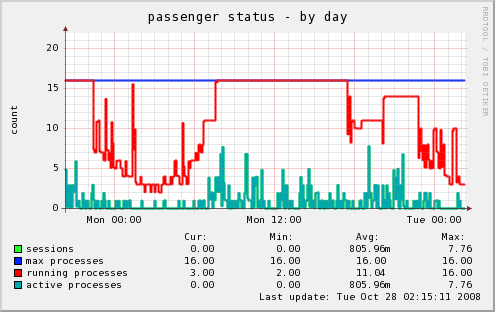
muninMunin est un outil de surveillance basé sur le célèbre RRDTool, permettant de connaître toutes les données systèmes des autres ordinateurs du réseau. Il les présente automatiquement sous forme de graphiques consultables depuis une page web. Par ailleurs, il dispose d’un système de plugins qui le rend simple d’utilisation et très modulaire.

J’ai choisi de le présenter, et non certains de ses concurrents comme Nagios, Cacti ou Zabbix, car il m’a semblé être le plus simple d’utilisation tout en conservant de fortes possibilités d’adaptation.

Un système Munin est composé de :

  • un serveur principal, récupérant les informations
  • un nœud par équipement à surveiller

Il faut signaler qu’avec une telle architecture Munin se différencie de Nagios. Ce dernier préfère en effet centraliser toutes les mesures sur le serveur, ce qui permet de ne rien installer sur les équipements surveillés.

Lire la suite…