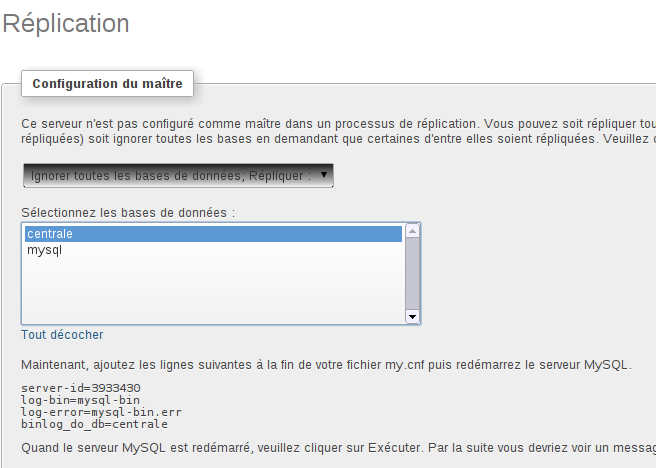
I : sur le serveur Maître, configurez la réplication comme suit :
Dans l’onglet réplication, choisissez l’option configurer le serveur maître.
Editer le fichier /etc/mysql/my.cnf
Redémarrez mysql : /etc/init.d/mysql restart
Puis faites exécuter dans phpMyAdmin
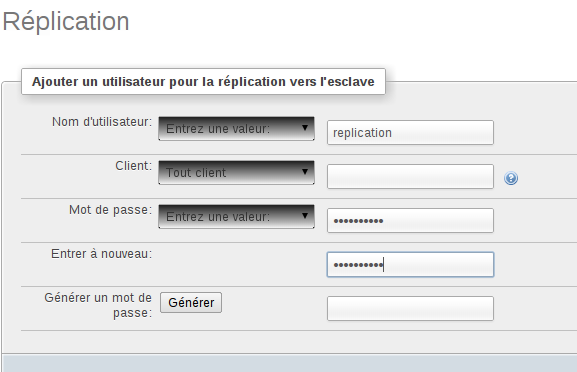
Ajouter un nouvel utilisateur pour la réplication et donner lui tous les privilèges nécessaires
CREATE USER ‘replicant’@'localhost’ IDENTIFIED BY ‘***’;
GRANT REPLICATION SLAVE , REPLICATION CLIENT ON * . * TO ‘replicant’@'localhost’ IDENTIFIED BY ‘***’;
II : sur le serveur esclave, configurez la réplication comme suit :
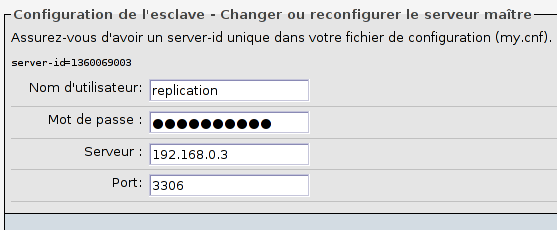
Dans l’onglet réplication, configurez :
Vous devrez ajouter le server-id proposé par phpMyAdmin dans /etc/mysql/my.cnf et redémarrez mysql (pensez à ajouter slave-skip-errors=1062,1053 !)
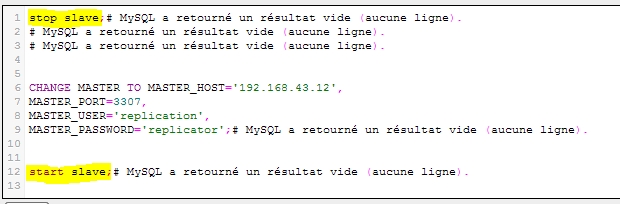
puis faire éxécuter dans phpMyAdmin
Faites reconfigurer le serveur maître en saisissant les informations du serveur maître
Ceci revient à faire en ligne de commande : et qui éditera au final le fichier master.info qui se trouve sur le serveur esclave :
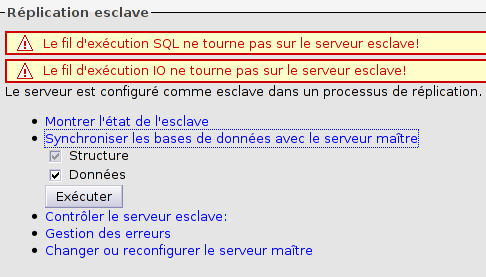
On obtient alors cet écran :
On pourra synchroniser les données afin de copier toute la base de données vers le serveur esclave et ensuite démarrer complètement le serveur esclave (ce qui correspond à démarrer d’abord le fil I/O qui lit les requêtes du maître et le splace dans le relay-lo et ensuite le fil mysql qui lit le relay-log et éxécute le sql).
Unless you are a MySQL performance tuning expert, it can be enormously challenging and somewhat overwhelming to locate and eliminate MySQL bottlenecks. While many DBAs focus on improving the performance of the queries themselves, this post will focus on the highest-impact non-query items: MySQL Server Performance and OS Performance for MySQL.
MySQL Performance Tuning
This post is a « best-of » compilation of the tricks and scripts I have found to be the most effective over the past decade. I’d like to write a 50 page article but am limiting this to 1 page.
For anyone serious about High Performance MySQL, I would highly highly recommend the fantastic book: « High Performance MySQL: Optimization, Backups, Replication, and more » – O’Reilly. I have spent many hours poring over it’s wisdom-filled pages and gaining much practical know-how.
MySQL Server Software
Each new MySQL server release contains ENORMOUS performance enhancements over previous versions. That is the absolute very first thing you should do: Upgrade your MySQL Server and Client libraries and keep them updated.
There are several « flavors » of MySQL believe it or not.. Most people use the stock MySQL Server. I, along with WikiPedia, Arch-Linux, and others, use MariaDB. MariaDB is a greatly enhanced 100% compatible replacement for the stock MySQL Server. It is based on the excellent work by the Percona project. The percona flavor of MySQL is the other truly improved version of MySQL to consider. I personally have spent a couple years using Percona, then I upgraded from Percona to MariaDB (which has a lot of Percona juju built in) and am no longer thinking about which version to go with. MariaDB is the bomb-diggity.
MySQL Engine
InnoDB not MyISAM. InnoDB may be surpassed by in-development engines like TokuDB. I ONLY use InnoDB, for everything.
Types of MySQL Servers to optimize
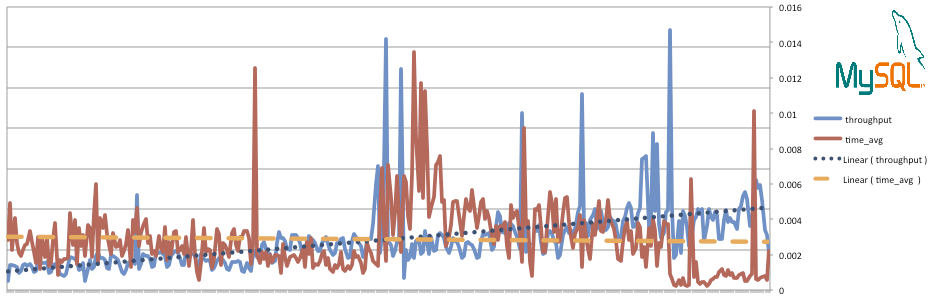
Seriously? Optimize EVERYTHING! The screenshots below are actual from one of my live servers. That server used to be 8GB RAM, but now as you may see in the screenshots, it is now only 2GB of RAM. I was able to save some serious $$$ by optimizing my server, without sacrificing speed… In fact I gained some speed in many instances.
I’ve used these optimization techniques on monster servers with 32GB of ram and many slaves, and also on a machine with 1GB of ram (running arch-linux).
DV servers do not have any MySQL modifications when they are initially provisioned. In fact, the my.cnf file that is included as part of the database server’s configuration includes multiple deprecated directives. Although this article will actually increase the memory used by MySQL the performance gain can be dramatic depending on your queries and database usage. The average user will get more mileage out of the server’s resources with MySQL changes similar to the following.
CAUTION:
With that said, it should always be noted that this can not be guaranteed to be a one-size-fits-all solution. It is possible that these recommendations are not ideal for a specific server configuration. More information on tuning specific situations can be found at the bottom of this article.
Requirements
Before you start, this article has the following dependencies:
Make a back upbefore you make any change to your DV.
Instructions
Tuning MySQL based on available RAM
Create a backup of your MySQL config:
cp /etc/my.cnf /etc/my.cnf.YYYY-MM-DD.bak
(Remember to replace YYYY-MM-DD with today’s date, ie: 2012-02-14.)
All of your server’s memory allocations can be found in /proc/user_beancounters. However, these can be difficult to read. The following commands take this information and turn your server into a number. If your DV has 1G RAM, the number is 2; for 2G RAM, it is 3; so on and so forth.
ramCount=`awk 'match($0,/vmguar/) {print $4}' /proc/user_beancounters`
ramBase=-16 && for ((;ramCount>1;ramBase++)); do ramCount=$((ramCount/2)); done
On its own, this number may not mean much more than the beancounters themselves. Consider this example, and the logic behind it: Why would a DV 4.0 with 4G of RAM have the same MySQL configuration as a server with DV 4.0 with 1G of RAM? It is very unlikely that those two servers will have an identical MySQL workload – their configuration files should reflect as much. Using the server’s beancounters as a guideline, a more suitable my.cnf can be crafted. The following is a single command:
When phpMyAdmin is installed, the default session timeout value is too low for many users, making your phpMyAdmin session expire too soon. One could argue that a low session timeout value is a good idea from a security perspective. If you do not think this is an issue, here are a few simple steps that’ll let you change how long phpMyAdmin will keep your session(s) alive.
Open config.inc.php in the phpMyAdmin “root” directory. Look for a line that contains this: $cfg[‘LoginCookieValidity’]. Set the value to the desired number of seconds you want the session to stay alive (3600 = one hour, which is reasonable for most users). If you do not have that line in your config.inc.phpfile, add it like this:
$cfg[‘LoginCookieValidity’] = 3600;
Don’t forget to save the file, and then login again to phpMyAdmin. You may need to close the browser and re-open your phpMyAdmin URL.
This also assumes that the PHP session garbage collection is set-up accordingly. This can be done in a number of ways:
php.ini; add a line (or change an existing) that contains session.gc_maxlifetime = <seconds>
Apache configuration; add a line to the appropriate <Directory> block that says “php_admin_value session.gc_maxlifetime <seconds>”
config.inc.php (phpMyAdmin); after the previously edited line, add a line with “ini_set(‘session.gc_maxlifetime’, <seconds>);”
The <seconds> above is the same value that you set your variable to in config.inc.php at the beginning of this post, “3600” (sans quotes) in my case. (Some of these methods may or may not work on the server you’re using.)
This isn’t the only way to circumvent phpMyAdmin sessions expiring on you in the middle of that important work; you can, of course, configure phpMyAdmin to have appropriate access directly, thus allowing you to access your MySQL database(s) without entering a username and a password. You’ll find more information about this on the phpMyAdminwebsite.
Neat tricks with iptables: The past few months have seen me digging deep into the world of TCP/IP and firewalls. It has been a fascinating journey into packet queueing and TCP headers, three-way handshakes and ICMP broadcasts.
The result of this research has been the ongoing creation of a firewall to protect my laptop against open networks, and my Internet server from port scanning and DoS attacks. I’m pretty certain I haven’t even scratched the surface yet, but I have found some settings to protect against the most common attacks. Below I’ll summarize the major pieces of my new firewall, and the logic behind it.
Address spoofing: win with iptables
The easiest way to fool a server is to construct a packet that whose source address is faked, or spoofed. This is surprisingly easy to do. To craft packets, I use a very powerful network analysis tool called Scapy. Scapy will allow you to create packets on the fly, transmit them, and scan your network for any response.
For example, let’s say I’m on my local network (which I am right now, as I write this), connected via wireless as192.168.15.113. I’m going to interact with the router, which is at 192.168.15.1. For the purposes of analysis, I’ve also setup a virtual machine running on 192.168.15.114, so I can see what happens when I spoof the packet.
So, let’s say I spoof an ICMP echo-request packet, sent to .1 (router) from .113 (me) but spoofed as if it had come from .114 (virtual machine). In Scapy this is quite easy to do. I run two scapy session in two terminal windows. In the first I type:
>>> send(IP(src="192.168.15.114", dst="192.168.15.1")/ICMP())
.
Sent 1 packets.
Although my machine is at .113, I’m telling scapy to set the source address for the ICMP echo-request packet to.114, which is the host I want to attack. I’m sending this “ping” to the router, which should now send its response back to .114 instead of me.
In my other terminal window, I run scapy again, this time in promiscuous mode as a packet sniffer. Promiscuous mode means that it will capture all packets seen on the network, not just those destined for my own machine. Here’s what I see:
I ran the sniffer, then did the ping, then stopped the sniffer by pressing Control-C. I can see that two ICMP packets were seen during the sniff. By showing the contents of these packets, I can see both the packet that I transmitted, and the response – which came back to .114!
That’s a spoof. How can it be used to attack someone? Read on in the next section, since what we just did forms the basis for a smurf attack.
Some packet spoofs, however, are more obvious. For example, a packet coming from the Internet bound for a private IP address or certain broadcast addresses, such as address beginning with 192.168 or 224. These are never valid, so it’s a good idea to drop such packets immediately upon receipt. Here are the iptables rules to do this:
# Reject packets from RFC1918 class networks (i.e., spoofed)
iptables -A INPUT -s 10.0.0.0/8     -j DROP
iptables -A INPUT -s 169.254.0.0/16 -j DROP
iptables -A INPUT -s 172.16.0.0/12  -j DROP
iptables -A INPUT -s 127.0.0.0/8    -j DROP

iptables -A INPUT -s 224.0.0.0/4      -j DROP
iptables -A INPUT -d 224.0.0.0/4      -j DROP
iptables -A INPUT -s 240.0.0.0/5      -j DROP
iptables -A INPUT -d 240.0.0.0/5      -j DROP
iptables -A INPUT -s 0.0.0.0/8        -j DROP
iptables -A INPUT -d 0.0.0.0/8        -j DROP
iptables -A INPUT -d 239.255.255.0/24 -j DROP
iptables -A INPUT -d 255.255.255.255  -j DROP
Here’s the same thing, now for ipfw users:
# Verify the reverse path to help avoid spoofed packets.  This means any
# packet coming from a particular interface must have an address matching the
# netmask for that interface.
ipfw add 100 deny all from any to any not verrevpath in

# Deny all inbound traffic from RFC1918 address spaces (spoof!)
ipfw add 110 deny all from 192.168.0.0/16 to any in
ipfw add 120 deny all from 172.16.0.0/12 to any in
ipfw add 130 deny all from 10.0.0.0/8 to any in
ipfw add 140 deny all from 127.0.0.0/8 to any in

ipfw add 150 deny all from 224.0.0.0/4 to any in
ipfw add 160 deny all from any to 224.0.0.0/4 in
ipfw add 170 deny all from 240.0.0.0/5 to any in
ipfw add 180 deny all from any to 240.0.0.0/5 in
ipfw add 190 deny all from 0.0.0.0/8 to any in
ipfw add 200 deny all from any to 0.0.0.0/8 in
ipfw add 210 deny all from any to 239.255.255.0/24 in
ipfw add 220 deny all from any to 255.255.255.255 in