Archive

Archives pour 11/2023

iptables revisited: a not so ordinary ‘firewall’
10/11/2023 Comments off

iptables revisited

Source: Per Linde, Martynas Pumputis and Guillermo Rodr ́ıguez iptables revisited: a not so ordinary ‘firewall’

iptables revisited: Abstract

At the present time, security on the internet, and networks in general have evolved, and become an issue that should not be disregarded. It is well known that many experts recommend Linux as the main operating system for the machines that have to be in charge of security (also for a desktop computer). Linux included a basic firewall tool called ipchains in the series of its kernel until 2.4 version, though after that version it switched to iptables. iptables is known for its efficiency and functionality, but the enormous functionality means a more complex tool to be configured. This paper will overview some mechanisms to do advanced configuration of iptables based on two main scenarios. The different configurations presented will try to prove the remarkable power of iptables as an independent firewall and also as a tool that can work in conjuntion with other tools usually incorporated when included this one.

Introduction

iptables is a firewall developed by the Netfilter Project 1 . Presently, this firewall is becoming more and more popular (both among end users and network administrators). The popularity of this firewall it closely related to Linux operating system, because iptables works with Linux kernels 2.4 and 2.6 and almost every major Linux distribution comes with pre-installed iptables firewall. This firewall is also known as a stateful packet filter. It is a main difference between iptables and ipchains (an ancestor of iptables that was used with Linux kernel versions up to 2.4). The firewall supports not only a packet filtering, but it is also able to log, forward packets and it could be used together with such tools as psad, snort, etc. In this paper we will look a bit deeper into more advance iptables configurations, but first of all, we would like to introduce a reader to a basic usage of iptables. The core of the firewall consists of four parts [7]: tables, chains, matches and targets. A system administrator is able to define an iptables policy, i.e. tables of chains, which describe how a kernel should react against different groups of packets. Rules are used to create a chain – collection of rules that is applied to every packet. There are five predefined chains:

  • INPUT: used for incoming packets before routing.
  • OUTPUT: used for packets coming into the box itself.
  • FORWARD: used for packets being routed through the box.
  • PREROUTING: used for locally-generated packets before routing.
  • POSTROUTING: used for packets as they about to leave iptables.

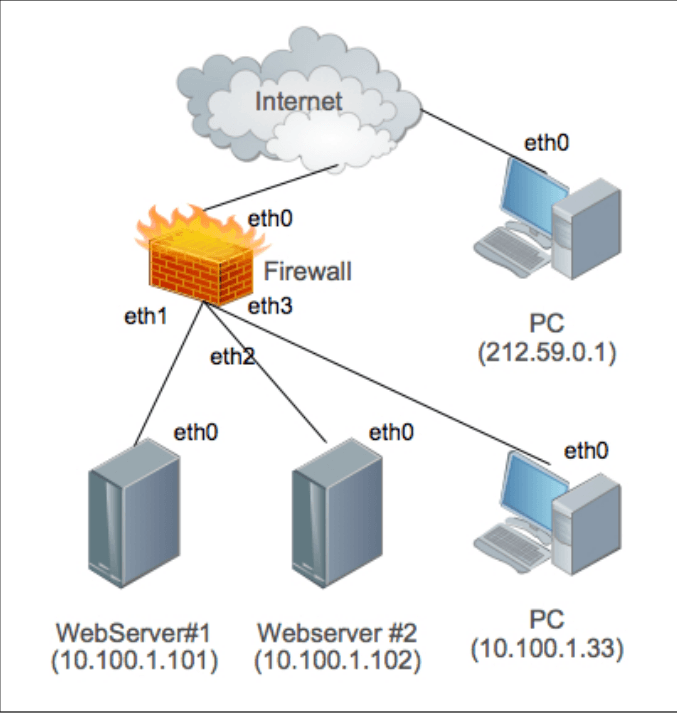
Every rule should have a set of matches, that helps to filter packets (e.g. -d 10.100.1.1 matches a destination IP 10.100.1.1), and it also has to have a target – an action which should be performed when a rule matches on a packet (e.g. ACCEPT, DROP, LOG…). All the examples presented in this paper (excluding the one used at section 6) will be based on the scenario presented in the figure 1. In the following scenario, WebServer#1 (10.100.1.101 assigned to its ‘eth0’ interface), WebServer#2 (10.100.1.102 assigned to its ‘eth0’ interface) and PC (10.100.1.33 assigned to its ‘eth0’ interface) belong to a local network and every packet that comes from the Internet/LAN is filtered by the firewall (‘eth1’ interface for LAN’s traffic, ‘eth0’ for Internet’s traffic). PC (212.59.0.1 assigned to ‘eth0’ interface) is reachable directly through the Internet. Capture du 2016-04-19 17:53:32 The listing 1 shows a couple of rules, the first one appends a rule to the end of the INPUT chain and it specifies that every packet from the source with IP address 212.59.0.1 will beDROPed and the second rule logs all outgoing connections from eth1 interface.

iptables -A INPUT -s 212.59.0.1 -j DROP
iptables -A OUTPUT -o eth1 -j LOG

Lire la suite…

How to receive a million packets per second

09/11/2023 Comments off

receive million packetsLast week during a casual conversation I overheard a colleague saying: « The Linux network stack is slow! You can’t expect it to do more than 50 thousand packets per second per core! »

That got me thinking. While I agree that 50kpps per core is probably the limit for any practical application, what is the Linux networking stack capable of? Let’s rephrase that to make it more fun:

On Linux, how hard is it to write a program that receives 1 million UDP packets per second?

Hopefully, answering this question will be a good lesson about the design of a modern networking stack.

First, let us assume:

  • Measuring packets per second (pps) is much more interesting than measuring bytes per second (Bps). You can achieve high Bps by better pipelining and sending longer packets. Improving pps is much harder.
  • Since we’re interested in pps, our experiments will use short UDP messages. To be precise: 32 bytes of UDP payload. That means 74 bytes on the Ethernet layer.
  • For the experiments we will use two physical servers: « receiver » and « sender ».
  • They both have two six core 2GHz Xeon processors. With hyperthreading (HT) enabled that counts to 24 processors on each box. The boxes have a multi-queue 10G network card by Solarflare, with 11 receive queues configured. More on that later.
  • The source code of the test programs is available here: udpsender, udpreceiver.

Prerequisites

Let’s use port 4321 for our UDP packets. Before we start we must ensure the traffic won’t be interfered with by the iptables:

receiver$ iptables -I INPUT 1 -p udp --dport 4321 -j ACCEPT  
receiver$ iptables -t raw -I PREROUTING 1 -p udp --dport 4321 -j NOTRACK  

A couple of explicitly defined IP addresses will later become handy:

receiver$ for i in `seq 1 20`; do   
              ip addr add 192.168.254.$i/24 dev eth2; 
          done
sender$ ip addr add 192.168.254.30/24 dev eth3  

1. The naive approach

To start let’s do the simplest experiment. How many packets will be delivered for a naive send and receive?

The sender pseudo code:

fd = socket.socket(socket.AF_INET, socket.SOCK_DGRAM)  
fd.bind(("0.0.0.0", 65400)) # select source port to reduce nondeterminism  
fd.connect(("192.168.254.1", 4321))  
while True:  
    fd.sendmmsg(["x00" * 32] * 1024)

While we could have used the usual send syscall, it wouldn’t be efficient. Context switches to the kernel have a cost and it is be better to avoid it. Fortunately a handy syscall was recently added to Linux: sendmmsg. It allows us to send many packets in one go. Let’s do 1,024 packets at once.

The receiver pseudo code:

fd = socket.socket(socket.AF_INET, socket.SOCK_DGRAM)  
fd.bind(("0.0.0.0", 4321))  
while True:  
    packets = [None] * 1024
    fd.recvmmsg(packets, MSG_WAITFORONE)

Similarly, recvmmsg is a more efficient version of the common recv syscall.

Let’s try it out:

sender$ ./udpsender 192.168.254.1:4321  
receiver$ ./udpreceiver1 0.0.0.0:4321  
  0.352M pps  10.730MiB /  90.010Mb
  0.284M pps   8.655MiB /  72.603Mb
  0.262M pps   7.991MiB /  67.033Mb
  0.199M pps   6.081MiB /  51.013Mb
  0.195M pps   5.956MiB /  49.966Mb
  0.199M pps   6.060MiB /  50.836Mb
  0.200M pps   6.097MiB /  51.147Mb
  0.197M pps   6.021MiB /  50.509Mb

With the naive approach we can do between 197k and 350k pps. Not too bad. Unfortunately there is quite a bit of variability. It is caused by the kernel shuffling our programs between cores. Pinning the processes to CPUs will help:

sender$ taskset -c 1 ./udpsender 192.168.254.1:4321  
receiver$ taskset -c 1 ./udpreceiver1 0.0.0.0:4321  
  0.362M pps  11.058MiB /  92.760Mb
  0.374M pps  11.411MiB /  95.723Mb
  0.369M pps  11.252MiB /  94.389Mb
  0.370M pps  11.289MiB /  94.696Mb
  0.365M pps  11.152MiB /  93.552Mb
  0.360M pps  10.971MiB /  92.033Mb

Now, the kernel scheduler keeps the processes on the defined CPUs. This improves processor cache locality and makes the numbers more consistent, just what we wanted.

Lire la suite…

Reduce firewall configuration complexity using iptables with chains

09/11/2023 Comments off

firewall configuration: Introduction

Reduce firewall configuration complexity: Setting up a firewall on your *nix box, being it a workstation, laptop, or server, is always a good idea. In most cases, you can do with some simple firewall rules, f.e. on your laptop, block all incoming requests (except the established connections, i.e. the replies on the outgoing requests you made), or on a simple webserver (allow port 80 only).

But if you need more complex rules, f.e. a server that hosts a website available for the entire internet, but with an ssh and samba service that should only be available for the local subnet, or even some specific IP addresses, it becomes a bit more complex.
And if you want to filter the outgoing traffic as well, your iptables rules get a mess after a while, and when you want to change anything, chances of a mistake or forgetting something are high, which may result in locking yourself out of your box (at least for remote access), or leaving something open that shouldn’t.

To make your rules more manageable, you can make use of chains in your iptables rules. I got some inspiration in an article that uses chains to make iptables more efficient (faster). My goal was to get easier to read and configure iptables rules, but it will result in faster handling of packets as well.

Setup

  • A web service should be available from all networks (i.e. internet) on port 80 (http) and 443 (https)
  • The server can be managed remotely using ssh (port 20) and webmin (port 10000), but only from a limited set of IP addresses (admin PC’s).
  • The server hosts a samba service (several TCP and UDP ports), that should only be available from a limited set of IP addresses (admin + webmaster PC’s).
  • Outgoing connections will be filtered, but some services should be allowed (dns, dhcp, smtp, ntp) and some external websites should be available to get updates.


Concepts

ESTABLISHED state

When using this option, you can filter for established connections. If you define it in both the INPUT and OUTPUT rules, you only have to define in the INPUT rules which NEW incoming requests should be allowed, and in the OUTPUT rules which NEW outgoing request are allowed. The established connections will be allowed and should not be redefined (making the configuration a lot more readable and maintainable). An example allowing only an ssh service without using the ESTABLISHED state would be :

# iptables -A INPUT -p tcp --dport ssh -j ACCEPT
# iptables -A INPUT -j REJECT
# iptables -A OUTPUT -p tcp --sport ssh -j ACCEPT
# iptables -A OUTPUT -j REJECT

Basically, every incoming/outgoing connection is dropped, except if the incoming packet has port 22 (ssh) as destination, or if the outgoing packet was sent from port 22 (which is the reply of the ssh server).

When using ESTABLISHED state, this will be :

# iptables -A INPUT -p tcp --dport ssh -j ACCEPT
# iptables -A INPUT -j REJECT
# iptables -A OUTPUT -m state --state ESTABLISHED -j ACCEPT
# iptables -A OUTPUT -j REJECT

Now, every incoming/outgoing connection is dropped, except if the incoming packet has port 22 (ssh) as destination, or if the packet belongs to an established connection. Because incoming connections to port 22 are allowed, the firewall will remember a packet coming in, creating a ‘connection’ for the host/port the packet originates from when the ssh server replies to it. So when the reply of the ssh server is sent out, it matches an ‘established’ connection and will be allowed out.

In this example, the benefit of using the connection state is not clear, but when more allowed incoming services are added, they only have to be added on the INPUT chain, but not on the OUTPUT chain, because they are covered by the ESTABLISHED rule.
In the first example (without the ESTABLISHED rule), every allowed incoming connection should be repeated in the OUTPUT chain, matching the packets sent for the outgoing connection, which results in an equal amount of rules on both chains.
If you want to do filtering in both directions (allowing incoming request for listening services and outgoing request for remote services), this can become very messy, and almost unmaintainable without making mistakes.

Introducing chains

When two services (on different ports) should be available to a limited but identical list of IP addresses.
Without using chains, for every combination of port and IP a rule should be created :

# iptables -A INPUT -p tcp -m tcp -s 10.100.2.3 --dport 22 -j ACCEPT
# iptables -A INPUT -p tcp -m tcp -s 10.100.2.4 --dport 22 -j ACCEPT
# iptables -A INPUT -p tcp -m tcp -s 10.100.2.7 --dport 22 -j ACCEPT

# iptables -A INPUT -p tcp -m tcp -s 10.100.2.3 --dport 10000 -j ACCEPT
# iptables -A INPUT -p tcp -m tcp -s 10.100.2.4 --dport 10000 -j ACCEPT
# iptables -A INPUT -p tcp -m tcp -s 10.100.2.7 --dport 10000 -j ACCEPT

Resulting in a lot of rules, and when an IP address has to be changed/added/removed, this has to be done for every corresponding rule.

When using chains, this can be much easier. Imagine, that you first check if the packet matches the destination port, and if it does, jump to a new chain, where a list of IP addresses is checked. :

// create new chain admin_IP
# iptables -N admin_IP

// add rules to chain admin_IP
# iptables -A admin_IP -s 10.100.2.3 -j ACCEPT
# iptables -A admin_IP -s 10.100.2.4 -j ACCEPT
# iptables -A admin_IP -s 10.100.2.7 -j ACCEPT
// drop all packets that are not matched by previous rules
# iptables -A admin_IP -j DROP

// filter ports in INPUT chain
# iptables -A INPUT -p tcp -m tcp --dport 22 -j admin_IP
# iptables -A INPUT -p tcp -m tcp --dport 10000 -j admin_IP

As you can see, there is are several benefits of putting the IP addresses in a separate chain :

  • the list of IP addresses in the separate chain can be reused for both ports, so they have to be defined only once.
  • adding/changing/removing an IP address is much easier
  • there is a better overview of the firewall rules.

Lire la suite…

Categories: Réseau, Sécurité Tags: ,

Preventing brute force attacks using iptables recent matching

08/11/2023 Comments off

General idea

brute force attacksIn recent times our network has seen a lot of attempts to brute-force ssh passwords. A method to hamper such attacks by blocking attacker’s IP addresses using iptables ‘recent’ matching is presented in this text:

When the amount of connection attempts from a certain IP address exceeds a defined threshold, this remote host is blacklisted and further incoming connection attempts are ignored. The host is only removed from the blacklist after it has been stopped connecting for a certain time.

Edit: The fail2ban scripts offer a more sophisticated (but also more heavy-weighted) solution for this problem.

Software requirements

Linux kernel and iptables with ‘recent’ patch. (It seems that this patch has entered the mainline some time ago. ‘Recent’ matching e.g. is known to be included with kernels 2.4.31 and 2.6.8 of Debian Sarge 4.0.)

Implementation

We begin with empty tables…

iptables -F

and add all the chains that we will use:

iptables -N ssh
iptables -N blacklist

Setup blacklist chain

One chain to add the remote host to the blacklist, dropping the connection attempt:

iptables -A blacklist -m recent --name blacklist --set
iptables -A blacklist -j DROP

The duration that the host is blacklisted is controlled by the match in the ssh chain.

Setup ssh chain

In the ssh chain, incoming connections from blacklisted hosts are dropped. The use of --update implies that the timer for the duration of blacklisting (600 seconds) is restarted every time an offending packet is registered. (If this behaviour is not desired, --rcheckmay be used instead.)

iptables -A ssh -m recent --update --name blacklist --seconds 600 --hitcount 1 -j DROP

These rules are just for counting of incoming connections.

iptables -A ssh -m recent --set --name counting1
iptables -A ssh -m recent --set --name counting2
iptables -A ssh -m recent --set --name counting3
iptables -A ssh -m recent --set --name counting4

With the following rules, blacklisting is controlled using several rate limits. In this example, a host is blacklisted if it exceeds 2 connection attempts in 20 seconds, 14 in 200 seconds, 79 in 2000 seconds or 399 attempts in 20000 seconds.

iptables -A ssh -m recent --update --name counting1 --seconds 20 --hitcount 3 -j blacklist
iptables -A ssh -m recent --update --name counting2 --seconds 200 --hitcount 15 -j blacklist
iptables -A ssh -m recent --update --name counting3 --seconds 2000 --hitcount 80 -j blacklist
iptables -A ssh -m recent --update --name counting4 --seconds 20000 --hitcount 400 -j blacklist

The connection attempts that have survived this scrutiny are accepted:

iptables -A ssh -j ACCEPT

Lire la suite…

iptables « recent » module and hit limits

08/11/2023 Comments off

iptables « recent » module and hit limits

iptables « recent » module and hit limits

Those annoying ssh attacks

You know those. you have tried blockhosts, denyhosts, fail2ban, and they can still be annoying.

an alternative is to use some feature or features of iptables.

Two possible uses … examples

Your default INPUT chain policy is ACCEPT

This is the version that is found online, typically under tags such as Brute-force.

one adds lines to ones iptables

iptables -N SSHSCAN

iptables -A INPUT -i eth0 -p tcp -m tcp --dport 22 -m state --state NEW -j SSHSCAN 

iptables -A SSHSCAN -m recent --set --name SSH --rsource 
iptables -A SSHSCAN -m recent --update --seconds 3600 --hitcount 5 --name SSH --rsource -j LOG --log-prefix "Anti SSH-Bruteforce: " --log-level 6 
iptables -A SSHSCAN -m recent --update --seconds 3600 --hitcount 5 --name SSH --rsource -j DROP

Your default INPUT chain policy is DROP

This is a variation of the above, but takes into account the DROP policy. It is a small change, but necessary if you really want to be able to log in via ssh.

iptables -N SSHSCAN

iptables -A INPUT -i eth0 -p tcp -m tcp --dport 22 -m state --state NEW -j SSHSCAN

iptables -A SSHSCAN -m recent --set --name SSH --rsource
iptables -A SSHSCAN -m recent --update --seconds 3600 --hitcount 5 --name SSH --rsource -j LOG --log-prefix "Anti SSH-Bruteforce: " --log-level 6
iptables -A SSHSCAN -m recent --update --seconds 3600 --hitcount 5 --name SSH --rsource -j LogDrp
iptables -A SSHSCAN -j ACCEPT

Discussion

The recent module takes a number of options, and the examples above demonstrate some.

  • —name xyz give a name to the particular ‘class’ you are defining
  • —rsource in the list you keep, use the remote (source) address
  • —rcheck see if the address is in the list
  • —update like rcheck, but update the timestamp for tracking hits
  • —seconds the number of seconds to track the address
  • —hitcount the number of hits withing the time defined be —seconds at which point the rule gets activated.

So, in the examples, after the chain is defined to exist ( -N SSHSCAN), we have an INPUT rule that says ‘go to chain SSHSCAN if the destination port is 22’. In that chain, we set the module’s reference to this as SSH; then we tell it how to log this, if we have gotten 5 hits within 3600 seconds (actually more, as the time is updated rather than checked) and after that, DROP the next packets.

If the address has not gone up to 5 hits, it passes through and gets ACCEPTed.

Depending on your kernel and version of iptables, you can find the current list in

/proc/self/net/xt_recent/SSH

or

/proc/net/ipt_recent/SSH

ipsets

what does one do when one’s iptables rules start to get long? cpu and memory hit hard? convert a table to an ipset.

here is an example of something i need to test:

ipset -N sshban iphash --hashsize 4096 --probes 2 --resize 50

for i in ` cat /proc/net/xt_recent/SSH  | awk '{print $1;}' | cut -d '=' -f 2 `; do 
ipset -A sshban $i;
echo -$i > /proc/net/xt_recent/SSH
done

where we also have iptables rule

iptables -I INPUT -m set —set sshban src -j DROP

Source: we.riseup.net

Categories: Réseau, Sécurité Tags: ,