What is the main objective of this entire topology?
Redundancy and Load Sharing! Imagine a scenario where your single web server is receiving millions and millions of HTTP requests per second, the CPU load is going insane, as well as the memory usage, when suddenly “crash!”, the server dies without saying good-bye (probably because of some weird hardware out-stage that you certainly won’t have time to debug). Well, this simple scheme might lead you into a brand new world of possibilities
What is this going to solve?
Hardware Failures! We are going to have redundant hardware all over the place, if one goes down, another one will be immediately ready for taking its place. Also, by using load sharing schemes, this is going to solve our High Usage! issue. Balancing the load among every server on our “farm” will reduce the amount of HTTP request per server (but you already figured that out, right?).
Let’s set it up! Firstly, we’re not going to use a domain scheme (let’s keep it simple), make sure your /etc/hosts file looks exactly like the picture below on every machine:
Here are a few notes about how to set-up a high-availability web server farm using Ubuntu 12.04 LTS using a whole load of awesome software (HAProxy, HeartBeat, Watchdog and Nginx)
The setup
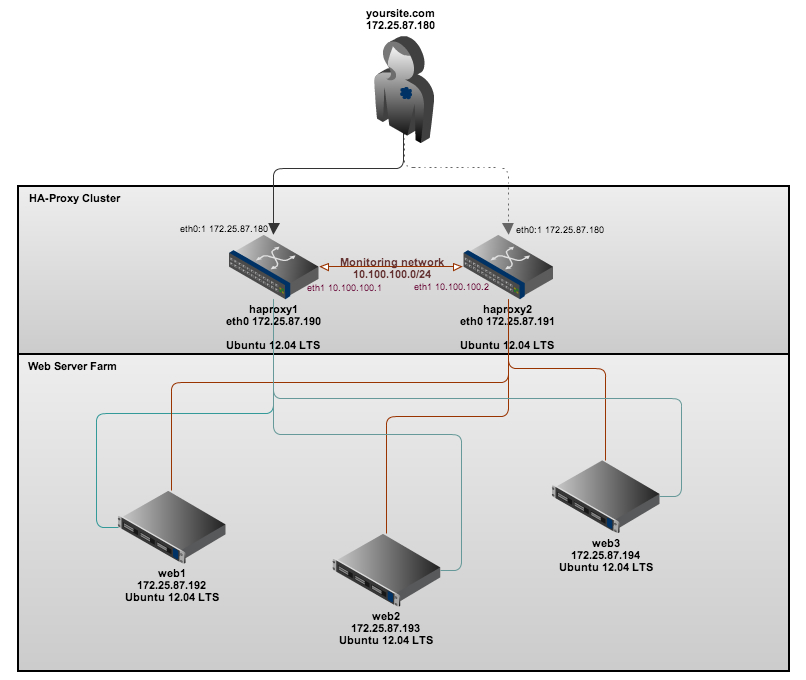
In my setup I have five virtual machines, these are named and used for the following:-
haproxy1 – Our first proxy (master)/load-balancer (running HAProxy, HeartBeat and Watchdog) [IP address: 172.25.87.190] haproxy2 – Our second proxy (failover)/load-balancer (running HAProxy, HeartBeat and Watchdog) [IP address: 172.25.87.191] web1 – Our first web server node (running nginx) [IP address: 172.25.87.192] web2 – Our second web server node (running nginx) [IP address: 172.25.87.193] web3 – Our third web server node (running nginx) [IP address: 172.25.87.194]
The servers are connected in the following way:-
In my next post I will also explain how to configure the web servers to point to a backend shared storage cluster (using NFS) and a MySQL cluster server to have a truly highly available web hosting platform.
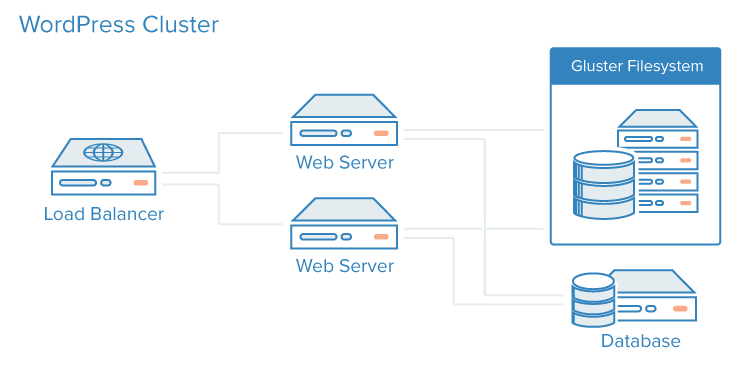
In this guide we will create and deploy a scalable WordPress instance consisting of a MySQL database server, a GlusterFS distributed filesystem, Nginx web servers and an Nginx load balancer. By using user-data and droplet meta-data we will automate the deployment of our site. Finally we will provide a Ruby script which will automate this entire process and ease the creation of scalable WordPress sites. Through this tutorial you will learn about the power and flexibility of user-data and droplet meta-data in deploying services on DigitalOcean.
Step One – Planning our Deployment
The deployment we create in this tutorial will consist of a single MySQL database server, multiple GlusterFS servers in a cluster, multiple Nginx web servers and a single Nginx load balancer.
Before we begin we should know:
What size droplet we will use for our MySQL server
How many GlusterFS nodes we will create
What size our GlusterFS nodes will be
How many web server nodes we will need
What size droplets we will use for our web servers
What size droplet we will use for our load balancer
The domain name we will use for our new site
We can add additional nodes or scale up the nodes we created if we need to later. Once we have decided on these details we can begin deploying our site.
WordPress is the most popular CMS (content management system) used on the internet today. While many people use it because it is powerful and simple, sometimes people make a trade-off for convenience at the expense of security.
This is the case in how you choose to assign directory ownership and permissions, and how you choose to perform upgrades. There are a variety of different methods to do this. We will choose what we consider a relatively secure way of upgrading and installing themes and plugins.
Once you have the user and required software, you can start following this guide.
Set Up Secure Updates with SSH
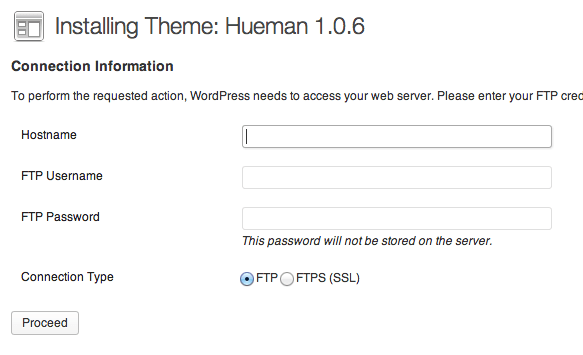
If you do not have key-based updates and installations configured, you will get a prompt for connection information whenever you attempt to do either of these tasks.
It will ask you to provide FTP credentials, such as a hostname, FTP username, and FTP password:
FTP is an inherently insecure protocol, so we do not recommend you using it in most cases. We will be configuring our installation to use a secure alternative.
Changing Permissions
If you followed the guide on installing WordPress above, you will notice that you gave permission of the web directory to the Apache web user. This is a very quick way to get started, but can potentially be a security risk. In an ideal situation, you would separate the content owner from the web process. We will do this as part of our preparation for allowing SSH updates.
We will create a user called wp-user to own our WordPress installation.
sudo adduser wp-user
You will be asked a lot of question, including the password you want to set. We do not want to set a password, so press « ENTER » through all of the prompts, including the repeated password questions.
Next, change to the /var/www/html directory, where our WordPress files are being served.
cd /var/www/html
We will give our new user ownership over everything under this directory, changing it from the www-data Apache web user that we configured during installation.
Q. Can you explain how to setup network parameters such as IP address, subnet, dhcp etc using /etc/network/interfaces file?
A. /etc/network/interfaces file contains network interface configuration information for the both Ubuntu and Debian Linux. This is where you configure how your system is connected to the network.
Defining physical interfaces such as eth0
Lines beginning with the word « auto » are used to identify the physical interfaces to be brought up when ifup is run with the -a option. (This option is used by the system boot scripts.) Physical interface names should follow the word « auto » on the same line. There can be multiple « auto » stanzas. ifup brings the named inter faces up in the order listed. For example following example setup eth0 (first network interface card) with 192.168.1.5 IP address and gateway (router) to 192.168.1.254: