Archive

Articles taggués ‘ssh’

How to secure SSH login with one-time passwords on Linux

28/10/2023 Comments off

As someone says, security is a not a product, but a process. While SSH protocol itself is cryptographically secure by design, someone can wreak havoc on your SSH service if it is not administered properly, be it weak passwords, compromised keys or outdated SSH client.

As far as SSH authentication is concerned, public key authentication is in general considered more secure than password authentication. However, key authentication is actually not desirable or even less secure if you are logging in from a public or shared computer, where things like stealth keylogger or memory scraper can always a possibility. If you cannot trust the local computer, it is better to use something else. This is when « one-time passwords » come in handy. As the name implies, each one-time password is for single-use only. Such disposable passwords can be safely used in untrusted environments as they cannot be re-used even when they are stolen.

One way to generate disposable passwords is via Google Authenticator. In this tutorial, I am going to demonstrate another way to create one-time passwords for SSH login: OTPW, a one-time password login package. Unlike Google Authenticator, you do not rely on any third party for one-time password generation and verification.

What is OTPW?

OTPW consists of one-time password generator and PAM-integrated verification routines. In OTPW, one-time passwords are generated apriori with the generator, and carried by a user securely (e.g., printed in a paper sheet). Cryptographic hash of the generated passwords are then stored in the SSH server host. When a user logs in with a one-time password, OTPW’s PAM module verifies the password, and invalidates it to prevent re-use.

Step One: Install and Configure OTPW on Linux

Debian, Ubuntu or Linux Mint:

Install OTPW packages with apt–get.

$ sudo apt-get install libpam-otpw otpw-bin

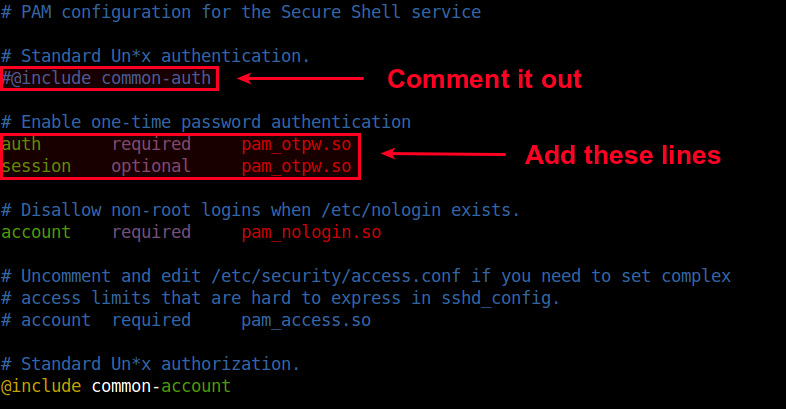
Open a PAM configuration file for SSH (/etc/pam.d/sshd) with a text editor, and comment out the following line (to disable password authentication).

#@include common-auth

and add the following two lines (to enable one-time password authentication):

auth       required     pam_otpw.so
session    optional     pam_otpw.so
16775121360_d1f93feefa_b

Fedora or CentOS/RHEL:

OTPW is not available as a prebuilt package on Red Hat based systems. So let’s install OTPW by building it from the source.

First, install prerequites:

$ sudo yum git gcc pam-devel
$ git clone https://www.cl.cam.ac.uk/~mgk25/git/otpw
$ cd otpw

Open Makefile with a text editor, and edit a line that starts with « PAMLIB= » as follows.

On 64-bit system:

PAMLIB=/usr/lib64/security

On 32-bit system:

PAMLIB=/usr/lib/security

Compile and install it. Note that installation will automatically restart an SSH server. So be ready to be disconnected if you are on an SSH connection.

$ make
$ sudo make install

Now you need to update SELinux policy since /usr/sbin/sshd tries to write to user’s home directory, which is not allowed by default SELinux policy. The following commands will do. If you are not using SELinux, skip this step.

$ sudo grep sshd /var/log/audit/audit.log | audit2allow -M mypol
$ sudo semodule -i mypol.pp

Next, open a PAM configuration file for SSH (/etc/pam.d/sshd) with a text editor, and comment out the following line (to disable password authentication).

#auth       substack     password-auth

and add the following two lines (to enable one-time password authentication):

auth       required     pam_otpw.so
session    optional     pam_otpw.so

Lire la suite…

Securing your server with iptables

12/08/2021 Comments off

Securing your server with iptables

securing your server linuxIn the Getting Started guide, you learned how to deploy a Linux distribution, boot your Linode and perform some basic administrative tasks. Now it’s time to harden your Linode to protect it from unauthorized access.

Update Your System–Frequently

Keeping your software up to date is the single biggest security precaution you can take for any operating system–be it desktop, mobile or server. Software updates frequently contain patches ranging from critical vulnerabilities to minor bug fixes, and many software vulnerabilities are actually patched by the time they become public.

Automatic Security Updates

There are opposing arguments for and against automatic updates on servers. Nonetheless, CentOS, Debian, Fedora and Ubuntu can be automatically updated to various extents. Fedora’s Wiki has a good breakdown of the pros and cons, but if you limit updates to those for security issues, the risk of using automatic updates will be minimal.

The practicality of automatic updates must be something which you judge for yourself because it comes down to what you do with your Linode. Bear in mind that automatic updates apply only to packages sourced from repositories, not self-compiled applications. You may find it worthwhile to have a test environment which replicates your production server. Updates can be applied there and reviewed for issues before being applied to the live environment.

Add a Limited User Account

Up to this point, you have accessing your Linode as the root user. The concern here is that roothas unlimited privileges and can execute any command–even one that could accidentally break your server. For this reason and others, we recommend creating a limited user account and using that at all times. Administrative tasks will be done using sudo to temporarily elevate your limited user’s privileges so you can administer your server without logging in as root.

To add a new user, log in to your Linode via SSH.

CentOS / Fedora

  1. Create the user, replacing example_user with your desired username, and assign a password:
    useradd example_user && passwd example_user
  2. Add the user to the wheel group for sudo privileges:
    usermod -aG wheel example_user

Debian / Ubuntu

  1. Create the user, replacing example_user with your desired username. You’ll then be asked to assign the user a password.
    adduser example_user
  2. Add the user to the sudo group so you’ll have administrative privileges:
    adduser example_user sudo

With your new user assigned, disconnect from your Linode as root:

exit

Log back in to your Linode as your new user. Replace example_user with your username, and the example IP address with your Linode’s IP address:

ssh [email protected]

Now you can administer your Linode from your new user account instead of root. Superuser commands can now be prefaced with sudo; for example, sudo iptables -L. Nearly all superuser commands can be executed with sudo, and those commands will be logged to /var/log/auth.log.

Lire la suite…

Administration réseau sous Linux: SSH

27/06/2021 Comments off

Source: Wikilivres

SSH signifie Secure SHell. C’est un protocole qui permet de faire des connexions sécurisées (i.e. cryptées) entre un serveur et un client SSH.

On peut l’utiliser pour se connecter à une machine distante comme avec telnet, pour transférer des fichiers de manière sécurisée ou pour créer des tunnels. Les tunnels permettent sécuriser des protocoles qui ne le sont pas en faisant passer les données par une connexion SSH.

Sections

Le système de clés de SSH

Cryptographie asymétrique

SSH utilise la cryptographie asymétrique RSA ou DSA. En cryptographie asymétrique, chaque personne dispose d’un couple de clé : une clé publique et une clé privée. La clé publique peut être librement publiée tandis que chacun doit garder sa clé privée secrète. La connaissance de la clé publique ne permet pas d’en déduire la clé privée.

Si la personne A veut envoyer un message confidentiel à la personne B, A crypte le message avec la clé publique de B et l’envoie à B sur un canal qui n’est pas forcément sécurisé. Seul B pourra décrypter le message en utilisant sa clé privée.

Cryptographie symétrique

SSH utilise également la cryptographie symétrique. Son principe est simple : si A veut envoyer un message confidentiel à B, A et B doivent d’abord posséder une même clé secrète. A crypte le message avec la clé sécrète et l’envoie à B sur un canal qui n’est pas forcément sécurisé. B décrypte le message grâce à la clé secrète.

Toute autre personne en possession de la clé secrète peut décrypter le message.

La cryptographie symétrique est beaucoup moins gourmande en ressources processeur que la cryptographie asymétrique, mais le gros problème est l’échange de la clé secrète entre A et B. Dans le protocole SSL, qui est utilisé par les navigateurs Web et par SSH, la cryptographique asymétrique est utilisée au début de la communication pour que A et B puissent s’échanger une clé secrète de manière sécurisée, puis la suite la communication est sécurisée grâce à la cryptographie symétrique en utilisant la clé secrète échangée.

Lire la suite…

Categories: Réseau, Système, Tutoriel Tags: ,

Linux/Unix: OpenSSH Multiplexer To Speed Up OpenSSH Connections

22/05/2021 Comments off

Source: nixCraft

How can I multiplex SSH sessions by setting up a master session and then having subsequent sessions go through the master to speed up my ssh connection on a Linux or Unix-like operating systems?

Multiplexing is nothing but send more than one ssh connection over a single connection. OpenSSH can reuse an existing TCP connection for multiple concurrent SSH sessions. This results into reduction of the overhead of creating new TCP connections. First, you need to set a ControlMaster to open a Unix domain socket locally.

Lire la suite…

Categories: Système, Tutoriel Tags: ,

Comment créer un tunnel SSH inverse

02/03/2021 Comments off

Parfois que nous avons besoin de vous connecter via SSH à un autre ordinateur, nous trouvons que cet ordinateur que nous comptions SSH dans (ce que nous allons appeler « destiny ») peuvent utiliser NAT et, par conséquent, il doesn ' t compte avec une adresse IP publique que nous pourrions utiliser pour se connecter à lui, ou il peut être derrière un pare-feu qui a gagné ' t permettent l'accès de l'extérieur.

Si le « destin » peut réussir à établir une connexion SSH vers un autre ordinateur qui n'est accessible, nous pouvons utiliser ce deuxième ordinateur afin d'établir un tunnel SSH inverse à notre ordinateur « destiny », nous allons appeler ce deuxième ordinateur « origine » (même si elle n'est pas réellement l'ordinateur que nous allons utiliser pour gérer à distance les « cibles », mais qu'un pont).

Un tunnel SSH inverse fonctionne en connectant « destinée » à « l'origine » et puis en se servant cette connexion SSH dans « destin » de n'importe quel ordinateur connecté à « l'origine ». Ce tunnel SSH inverse devrait fonctionner dans la plupart des distributions Linux sans problème.

Alors, laisse supposer que nous avons à présent deux ordinateurs :

« L'origine » IP : aaa.bbb.ccc.ddd

« Destiny » IP : inconnue ou non disponible

Tout d'abord, nous établissons la connexion SSH de "destinée" à « l'origine », qui permet la fonctionnalité SSH inverse avec le paramètre – r :

SSH r 61999:localhost:22 [email protected]

Le premier nombre (61999) indique quel port on va pour utiliser « origine » pour vous connecter à « destiny », localhost est le nom de domaine que nous utiliserons pour cela aussi bien, et le dernier numéro (22) indique quel port est le « destin » écouter pour SSH.

Une fois que cette connexion est établie, et être connecté à le "origine" (peu importe si nous sommes connectés local ou à distance), nous pouvons établir la connexion au « destin » :

SSH p 61999 destiny_user@localhost

Effectivement, nous pouvons utiliser un ordinateur avec un accès SSH permanent comme un pont entre des ordinateurs qui ne sont pas autrement accessibles par l'intermédiaire de SSH. N'importe quel ordinateur connecté à le « origine » peut se connecter à autres ordinateurs avec inversion de tunneling SSH activé.


Categories: Réseau, Système, Tutoriel Tags: , ,