Archive

Articles taggués ‘shell’

Ubuntu Tip:How to Connect/disconnect VPN from the command line

26/04/2021 Comments off

Source: ubuntugeek.com

This tutorial will explain How to Connect/disconnect VPN from the command line

If you want to interact with NetworkManager from the command line you can use the « nmcli » command.
Lire la suite…

Categories: Réseau, Système, Tutoriel Tags: , , ,

Utiliser une clé Wifi sur le Raspberry pi

25/04/2021 Comments off

Il existe deux moyens de connecter le Raspberry PI à internet, sois vous utilisez un câble Ethernet, sois une clé Wifi. Avant toutes choses il faut savoir que toutes les clés Wifi ne sont pas compatibles avec le Raspberry PI. Voilà quelque antenne compatible, je vous conseille d’en acheter une de cela si vous n’en posséder pas encore.

Lire la suite…

Comment créer un tunnel SSH inverse

02/03/2021 Comments off

Parfois que nous avons besoin de vous connecter via SSH à un autre ordinateur, nous trouvons que cet ordinateur que nous comptions SSH dans (ce que nous allons appeler « destiny ») peuvent utiliser NAT et, par conséquent, il doesn ' t compte avec une adresse IP publique que nous pourrions utiliser pour se connecter à lui, ou il peut être derrière un pare-feu qui a gagné ' t permettent l'accès de l'extérieur.

Si le « destin » peut réussir à établir une connexion SSH vers un autre ordinateur qui n'est accessible, nous pouvons utiliser ce deuxième ordinateur afin d'établir un tunnel SSH inverse à notre ordinateur « destiny », nous allons appeler ce deuxième ordinateur « origine » (même si elle n'est pas réellement l'ordinateur que nous allons utiliser pour gérer à distance les « cibles », mais qu'un pont).

Un tunnel SSH inverse fonctionne en connectant « destinée » à « l'origine » et puis en se servant cette connexion SSH dans « destin » de n'importe quel ordinateur connecté à « l'origine ». Ce tunnel SSH inverse devrait fonctionner dans la plupart des distributions Linux sans problème.

Alors, laisse supposer que nous avons à présent deux ordinateurs :

« L'origine » IP : aaa.bbb.ccc.ddd

« Destiny » IP : inconnue ou non disponible

Tout d'abord, nous établissons la connexion SSH de "destinée" à « l'origine », qui permet la fonctionnalité SSH inverse avec le paramètre – r :

SSH r 61999:localhost:22 [email protected]

Le premier nombre (61999) indique quel port on va pour utiliser « origine » pour vous connecter à « destiny », localhost est le nom de domaine que nous utiliserons pour cela aussi bien, et le dernier numéro (22) indique quel port est le « destin » écouter pour SSH.

Une fois que cette connexion est établie, et être connecté à le "origine" (peu importe si nous sommes connectés local ou à distance), nous pouvons établir la connexion au « destin » :

SSH p 61999 destiny_user@localhost

Effectivement, nous pouvons utiliser un ordinateur avec un accès SSH permanent comme un pont entre des ordinateurs qui ne sont pas autrement accessibles par l'intermédiaire de SSH. N'importe quel ordinateur connecté à le « origine » peut se connecter à autres ordinateurs avec inversion de tunneling SSH activé.
 

Categories: Réseau, Système, Tutoriel Tags: , ,

8 Practical Examples of Linux Xargs Command for Beginners

28/01/2021 Comments off

The Linux xargs command may not be a hugely popular command line tool, but this doesn’t take away the fact that it’s extremely useful, especially when combined with other commands like findand grep. If you are new to xargs, and want to understand its usage, you’ll be glad to know that’s exactly what we’ll be doing here.

Before we proceed, please keep in mind that all the examples presented in this tutorial have been tested on Ubuntu 14.04 LTS. Shell used is Bash, and version is 4.3.11.

1. How Xargs command works?

Well, before jumping onto its usage, it’s important to understand what exactly Xargs does. In layman’s terms, the tool – in its most basic form – reads data from standard input (stdin) and executes the command (supplied to it as argument) one or more times based on the input read. Any blanks and spaces in input are treated as delimiters, while blank lines are ignored. 


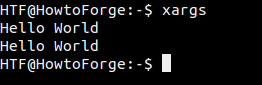
If no command is supplied as argument to xargs, the default command that the tool executes is echo. For example, in the following example, I just executed ‘xargs’ and entered ‘Hello World’ on stdin. As I pressed Ctrl+D (to tell xargs that we’re done with the input), the echocommand was automatically executed, and ‘Hello World’ was printed again.

How xargs command works

2. How to use xargs with another command?

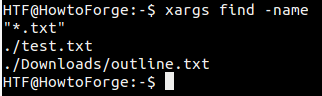
While echo is the default command xargs executes, you can explicitly specify any other command. For example, you can pass the find command along with its ‘-name’ option as argument to xargs, and then pass the name of the file (or type of files) you want find to search as input through stdin.

Here’s the complete command in question:

xargs find -name

For example, we provided « *.txt » in input through stdin, which means we want the find command to search all .txt files in the current directory (as well as its subdirectories).

Here’s the command in action:

Combine xargs with other commands

Lire la suite…

Categories: Système, Tutoriel Tags: , ,

Ubuntu Check RAM Memory Chip Speed and Specification From Within a Linux System

22/06/2016 Comments off

I want to add more RAM to my server running Ubuntu Linux. How do I find out my current RAM chip information such as its speed, type and manufacturer name within a Linux system without opening the case?

You need to use the dmidecode command which is a tool for dumping a computer’s DMI (some say SMBIOS) table contents in a human-readable format. This table contains a description of the system’s hardware components (such as RAM), as well as other useful pieces of information such as serial numbers and BIOS revision. Thanks to this table, you can retrieve hardware information without having to probe for the actual hardware. Open a command-line terminal (select Applications > Accessories > Terminal), and then type:

$ sudo dmidecode --type memory

OR

# dmidecode --type memory | less

OR

$ sudo dmidecode --type 17

Sample outputs:

# dmidecode 2.10
SMBIOS version fixup (2.51 -> 2.6).
SMBIOS 2.6 present.
Handle 0x0011, DMI type 16, 15 bytes
Physical Memory Array
	Location: System Board Or Motherboard
	Use: System Memory
	Error Correction Type: None
	Maximum Capacity: 4 GB
	Error Information Handle: Not Provided
	Number Of Devices: 4
Handle 0x0012, DMI type 17, 27 bytes
Memory Device
	Array Handle: 0x0011
	Error Information Handle: No Error
	Total Width: 72 bits
	Data Width: 64 bits
	Size: 2048 MB
	Form Factor: DIMM
	Set: 1
	Locator: DIMM#1A
	Bank Locator: Bank 1
	Type: DDR2
	Type Detail: Synchronous
	Speed: 667 MHz
	Manufacturer: Not Specified
	Serial Number: Not Specified
	Asset Tag: Not Specified
	Part Number: Not Specified
Handle 0x0013, DMI type 17, 27 bytes
Memory Device
	Array Handle: 0x0011
	Error Information Handle: No Error
	Total Width: 72 bits
	Data Width: 64 bits
	Size: 2048 MB
	Form Factor: DIMM
	Set: 1
	Locator: DIMM#2A
	Bank Locator: Bank 2
	Type: DDR2
	Type Detail: Synchronous
	Speed: 667 MHz
	Manufacturer: Not Specified
	Serial Number: Not Specified
	Asset Tag: Not Specified
	Part Number: Not Specified
Handle 0x0014, DMI type 17, 27 bytes
Memory Device
	Array Handle: 0x0011
	Error Information Handle: No Error
	Total Width: 72 bits
	Data Width: 64 bits
	Size: 2048 MB
	Form Factor: DIMM
	Set: 1
	Locator: DIMM#1B
	Bank Locator: Bank 1
	Type: DDR2
	Type Detail: Synchronous
	Speed: 667 MHz
	Manufacturer: Not Specified
	Serial Number: Not Specified
	Asset Tag: Not Specified
	Part Number: Not Specified
Handle 0x0015, DMI type 17, 27 bytes
Memory Device
	Array Handle: 0x0011
	Error Information Handle: No Error
	Total Width: 72 bits
	Data Width: 64 bits
	Size: 2048 MB
	Form Factor: DIMM
	Set: 1
	Locator: DIMM#2B
	Bank Locator: Bank 2
	Type: DDR2
	Type Detail: Synchronous
	Speed: 667 MHz
	Manufacturer: Not Specified
	Serial Number: Not Specified
	Asset Tag: Not Specified
	Part Number: Not Specified
Categories: Matériel, Système Tags: , , ,