Archive

Articles taggués ‘shell’

25 Useful Basic Commands of APT-GET and APT-CACHE for Package Management

17/11/2023 Comments off

This article explains how quickly you can learn to install, remove, update and search software packages using apt-get and apt-cache commands from the command line. This article provides some useful commands that will help you to handle package management in Debian/Ubuntu based systems.

APT-GET and APT-CACHE Commands

What is apt-get?

The apt-get utility is a powerful and free package management command line program, that is used to work with Ubuntu’s APT (Advanced Packaging Tool) library to perform installation of new software packages, removing existing software packages, upgrading of existing software packages and even used to upgrading the entire operating system.

What is apt-cache?

The apt-cache command line tool is used for searching apt software package cache. In simple words, this tool is used to search software packages, collects information of packages and also used to search for what available packages are ready for installation on Debian or Ubuntu based systems.

APT-CACHE – 5 Useful Basic Commands

1. How Do I List All Available Packages?

To list all the available packages, type the following command.

$ apt-cache pkgnames
esseract-ocr-epo
pipenightdreams
mumudvb
tbb-examples
libsvm-java
libmrpt-hmtslam0.9
libboost-timer1.50-dev
kcm-touchpad
g++-4.5-multilib
...

2. How Do I Find Out Package Name and Description of Software?

To find out the package name and with it description before installing, use the ‘search‘ flag. Using “search” with apt-cache will display a list of matched packages with short description. Let’s say you would like to find out description of package ‘vsftpd‘, then command would be.

$ apt-cache search vsftpd
vsftpd - lightweight, efficient FTP server written for security
ccze - A robust, modular log coloriser
ftpd - File Transfer Protocol (FTP) server
yasat - simple stupid audit tool

To find and list down all the packages starting with ‘vsftpd‘, you could use the following command.

$ apt-cache pkgnames vsftpd
vsttpd

3. How Do I Check Package Information?

For example, if you would like to check information of package along with it short description say (version number, check sums, size, installed size, category etc). Use ‘show‘ sub command as shown below.

$ apt-cache show netcat
Package: netcat
Priority: optional
Section: universe/net
Installed-Size: 30
Maintainer: Ubuntu Developers <[email protected]>
Original-Maintainer: Ruben Molina <[email protected]>
Architecture: all
Version: 1.10-40
Depends: netcat-traditional (>= 1.10-39)
Filename: pool/universe/n/netcat/netcat_1.10-40_all.deb
Size: 3340
MD5sum: 37c303f02b260481fa4fc9fb8b2c1004
SHA1: 0371a3950d6967480985aa014fbb6fb898bcea3a
SHA256: eeecb4c93f03f455d2c3f57b0a1e83b54dbeced0918ae563784e86a37bcc16c9
Description-en: TCP/IP swiss army knife -- transitional package
 This is a "dummy" package that depends on lenny's default version of
 netcat, to ease upgrades. It may be safely removed.
Description-md5: 1353f8c1d079348417c2180319bdde09
Bugs: https://bugs.launchpad.net/ubuntu/+filebug
Origin: Ubuntu

4. How Do I Check Dependencies for Specific Packages?

Use the ‘showpkg‘ sub command to check the dependencies for particular software packages. whether those dependencies packages are installed or not. For example, use the ‘showpkg‘ command along with package-name.

$ apt-cache showpkg vsftpd
Package: vsftpd
Versions: 
2.3.5-3ubuntu1 (/var/lib/apt/lists/in.archive.ubuntu.com_ubuntu_dists_quantal_main_binary-i386_Packages)
 Description Language: 
                 File: /var/lib/apt/lists/in.archive.ubuntu.com_ubuntu_dists_quantal_main_binary-i386_Packages
                  MD5: 81386f72ac91a5ea48f8db0b023f3f9b
 Description Language: en
                 File: /var/lib/apt/lists/in.archive.ubuntu.com_ubuntu_dists_quantal_main_i18n_Translation-en
                  MD5: 81386f72ac91a5ea48f8db0b023f3f9b

Reverse Depends: 
  ubumirror,vsftpd
  harden-servers,vsftpd
Dependencies: 
2.3.5-3ubuntu1 - debconf (18 0.5) debconf-2.0 (0 (null)) upstart-job (0 (null)) libc6 (2 2.15) libcap2 (2 2.10) libpam0g (2 0.99.7.1) libssl1.0.0 (2 1.0.0) libwrap0 (2 7.6-4~) adduser (0 (null)) libpam-modules (0 (null)) netbase (0 (null)) logrotate (0 (null)) ftp-server (0 (null)) ftp-server (0 (null)) 
Provides: 
2.3.5-3ubuntu1 - ftp-server 
Reverse Provides:

Lire la suite…

Categories: Système Tags: , ,

Email notifications using Gmail SMTP server on Linux

07/11/2023 Comments off

Send email notifications using Gmail SMTP

email notifications gmailUsing Gmail SMTP: Suppose you want to configure a Linux app to send out email messages from your server or desktop. The email messages can be part of email newsletters, status updates (e.g., Cachet), monitoring alerts (e.g., Monit), disk events (e.g., RAID mdadm), and so on. While you can set up your own outgoing mail server to deliver messages, you can alternatively rely on a freely available public SMTP server as a maintenance-free option.

One of the most reliable free SMTP servers is from Google’s Gmail service. All you have to do to send email notifications within your app is to add Gmail’s SMTP server address and your credentials to the app, and you are good to go.

One catch with using Gmail’s SMTP server is that there are various restrictions in place, mainly to combat spammers and email marketers who often abuse the server. For example, you can send messages to no more than 100 addresses at once, and no more than 500 recipients per day. Also, if you don’t want to be flagged as a spammer, you cannot send a large number of undeliverable messages. When any of these limitations is reached, your Gmail account will temporarily be locked out for a day. In short, Gmail’s SMTP server is perfectly fine for your personal use, but not meant for commercial bulk emails.

With that being said, let me demonstrate how to use Gmail’s SMTP server in Linux environment.

Google Gmail SMTP Server Setting

If you want to send emails from your app using Gmail’s SMTP server, you need to adjust the security setting of the Gmail account to be used. Go to the Google account settings, and enable the option to allow less secure apps, which is off by default.

Then you will need to provide your app with the following details.

  • Outgoing mail server (SMTP server): smtp.gmail.com
  • Use authentication: yes
  • Use secure connection: yes
  • Username: your Gmail account ID (e.g., « alice » if your email is [email protected])
  • Password: your Gmail password
  • Port: 587 (TLS) or 465 (SSL)

Exact configuration syntax may vary depending on apps. In the rest of this tutorial, I will show you several useful examples of using Gmail SMTP server in Linux.

Send Emails from the Command Line

As the first example, let’s try the most basic email functionality: send an email from the command line using Gmail SMTP server. For this, I am going to use a command-line email client called Mutt.

First, install Mutt as follows.

For Debian-based system:

$ sudo apt-get install mutt

For Red Hat based system:

$ sudo yum install mutt

Create a mutt configuration file (~/.muttrc) and specify in the file Gmail SMTP server information as follows. Replace <gmail-id> with your own Gmail ID. Note that this configuration is for sending emails only (not receiving emails).

$ vi ~/.muttrc

set from = "<gmail-id>@gmail.com"
set realname = "Dan Nanni"
set smtp_url = "smtp://<gmail-id>@smtp.gmail.com:587/"
set smtp_pass = "<gmail-password>"

Now you are ready to send out an email using mutt:

$ echo "This is an email body." | mutt -s "This is an email subject" [email protected]

To attach a file in an email, use « -a » option:

$ echo "This is an email body." | mutt -s "This is an email subject" [email protected] -a ~/test_attachment.jpg

22239850784_5fb0988075_c

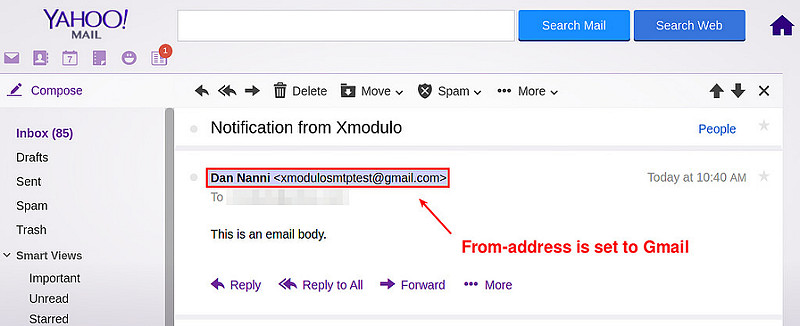
Using Gmail SMTP server means that the emails appear as sent from your Gmail account. In other words, a recipient will see your Gmail address as the sender’s address. If you want to use your domain as the email sender, you need to use Gmail SMTP relay service instead.

Another note is that if you are concerned about placing your SMTP password in the plain-text .muttrc file, you can encrypt the password using GnuPG.

Lire la suite…

Categories: Logiciel Tags: , ,

Append TimeStamp to file name

05/11/2023 Comments off

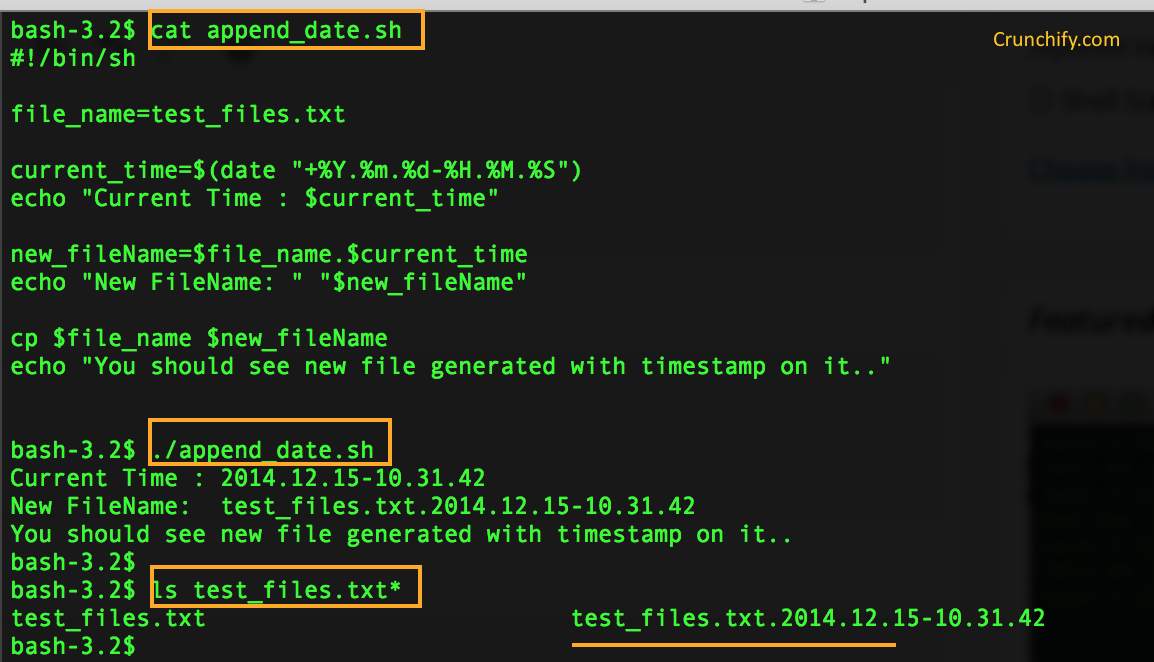
I need to create a shell script that appends a timestamp to existing file. I mainly use Mac OS X for development. Wanted to create the same on Mac Terminal.

Here are some basics on date command.

NAME

date -- display or set date and time

SYNOPSIS
date [-ju] [-r seconds] [-v [+|-]val[ymwdHMS]] ... [+output_fmt]
date [-jnu] [[[mm]dd]HH]MM[[cc]yy][.ss]
date [-jnu] -f input_fmt new_date [+output_fmt]
date [-d dst] [-t minutes_west]

Samples:

Script to append date stamp to file:

Categories: Système Tags: ,

Ubuntu Linux Change Hostname (computer name)

03/11/2023 Comments off

I am a new Ubuntu Linux laptop user. I setup my computer name to ‘tom’ during installation but now I would like to change the computer name to ‘jerry’. Can you tell me how do I I remove tom and set it to jerry on Ubuntu Linux? How do I change the Ubuntu computer name from ‘ubuntu’ to ‘AvlinStar’? Can you tell me more about Ubuntu Linux change hostname command?

You can use the hostname command to see or set the system’s host name. The host name or computer name is usually at system startup in /etc/hostname file. Open the terminal application and type the following commands to set or change hostname or computer name on Ubuntu.

Display the current Ubuntu hostname

Simply type the following command:
$ hostname
Sample outputs:

Fig.01: Ubuntu Linux Show the hostname/computer name command

Ubuntu change hostname command

The procedure to change the computer name on Ubuntu Linux:

  1. Type the following command to edit /etc/hostname using nano or vi text editor:
    sudo nano /etc/hostname
    Delete the old name and setup new name.
  2. Next Edit the /etc/hosts file:
    sudo nano /etc/hosts
    Replace any occurrence of the existing computer name with your new one.
  3. Reboot the system to changes take effect:
    sudo reboot

Sample outputs:

Gif 01: Ubuntu Linux Change Hostname Command Demo
Gif 01: Ubuntu change the computer name demo

How to change the Ubuntu server hostname without a system restart?

Type the following commands:
$ sudo hostname new-server-name-here
Next edit the /etc/hostname file and update hostname:
$ sudo nano /etc/hostname
Finally, edit the /etc/hosts file and update the lines that reads your old-host-name:
$ sudo nano /etc/hosts
From:
127.0.1.1 old-host-name
To:
127.0.1.1 new-server-name-here
Save and close the file.

Ubuntu Linux Change Hostname Using hostnamectl

Systemd based Linux distro such as Ubuntu Linux 16.04 LTS and above can simply use the hostnamectl command to change hostname. To see current setting just type the following command:
$ hostnamectl
Sample outputs:

   Static hostname: nixcraft
         Icon name: computer-laptop
           Chassis: laptop
        Machine ID: 291893e6499e4d99891c3cf4b70a138b
           Boot ID: 9fda2365b77841649e40a141fde46537
  Operating System: Ubuntu 17.10
            Kernel: Linux 4.13.0-21-generic
      Architecture: x86-64

To change hostname from nixcraft to viveks-laptop, enter:
$ hostnamectl set-hostname viveks-laptop
$ hostnamectl

Categories: Réseau, Système Tags: , ,

Using Bash Arrays with Examples

12/08/2021 Comments off

bash-scripting-32-638Arrays can be a useful tool when coding your bash scripts.  The simplest way that I can define an array is to state that an array is a variable for a multi-instance dataset.

For example, a variable is used when there is a single value from a dataset like the IP Address of a server.  However, an array can be used to store all of the IP Addresses in your server room.

Speaking of IP Addresses and bash arrays, my last article (Detect and Block WordPress Brute Force Login Attacks) includes a script which is an example of how an array can be used in bash scripting.

Because arrays can be so useful in bash scripting, I thought that I would put together the following article detailing ways of Using Bash Arrays with Examples.

Initializing Bash Arrays or Assigning Values to Arrays

For arrays to be useful, we need to be able to assign values to them.  We assign values to an array by listing the array along with its instance number as shown below.  This method will assign each instance of the array one by one.

#!/bin/bash
myarray[0]=Hello
myarray[1]=World,
myarray[3]=Happy
myarray[4]=Friday

# Display all instances of the array
echo ${myarray[*]}

We can see above that in addition to being able to assign the values one by one, we can reference all array instances with an asterisk (*).  Another way to display all instances of the array is to use the following “echo ${myarray[@]}”

We run the script and get:

$ ./arrays.sh
Hello World, Happy Friday

We can also retrieve individual instances of an array by specifying the individual array instance number.  We modify the above script slightly to retrieve a couple of the instances.

#!/bin/bash
myarray[0]=Hello
myarray[1]=World,
myarray[3]=Happy
myarray[4]=Friday

# Display all instances of the array
echo ${myarray[0]} ${myarray[4]}

We run the script again and we get:

$ ./arrays.sh
Hello Friday

Lire la suite…

Categories: Système, Tutoriel Tags: , , ,