Here are a few notes about how to set-up a high-availability web server farm using Ubuntu 12.04 LTS using a whole load of awesome software (HAProxy, HeartBeat, Watchdog and Nginx)
The setup
In my setup I have five virtual machines, these are named and used for the following:-
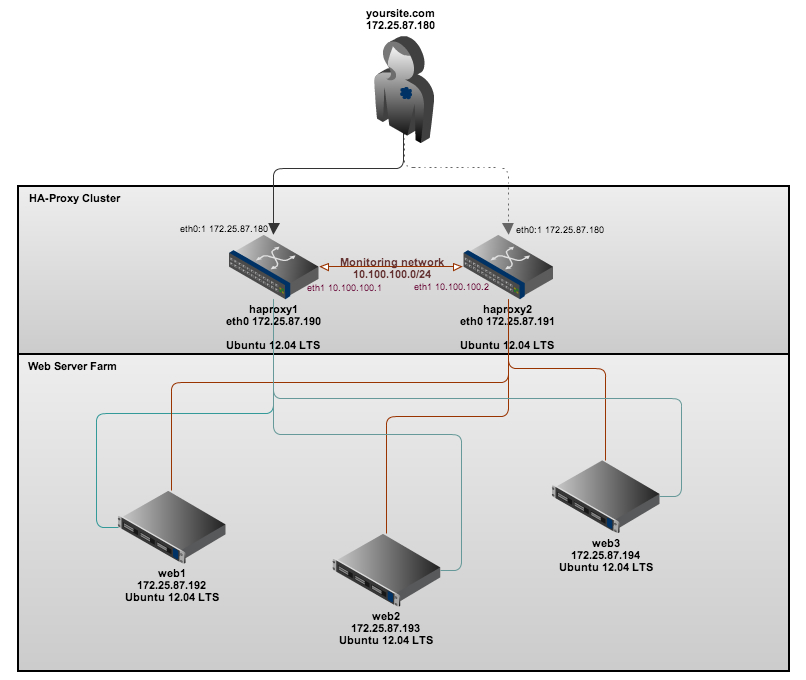
haproxy1 – Our first proxy (master)/load-balancer (running HAProxy, HeartBeat and Watchdog) [IP address: 172.25.87.190] haproxy2 – Our second proxy (failover)/load-balancer (running HAProxy, HeartBeat and Watchdog) [IP address: 172.25.87.191] web1 – Our first web server node (running nginx) [IP address: 172.25.87.192] web2 – Our second web server node (running nginx) [IP address: 172.25.87.193] web3 – Our third web server node (running nginx) [IP address: 172.25.87.194]
The servers are connected in the following way:-
In my next post I will also explain how to configure the web servers to point to a backend shared storage cluster (using NFS) and a MySQL cluster server to have a truly highly available web hosting platform.
WordPress is the most popular CMS (content management system) used on the internet today. While many people use it because it is powerful and simple, sometimes people make a trade-off for convenience at the expense of security.
This is the case in how you choose to assign directory ownership and permissions, and how you choose to perform upgrades. There are a variety of different methods to do this. We will choose what we consider a relatively secure way of upgrading and installing themes and plugins.
Once you have the user and required software, you can start following this guide.
Set Up Secure Updates with SSH
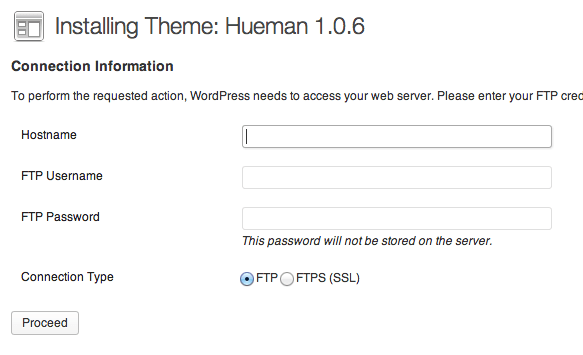
If you do not have key-based updates and installations configured, you will get a prompt for connection information whenever you attempt to do either of these tasks.
It will ask you to provide FTP credentials, such as a hostname, FTP username, and FTP password:
FTP is an inherently insecure protocol, so we do not recommend you using it in most cases. We will be configuring our installation to use a secure alternative.
Changing Permissions
If you followed the guide on installing WordPress above, you will notice that you gave permission of the web directory to the Apache web user. This is a very quick way to get started, but can potentially be a security risk. In an ideal situation, you would separate the content owner from the web process. We will do this as part of our preparation for allowing SSH updates.
We will create a user called wp-user to own our WordPress installation.
sudo adduser wp-user
You will be asked a lot of question, including the password you want to set. We do not want to set a password, so press « ENTER » through all of the prompts, including the repeated password questions.
Next, change to the /var/www/html directory, where our WordPress files are being served.
cd /var/www/html
We will give our new user ownership over everything under this directory, changing it from the www-data Apache web user that we configured during installation.
Les systèmes d’information sont aujourd’hui de plus en plus ouverts sur Internet. Cette ouverture, a priori bénéfique, pose néanmoins un problème majeur : il en découle un nombre croissant d’attaques. La mise en place d’une politique de sécurité autour de ces systèmes est donc primordiale. Outre la mise en place de pare-feu et de systèmes d’authentification de plus en plus sécurisés, il est nécessaire, pour compléter cette politique de sécurité, d’avoir des outils de surveillance pour auditer le système d’information et détecter d’éventuelles intrusions. Ce que nous appelons intrusion signifie pénétration des systèmes d’information, mais aussi tentatives des utilisateurs locaux d’accéder à de plus hauts privilèges que ceux qui leur sont attribués, ou tentatives des administrateurs d’abuser de leurs privilèges. Au cours de ce document, nous verrons comment se protéger efficacement face à ces intrusions, mais aussi les problèmes techniques déduits de ces outils, nouvellement apparus dans le monde informatique. Mais avant cela, il est important, pour comprendre le rôle précis de ces systèmes, de faire un rappel des principales attaques existantes à l’heure actuelle.
II. Les différents types d’attaques
L’informatique étant un domaine très vaste, le nombre de vulnérabilités présentes sur un système peut donc être important. Ainsi, les attaques visant ces failles peuvent être à la fois très variées et très dangereuses. C’est pourquoi nous allons dans un premier temps analyser ce que nous appellerons « l’anatomie d’une attaque », puis dans un second temps, nous caractériserons ces attaques et observerons leur déroulement. Un nombre important de termes techniques vont être employés dans cette partie. Ceux-ci ne seront pas toujours détaillés, afin de ne pas surcharger la lecture ; mais une annexe comportant un rappel sur les notions fondamentales liées aux protocoles des réseaux (TCP, UDP et IP) est disponible à la fin de ce document.
II-A. Anatomie d’une attaque
Fréquemment appelés « les 5 P » dans la littérature, ces cinq verbes anglophones constituent le squelette de toute attaque informatique : Probe, Penetrate, Persist, Propagate, Paralyze. Observons le détail de chacune de ces étapes :
Probe : consiste en la collecte d’informations par le biais d’outils comme whois, Arin, DNS lookup. La collecte d’informations sur le système cible peut s’effectuer de plusieurs manières, par exemple un scan de ports grâce au programme Nmap pour déterminer la version des logiciels utilisés, ou encore un scan de vulnérabilités à l’aide du programme Nessus.
Pour les serveurs web, il existe un outil nommé Nikto qui permet de rechercher les failles connues ou les problèmes de sécurité. Des outils comme firewalk, hping ou SNMP Walk permettent quant à eux de découvrir la nature d’un réseau ;
Penetrate : utilisation des informations récoltées pour pénétrer un réseau. Des techniques comme le brute force ou les attaques par dictionnaires peuvent être utilisées pour outrepasser les protections par mot de passe. Une autre possibilité pour s’infiltrer dans un système est d’utiliser des failles applicatives que nous verrons ci-après ;
Persist : création d’un compte avec des droits de super utilisateur pour pouvoir se réinfiltrer ultérieurement. Une autre technique consiste à installer une application de contrôle à distance capable de résister à un reboot (ex. : un cheval de Troie) ;
Propagate : cette étape consiste à observer ce qui est accessible et disponible sur le réseau local ;
Paralyze : cette étape peut consister en plusieurs actions. Le pirate peut utiliser le serveur pour mener une attaque sur une autre machine, détruire des données ou encore endommager le système d’exploitation dans le but de planter le serveur.
Après ces cinq étapes, le pirate peut éventuellement tenter d’effacer ses traces, bien que cela ne soit rarement utile. En effet, les administrateurs réseau sont souvent surchargés de logs à analyser. De plus, il est très difficile de supprimer entièrement des traces.
I couldn’t really find a suitable topic for this post actually but I will try to find answers for the following questions:
How can we fragment an IP packet manually in scapy
How does a fragmented packet look like and how the transport layer (TCP/UDP) header is located
How do we forward fragmented packets, do we reassemle them?
If we don’t reassemble, can we force reassembly?
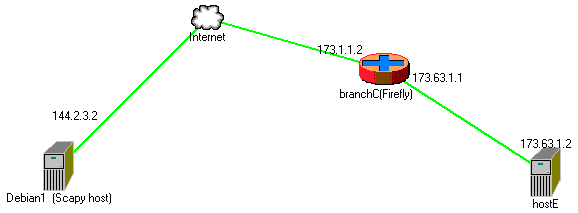
First of all a bit of a theory: if an incoming IP packet is to be forwarded to another next hop and the MTU of this new path is smaller than the packet to be transmitted, we must find a way to forward the packet. If the packet has DF (Don’t Fragment) bit on i.e we are instructed not to fragment the packet most probably by the source, then normally we are expected to send an ICMP packet with type “Fragmentation needed” and pray that on the way back to the source no devices block all ICMP type of traffic. Second scenario is that what if the source lets us fragment the packet. Then we need to fragment it and story from now on is about this part of the scenario and the topology we will use is something like below.
Scapy is a fantastic tool to generate your own packets. It is exremely flexible and in our example, we will perform the fragmentation of a packet via our script.
IP fragmentation attacks are a common form of denial of service attack, in which the perpetrator overbears a network by exploiting datagram fragmentation mechanisms.
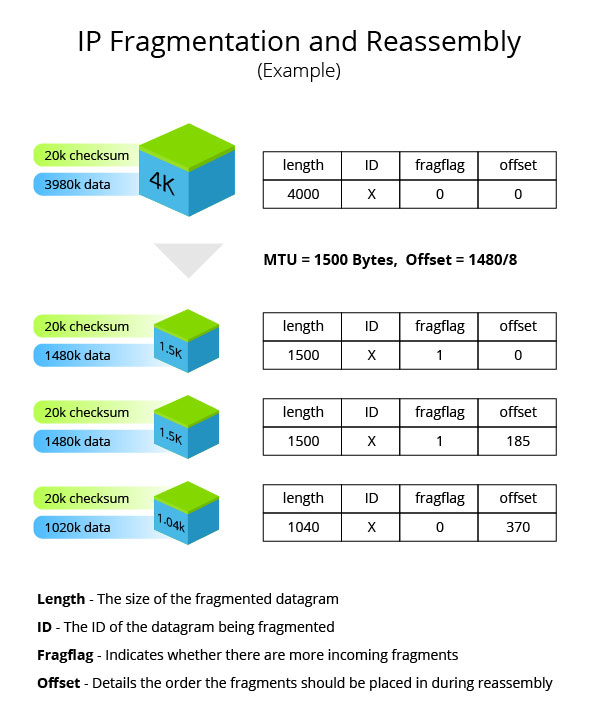
Understanding the attack starts with understanding the process of IP fragmentation, a communication procedure in which IP datagrams are broken down into small packets, transmitted across a network and then reassembled back into the original datagram.
Fragmentation is necessary for data transmission, as every network has a unique limit for the size of datagrams that it can process. This limit is known as the maximum transmission unit (MTU). If a datagram is being sent that is larger than the receiving server’s MTU, it has to be fragmented in order to be transmitted completely
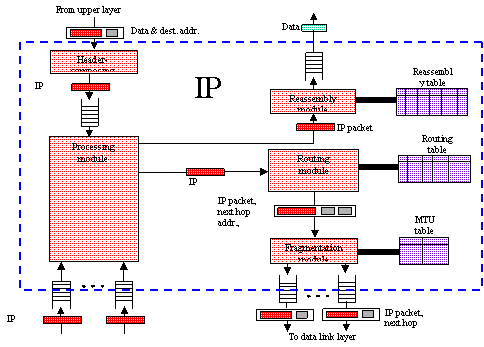
Example of how an IP datagram is fragmented and reassembled
The IP header in every datagram contains flags detailing whether fragmentation is allowed to take place. In cases where a « don’t fragment » flag is attached to the IP header, the packet is dropped and the server sends out a message saying that the ICMP datagram is too big to transmit. The offset explains to the recipient device the exact order the fragments should be placed in for reassembly.
Attack Types
IP fragmentation attacks can take several forms. While they all exploit the breakdown of datagrams in order to overbear the target networks, there are some notable differences in how different attack vectors are executed.
UDP and ICMP fragmentation attacks – These attacks involve the transmission of fraudulent UDP or ICMP packets that are larger than the network’s MTU, (usually ~1500 bytes). As these packets are fake, and are unable to be reassembled, the target server’s resources are quickly consumed, resulting in server unavailability.
TCP fragmentation attacks (a.k.a. Teardrop) – Also known as Teardrop attacks, these assaults target TCP/IP reassembly mechanisms, preventing them from putting together fragmented data packets. As a result, the data packets overlap and quickly overwhelm the victim’s servers, causing them to fail.Teardrop attacks are a result of an OS vulnerability common in older versions of Windows, including 3.1, 95 and NT. While patches were thought to have put a stop to these attacks, a vulnerability resurfaced in Windows 7 and Windows Vista, making Teardrop attacks once again a viable attack vector.The vulnerability was re-patched in the latest version of Windows, but operators should keep an eye out to ensure that it stays patched in all future versions.
Methods of Mitigation
IP fragmentation attacks are mitigated in several different ways, depending on the type and severity of the attack. Most mitigation methods ensure that malicious data packets never reach their target destinations. The most common one involves inspecting incoming packets for violations of fragmentation rules (e.g., using a router or a secured proxy).
At Incapsula, these inspections are augmented by dedicated DDoS protection hardware. On top of leveraging our on-edge position to observe fragmentation rules, Incapsula also employs blacklisting/whitelisting mechanisms that filter traffic based on factors such as IP reputation and rate patterns. Using these methods, our platform provides complete immunity from all types of IP fragmentation attacks.