Ce qui permet de réinjecter des données résultantes d’un SELECT * FROM base.table WHERE my_id='66666666'.
Il est évidement possible de faire toutes ces opération sur une instance en précisant son port avec l’option –port (valable pour mysqldump et mysql).
Pour obtenir une liste des utilisateurs mysql, on peut utiliser cette fonction (glanée sur serverfault) :
mygrants()
{
  mysql -B -N -e "SELECT DISTINCT CONCAT(
    'SHOW GRANTS FOR ''', user, '''@''', host, ''';'
    ) AS query FROM mysql.user" |
  mysql |
  sed 's/(GRANT .*)/1;/;s/^(Grants for .*)/## 1 ##/;/##/{x;p;x;}'
}
On peut choisir 3 types de format pour les binlogs :
statement : les requêtes INSERT / UPDATE sont conservées
row : les modifications de chaque ligne sont conservées (via une sorte de code « binaire » propre à MySQL)
mixed : en mode statement… sauf dans certains cas où cela passe en mode row
Avantages et inconvénients :
Le mode statement est utile pour conserver en clair toutes les requêtes. Il permet aussi de meilleures performances quand des UPDATE contiennent des clauses WHERE qui modifient de nombreuses lignes. Pour de la réplication, il peut être non fiable car le résultat d’un UPDATE peut donner des résultats différents sur un serveur SLAVE. Cela peut aussi poser des soucis avec les transactions InnoDB.
Le mode row a l’inconvénient de rendre illisibles toutes les requêtes. Dans certains cas particuliers (UPDATE contiennent des clauses WHERE qui modifient de nombreuses lignes), il peut être moins performant. Il a l’avantage d’être plus fiable pour de la réplication.
Le mode mixed est un bon compromis pour de la réplication : il permet de voir la plupart des requêtes en clair, mais évite le problème de fiabilité en passant en mode row quand c’est nécessaire.
Suppression
Pour supprimer les binlogs antérieurs à mysql-bin.00NNNN :
mysql> PURGE BINARY LOGS TO 'mysql-bin.00NNNN';
ou par rapport à une date :
mysql> PURGE BINARY LOGS BEFORE "2011-12-07 00:00:00";
Désactivation
Pour désactiver les binlogs, on ajoutera l’option suivante dans la configuration :
disable-log-bin
Lecture
On pourra lire en ligne de commande le contenu d’un binlog via la commande :
# mysqlbinlog /var/log/mysql/mysql-bin.001789 | less
Note : si vous obtenez une erreur mysqlbinlog: unknown variable 'default-character-set=utf8' c’est que la directive default-character-set a été placée dans la configuration MySQL (/etc/mysql ou .my.cnf) dans la mauvaise section : [client] au lieu de [mysql] (ou [mysqldump]).
Replay
ATTENTION, CES MANIPULATIONS PEUVENT ÊTRE DANGEREUSES POUR VOS DONNÉES, BIEN SAVOIR CE QUE L’ON FAIT.
On pourra ainsi injecter le contenu d’un binlog dans une base… tout simplement avec une commande du type :
# mysqlbinlog /var/log/mysql/mysql-bin.001789 | mysql -P3307
À noter que si une partie des données étaient déjà présentes (cas d’un binlog corrompu lors d’incident lors d’une réplication), on pourra procéder ainsi :
# mysqlbinlog /var/log/mysql/mysql-bin.001789 > mysql-bin.001789.txt
# sed -i 's/INSERT INTO/INSERT IGNORE INTO/gi' mysql-bin.001789.txt
# cat mysql-bin.001789.txt | mysql -P3307
Log des requêtes lentes
Pour débugger les applications lentes, c’est une fonctionnalité intéressante de trouver quel requête est longue. Pour cela on peut spécifier quand une requêtes est considéré comme longue, le chemin où stocker les requêtes, et l’activation des logs.
Master / Slave replication in MySQL is a great way to store an exact replica of your database on another machine in another location as part of a disaster recovery plan. Before setting up Master / Slave replication there are a few things to remember.
Writes – Writes to the master database should make it to the slave. But writes to the slave will not make it to the master. If you do write records to the slave database directly, be prepared to have to either recreate the records or back them up separately and recover them if the replication breaks. Many times the only way to get the databases to replicate again is to backup the master and recover it over the top of the slave deleting anything that was in the slave database before.
Broken Replication – Writes made directly to the slave can cause the replication to break due to duplicate key rows, etc.. Always write to the master.
Reads – Reads should be possible from either server. Many organizations will use replication so as to create another database to read from thereby taking the load of all of their select statements and reports off the master server.
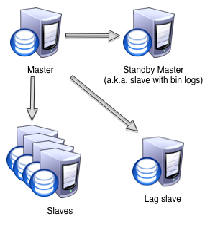
Master Slave MySQL Replication
Steps to Setup MySQL Master / Slave Replication
Prerequisites
We will be assuming that the following prerequisites are done prior to beginning the steps listed below:
MySQL has been installed on both the master and the slave servers
The slave server is able to communicate directly to the mysqld port (typically 3306) on the master server, meaning that there is no firewall, routing, NAT or other problems preventing communication.
You have an administrator MySQL user that can create users on both the master and the slave machines.
You have permissions to edit the /etc/my.cnf files on both machines and enough privileges to restart mysql.
In this tutorial, we will teach you how to use a Iptables with shared private networking to simulate the network traffic isolation that a true private network can provide. We will also cover why you would want to do this, and provide an example of how to implement this in your own environment. The example should explain the concept well enough that you should be able to adapt the configuration to your own needs.
DigitalOcean’s private networking option grants a second networking interface to a VPS, which is only accessible to other VPSs in the same datacenter–which includes the VPSs of other customers in the same datacenter. This is known as shared private networking. This means that data sent over a VPS’s private interface does not leave the datacenter at all, and no billable bandwidth usage will be incurred.
At the time of this writing, DigitalOcean offers the private networking option for VPSs in the following data centers:
Amsterdam 2
New York 2
Singapore 1
Note: This tutorial covers IPv4 security. In Linux, IPv6 security is maintained separately from IPv4. For example, iptables only maintains firewall rules for IPv4 addresses but it has an IPv6 counterpart called ip6tables, which can be used to maintain firewall rules for IPv6 network addresses.
If your VPS is configured for IPv6, please remember to secure both your IPv4 and IPv6 network interfaces with the appropriate tools. For more information about IPv6 tools, refer to this guide: How To Configure Tools to Use IPv6 on a Linux VPS
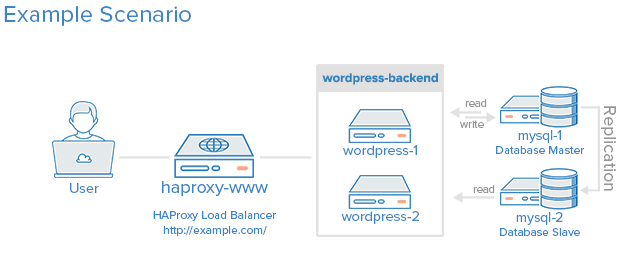
Here is a diagram of what the environment looks like:
The example environment uses five VPSs (and iptables are not configured):
haproxy-www: Reverse proxy load balancer
wordpress-1: First application server
wordpress-2: Second application server
mysql-1: Master MySQL database server
mysql-2: Slave MySQL database server
If your setup doesn’t look like this, you should still be able to follow along. Also, if you would like to read up on setting up a VPS with private networking or iptables basics, here are a few links that you might find to be useful (this tutorial assumes you know the basics of iptables):
If you are already familiar with the concepts, and would like to see the iptables setup, feel free to skip to the Overview of Iptables Configuration section.
Our Goal
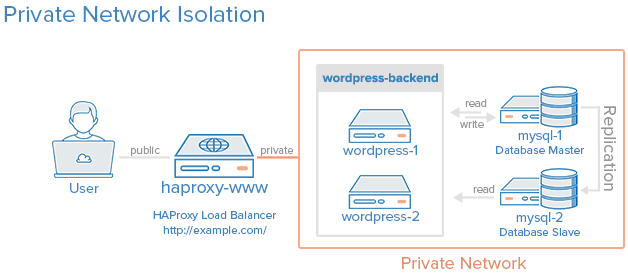
When we are finished with this tutorial, we should have an environment that looks something like the following diagram:
All of the servers in the private network area can only be communicated with by other servers within this private network (the orange box). The load balancer will be accessible via the Internet and also be linked to the private network. The enforcement of this policy will be implemented via iptables on each server.
Note: To block traffic to your public interface, you can either disable your public interface or set up firewall rules to achieve a similar effect with Iptables. We will go with the firewall option because we can configure it block unwanted network traffic, while allowing our server to access the Internet when it initiates the connection (this is useful for things like downloading updates on the server).
I‘m a new Ubuntu Linux user and my cloud hosting company installed MySQL server by default. I need to remove it and delete it from my server as I have no use of MySQL server. How can I uninstall MySQL on a Ubuntu based systems?
Typically following Mysql packages are installed on the Debian or Ubuntu Linux systems:
mysql-client – The latest version of MySQL database client.
mysql-server – The latest version of MySQL database server.
mysql-common – MySQL database common files.
How do I uninstall Mysql server?
Just use the apt-get command as follows remove both MySQL server and client in Ubuntu Linux:
Reading package lists... Done
Building dependency tree
Reading state information... Done
The following packages were automatically installed and are no longer required:
  linux-headers-3.2.0-31-virtual linux-headers-3.2.0-31
Use 'apt-get autoremove' to remove them.
The following packages will be REMOVED:
  libdbd-mysql-perl* libmysqlclient18* mysql-client* mysql-client-5.5* mysql-common* mysql-server*
  mysql-server-5.5*
0 upgraded, 0 newly installed, 7 to remove and 0 not upgraded.
After this operation, 67.5 MB disk space will be freed.
Do you want to continue [Y/n]? y
(Reading database ... 105097 files and directories currently installed.)
Removing mysql-server ...
Removing mysql-server-5.5 ...
mysql stop/waiting
Purging configuration files for mysql-server-5.5 ...
Removing mysql-client ...
Removing mysql-client-5.5 ...
Removing libdbd-mysql-perl ...
Removing libmysqlclient18 ...
Purging configuration files for libmysqlclient18 ...
Removing mysql-common ...
Purging configuration files for mysql-common ...
dpkg: warning: while removing mysql-common, directory '/etc/mysql' not empty so not removed.
Processing triggers for ureadahead ...
Processing triggers for man-db ...
Processing triggers for libc-bin ...
ldconfig deferred processing now taking place