Occasionally I type a password or other sensitive information into a shell prompt. Using bash history, the command can be removed.
# say we start with an empty bash command history
bash-3.2$ history
 1 history
# enter a command that requires a password
bash-3.2$ sudo rm -i some_file
Password:
# accidentally ^C and type your password
# into the prompt and hit enter
bash-3.2$ secret_password
bash: secret_password: command not found
# your password is now there for all to
# see in your bash history
bash-3.2$ history
 1 history
 2 sudo rm -i some_file
 3 secret_password
 4 history
# first option to fix it, delete the numbered entry from
# history and write to your ~/.bash_history file
bash-3.2$ history -d 3
bash-3.2$ history -w
# entry 3 will be removed entirely from your command history
bash-3.2$ history
 1 history
 2 sudo rm -i some_file
 3 history
 4 history -d 3
 5 history -w
 6 history
# the second option is to clear the entire history
# and write the changes to disk
bash-3.2$ history -c
bash-3.2$ history -w
# it's now pretty obvious that your history has been
# scrubbed clean, but at least your password is history!
bash-3.2$ history
 1 history -w
 2 history
Though Mac users don’t usually have to worry excessively about “camfecting” malware and spyware, some security conscious users may find it nice to know if a process or application is attempting to access their computers web camera or microphone.
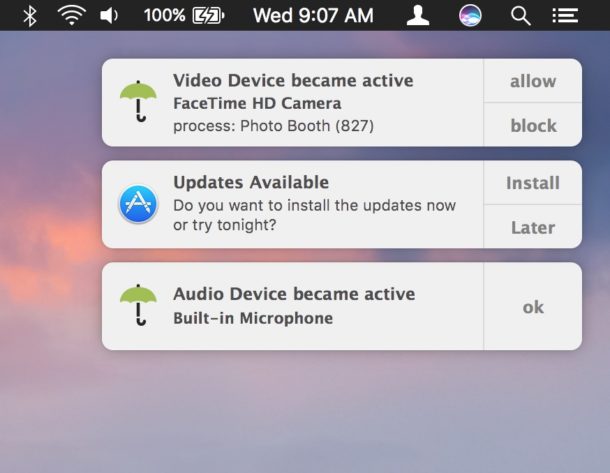
With the help of a free third party security utility called Oversight, you can have your Mac alert you anytime an application or process tries to activate either recording device on the computer.
The developer of Oversight explains why a tool like Oversight could be valuable to some users:
“One of the most insidious actions of malware, is abusing the audio and video capabilities of an infected host to record an unknowing user. Macs, of course, are not immune; malware such as OSX/Eleanor, OSX/Crisis, OSX/Mokes, and others, all attempt to spy on OS X users. OverSight constantly monitors a system, alerting a user whenever the internal microphone is activated, or the built-in webcam is accessed. And yes, while the webcam’s LED will turn on whenever a session is initially started, new research has shown that malware can surreptitious piggyback into such existing sessions (FaceTime, Sykpe, Google Hangouts, etc.) and record both audio and video – without fear of detection.”
Sound good? If so, it’s a free download that is easy to install on a Mac with either macOS or Mac OS X:
If you’re interested in this app, simply download Oversight and run the installer (it can be just as easily uninstalled later if you decide you do not need it).
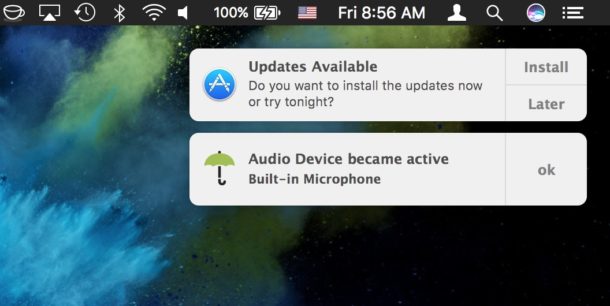
Once installed, Oversight is small and lightweight running quietly in the background, and it will alert you anytime the Mac microphone or webcam FaceTime camera are attempting to be activated. You can then directly intervene and either allow the webcam or microphone access (for legitimate use), or deny it (for theoretical illegitimate use).
Keep in mind that Oversight does not differentiate between legitimate and illegitimate use of the webcam and microphone on your Mac, that is up to you. For example, you will get a notification alert that the microphone and FaceTime camera are trying to be accessed when you open an app like Skype, Photo Booth, FaceTime, or are recording a video on your Mac with the webcam, but since those applications legitimately use the computers microphone and camera they are probably nothing to be concerned about (assuming you have launched them yourself anyway). On the other hand, if out of the blue and with no provocation if you see a process has attempted to access your microphone, that could potentially be an unauthorized attempt to use the microphone and you could choose to reject it and block the device access with Oversight. Whenever possible, Oversight will attempt to notify you of the process name and PID, but sometimes you will see blank notifications of access anyway – again just think about what apps you are using and if they have any reason to use your camera or microphone, similar to how you can control this type of access in iOS for Photos, camera, and microphone.
This is a software solution which is quite a bit more fancy than the low-tech solution of putting tape on your web camera like the FBI Director does and many security professionals do. You could always use Oversight along with some tape too if you’re extra concerned about your Mac webcam or microphone access and want to be sure nothing fishy is going on from camfecting or otherwise.
While apps like Oversight could be considered overboard and unnecessary for many Mac users, others who are privacy conscious or in fields where higher security matters may find them to be helpful. I’ve personally noticed a particular web browser will occasionally attempt to access the microphone on my Mac from time to time without an obvious reason which I find to be… curious… and Oversight notified me each time. It’s not for everyone, but if you want to be notified when something is trying to use your Mac camera or microphone, check out the app yourself.
Fortunately, Mac Leopard users have a program called Time Machine that makes things a lot easier. But is Time Machine the perfect backup solution? I don’t think so. There are a couple of things that make Time Machine very unsuitable for me:
You need to get a seperate external hard drive that can only be used for Time Machine (and has to be formatted first)
That drive has to be formatted in HFS+, hence, without any (commercial) third-party plugins it’s not readable on Windows or Linux systems
You have to leave your drive on all the time to make sure Time Machine makes backups
You can’t make a list of things you want to have backed up, you can only exclude folders from your complete hard disk
Time Machine makes an exact copy of your hard drive
Especially that last ‘feature’ is very irritating to me. I have an external drive with about 300G of files, including lots of music and video files. My MacBook drive is only 80GB big, so i can never have the complete contents of my external drive on my MacBook. Let’s say i have 10GB of MP3 files, which i backup with Time Machine, then i remove about 5GB of files from my MacBook to free some space. What happens when the next backup round is happening? Exactly, the 5GB of files get deleted from the external disk as well. When i want to play a certain MP3 file from my external drive i now have to ‘restore’ and ‘look back in history’ to find it. Not very user-friendly.
Luckily, there is a very good (free) alternative to Time Machine that does exactly what i want with backups: it lets you specify which folders you want to backup, it doesn’t delete things on the backup drive when you delete files from your original drive, and it’s compatible with any external drive and can even backup files over a network. This piece of software is called rsync. Here’s how to use it.
rsync is a command-line utility shipped with every copy of Mac OS X. It originated from the UNIX/Linux world, where it has been part of most Linux distributions for many years. rsync is reliable, fast, and easily configurable. Try running it by opening up the Terminal.app (located in your Applications/Utilities folder) and running the command:
rsync
You’ll get an overview of all possible options. In essence the syntax is very simple:
rsync OPTIONS SOURCE DESTINATION
What you’ll probably want is a one-way transfer of all files in SOURCE to DESTINATION, where only files are copied that are not available on the DESTINATION disk or different. Aside from that you’ll want to include all subdirectories, links, permissions, date/time, groups, owner and devices. To do that simply use this easy-to-remember option list:
rsync -rlptgoD
Ha, just kidding! Fortunately there is another switch that does all of that with one switch, namely the archive switch:
rsync -a
So, let’s say you want to backup the files in your Documents directory to your external harddrive, which you appropriately named ‘backup’, then this would be the command:
rsync -a ~/Documents/ /Volumes/backup/Documents
For those of you who don’t use the Terminal very often: the tilde (~) is a shortcut for your home directory. If, for example, your name would be ‘Alice’ your home directory would probably be
In the Getting Started guide, you learned how to deploy a Linux distribution, boot your Linode and perform some basic administrative tasks. Now it’s time to harden your Linode to protect it from unauthorized access.
Update Your System–Frequently
Keeping your software up to date is the single biggest security precaution you can take for any operating system–be it desktop, mobile or server. Software updates frequently contain patches ranging from critical vulnerabilities to minor bug fixes, and many software vulnerabilities are actually patched by the time they become public.
Automatic Security Updates
There are opposing arguments for and against automatic updates on servers. Nonetheless, CentOS, Debian, Fedora and Ubuntu can be automatically updated to various extents. Fedora’s Wiki has a good breakdown of the pros and cons, but if you limit updates to those for security issues, the risk of using automatic updates will be minimal.
The practicality of automatic updates must be something which you judge for yourself because it comes down to what you do with your Linode. Bear in mind that automatic updates apply only to packages sourced from repositories, not self-compiled applications. You may find it worthwhile to have a test environment which replicates your production server. Updates can be applied there and reviewed for issues before being applied to the live environment.
Up to this point, you have accessing your Linode as the root user. The concern here is that roothas unlimited privileges and can execute any command–even one that could accidentally break your server. For this reason and others, we recommend creating a limited user account and using that at all times. Administrative tasks will be done using sudo to temporarily elevate your limited user’s privileges so you can administer your server without logging in as root.
Now you can administer your Linode from your new user account instead of root. Superuser commands can now be prefaced with sudo; for example, sudo iptables -L. Nearly all superuser commands can be executed with sudo, and those commands will be logged to /var/log/auth.log.
Some of the more privacy conscious Mac users out there might put tape over their webcam or use apps like Oversight to detect camera activity. While either of those approaches can be satisfactory for many users (or considered totally paranoid and overboard to others), many advanced Mac users in the security community go a step further and just outright disable their Macs front-facing web camera. This article will show you how to completely deactivate the front FaceTime camera on a Mac.
To be clear, this aims to completely disable the software components behind the built-in camera on Macs which prevents it from being used by any application, this webcam is sometimes called the FaceTime camera or the iSight camera, or simply the front-facing camera. All modern Macs have this camera, it is located at the top of the display and embedded into the screen bezel. By disabling the Macs camera, any application that requires it’s usage will no longer function as intended because camera access will become impossible.
This is an advanced tutorial aimed at advanced users, it is not intended for novice or casual Mac users. This approach disables the Mac built-in camera by changing system level permissions for system level files directly relating to the camera components. If you are not comfortable modifying system files using the command line with super user privileges, do not proceed.
This tutorial applies to modern versions of MacOS including Sierra and El Capitan, you will need turn off rootless temporarily so that you can make modifications to the system folder, if you’re not sure how to do that, you can learn how to disable SIP on Mac OS here. You should aways backup a Mac before making any modifications to system software. Older versions of Mac OS X that wish to disable the iSight camera can follow these instructions instead to accomplish the same effect.
How to Disable the Web Camera on Mac
This is a string of commands that will completely disable the built-in Mac camera, meaning no applications will be able to use the front-facing camera at all. This is intended for advanced users only who thoroughly understand proper syntax and command line usage.
Back up the Mac if you have not done so already, then you will need to disable SIPfirst (and yes you should re-enable it when finished)
Open the Terminal app as found in /Applications/Utilities/
One by one on their own line and executed separately, issue the following five command strings into the command line and authenticate:
Exit Terminal when complete, don’t forget to re-enable SIP on the Mac as well
(Note you can also use chmod 200 instead of a-r if you prefer using numbers, the effect will be the same and permissions will be –w——-)
After the Mac camera has been disabled this way, if you attempt to open FaceTime, Skype, Photo Booth, QuickTime, iMovie, or any other app which uses the built-in camera, you will get a message stating “there is no connected camera” on the Mac – which is exactly what you would want to see if you disabled the camera intentionally.
You should not need to reboot for the changes to take effect, though you may need to relaunch some active applications with camera access.
How to Re-Enable the Camera on Mac
Just as before when disabling the camera, to re-enable the Mac camera this way you will likely need to temporarily disable SIP in Mac OS before beginning. Then the commands to issue one by one are as follows:
(Note you can also use chmod 755 instead of a+r if you prefer using numbers to return to -rwxr-xr-x, the effect will be the same)
You’ll notice the difference between the enabling and disabling commands are simply the permissions change chmod command flag – has turned into a +, indicating the file(s) have read access now whereas before they did not, which is what prevented the camera from working.
If this approach is insufficient for your privacy or security needs for whatever reason, you’d likely need to go a step further and actually disassemble your Mac hardware to physically disconnect any camera cables, a task which is quite advanced but undeniably the most effective approach if you want to completely disable the Mac camera and don’t ever want the Macs camera to be used.
Why would I want to disable the Mac camera?
Most Mac users would not want to disable their FaceTime / iSight camera. Typically only very advanced Mac users who have a specific reason to completely disable the built-in camera on their Mac would want to do this, whether they are systems administrators, security professionals, for privacy reasons, or otherwise. This is not intended for the average Mac user. If you’re an average, casual, or novice Mac user who is concerned about privacy and any possible camera shenanigans, try putting tape on your web cam, like the FBI director does, which is much lower tech and less involved, easy to reverse, and quite effective since obviously if something is obstructing the camera lens than it is not usable.