Archive

Articles taggués ‘iptables’

Preventing brute force attacks using iptables recent matching

08/11/2023 Comments off

General idea

brute force attacksIn recent times our network has seen a lot of attempts to brute-force ssh passwords. A method to hamper such attacks by blocking attacker’s IP addresses using iptables ‘recent’ matching is presented in this text:

When the amount of connection attempts from a certain IP address exceeds a defined threshold, this remote host is blacklisted and further incoming connection attempts are ignored. The host is only removed from the blacklist after it has been stopped connecting for a certain time.

Edit: The fail2ban scripts offer a more sophisticated (but also more heavy-weighted) solution for this problem.

Software requirements

Linux kernel and iptables with ‘recent’ patch. (It seems that this patch has entered the mainline some time ago. ‘Recent’ matching e.g. is known to be included with kernels 2.4.31 and 2.6.8 of Debian Sarge 4.0.)

Implementation

We begin with empty tables…

iptables -F

and add all the chains that we will use:

iptables -N ssh
iptables -N blacklist

Setup blacklist chain

One chain to add the remote host to the blacklist, dropping the connection attempt:

iptables -A blacklist -m recent --name blacklist --set
iptables -A blacklist -j DROP

The duration that the host is blacklisted is controlled by the match in the ssh chain.

Setup ssh chain

In the ssh chain, incoming connections from blacklisted hosts are dropped. The use of --update implies that the timer for the duration of blacklisting (600 seconds) is restarted every time an offending packet is registered. (If this behaviour is not desired, --rcheckmay be used instead.)

iptables -A ssh -m recent --update --name blacklist --seconds 600 --hitcount 1 -j DROP

These rules are just for counting of incoming connections.

iptables -A ssh -m recent --set --name counting1
iptables -A ssh -m recent --set --name counting2
iptables -A ssh -m recent --set --name counting3
iptables -A ssh -m recent --set --name counting4

With the following rules, blacklisting is controlled using several rate limits. In this example, a host is blacklisted if it exceeds 2 connection attempts in 20 seconds, 14 in 200 seconds, 79 in 2000 seconds or 399 attempts in 20000 seconds.

iptables -A ssh -m recent --update --name counting1 --seconds 20 --hitcount 3 -j blacklist
iptables -A ssh -m recent --update --name counting2 --seconds 200 --hitcount 15 -j blacklist
iptables -A ssh -m recent --update --name counting3 --seconds 2000 --hitcount 80 -j blacklist
iptables -A ssh -m recent --update --name counting4 --seconds 20000 --hitcount 400 -j blacklist

The connection attempts that have survived this scrutiny are accepted:

iptables -A ssh -j ACCEPT

Lire la suite…

iptables « recent » module and hit limits

08/11/2023 Comments off

iptables « recent » module and hit limits

iptables « recent » module and hit limits

Those annoying ssh attacks

You know those. you have tried blockhosts, denyhosts, fail2ban, and they can still be annoying.

an alternative is to use some feature or features of iptables.

Two possible uses … examples

Your default INPUT chain policy is ACCEPT

This is the version that is found online, typically under tags such as Brute-force.

one adds lines to ones iptables

iptables -N SSHSCAN

iptables -A INPUT -i eth0 -p tcp -m tcp --dport 22 -m state --state NEW -j SSHSCAN 

iptables -A SSHSCAN -m recent --set --name SSH --rsource 
iptables -A SSHSCAN -m recent --update --seconds 3600 --hitcount 5 --name SSH --rsource -j LOG --log-prefix "Anti SSH-Bruteforce: " --log-level 6 
iptables -A SSHSCAN -m recent --update --seconds 3600 --hitcount 5 --name SSH --rsource -j DROP

Your default INPUT chain policy is DROP

This is a variation of the above, but takes into account the DROP policy. It is a small change, but necessary if you really want to be able to log in via ssh.

iptables -N SSHSCAN

iptables -A INPUT -i eth0 -p tcp -m tcp --dport 22 -m state --state NEW -j SSHSCAN

iptables -A SSHSCAN -m recent --set --name SSH --rsource
iptables -A SSHSCAN -m recent --update --seconds 3600 --hitcount 5 --name SSH --rsource -j LOG --log-prefix "Anti SSH-Bruteforce: " --log-level 6
iptables -A SSHSCAN -m recent --update --seconds 3600 --hitcount 5 --name SSH --rsource -j LogDrp
iptables -A SSHSCAN -j ACCEPT

Discussion

The recent module takes a number of options, and the examples above demonstrate some.

  • —name xyz give a name to the particular ‘class’ you are defining
  • —rsource in the list you keep, use the remote (source) address
  • —rcheck see if the address is in the list
  • —update like rcheck, but update the timestamp for tracking hits
  • —seconds the number of seconds to track the address
  • —hitcount the number of hits withing the time defined be —seconds at which point the rule gets activated.

So, in the examples, after the chain is defined to exist ( -N SSHSCAN), we have an INPUT rule that says ‘go to chain SSHSCAN if the destination port is 22’. In that chain, we set the module’s reference to this as SSH; then we tell it how to log this, if we have gotten 5 hits within 3600 seconds (actually more, as the time is updated rather than checked) and after that, DROP the next packets.

If the address has not gone up to 5 hits, it passes through and gets ACCEPTed.

Depending on your kernel and version of iptables, you can find the current list in

/proc/self/net/xt_recent/SSH

or

/proc/net/ipt_recent/SSH

ipsets

what does one do when one’s iptables rules start to get long? cpu and memory hit hard? convert a table to an ipset.

here is an example of something i need to test:

ipset -N sshban iphash --hashsize 4096 --probes 2 --resize 50

for i in ` cat /proc/net/xt_recent/SSH  | awk '{print $1;}' | cut -d '=' -f 2 `; do 
ipset -A sshban $i;
echo -$i > /proc/net/xt_recent/SSH
done

where we also have iptables rule

iptables -I INPUT -m set —set sshban src -j DROP

Source: we.riseup.net

Categories: Réseau, Sécurité Tags: ,

Mass-blocking IP addresses with ipset

30/10/2023 Comments off

Using ipset to block many IP addresses

I was sponsoring an upload of ipset to Debian the other day. This reminded me of ipset, a very cool program as I am going to show. It makes administering related netfilter (that is: firewall) rules easy along with a good performance. This is achieved by changing how rules match in iptables. Traditionally, an iptables rule matches a single network identity, for example a single IP address or a single network only. With ipsets you can operate on a bunch of (otherwise unrelated) addresses at once easily. If you happen to need bulk actions in your firewall, for example you want to blacklist a long list of IP addresses at once, you will love IP sets. I promise.

Drawbacks of netfilter

IP sets do exist for a longer time, however they made it into the upstream Linux kernel as of version 2.6.39. That means Debian Wheezy will support it as is; for Debian Squeeze you can either use a backported kernel or compile yourself the module shipped in the ipset-source package. In any case you additionally need the command line utilities named ipset. Thus, install that package before you can start. Having that said, Squeeze users should note the ipset syntax I am demonstrating below slightly differs from the syntax supported by the Squeeze utilities. The big picture remains the same, though.

IP utils do not conflict with iptables, but extend it in a useful way. You can combine both as you like. In fact, you still need iptables to turn IP sets into something really useful. Nonetheless you will be hitting iptables‘ limitation soon if you exceed a certain number of rules. You can combine as many conditions within a filter rule as you like, however you can only specify a single pattern for each condition. You figure, this does not scale very well if a pattern to match against does not follow a very tight definition such as a CIDR pattern.

This means you can happily filter whole network blocks such as 192.168.0.0/24 (which translates to 255 hosts) in iptables, but there is no way to specify a particular not specially connected set of IP addresses within this range if it cannot be expressed with a CIDR prefix. For example, there is no way to block, say, 192.168.0.5, 192.168.0.100 and 192.168.0.220 in a single statement only. You really need to declare three rules which only differ by the IP address. Pretend, you want to prevent these three addresses from accessing your host. You would probably do something like this:

iptables -A INPUT -s 192.168.0.5 -p TCP -j REJECT
iptables -A INPUT -s 192.168.0.100 -p TCP -j REJECT
iptables -A INPUT -s 192.168.0.220 -p TCP -j REJECT

Alternatively you could do

iptables -A INPUT -s 192.168.0.0/24 -p TCP -j REJECT

but this would block 251 unrelated hosts, too. Not a good deal I’d say. Now, while the former alternative is annoying, what’s the problem with it? The problem is: It does not scale. Netfilter rules work like a fall-through trapdoor. This means whenever a packet enters the system, it passes through several chains and in each of these chains, netfilter checks all rules until either one rule matches or there are no rules left. In the latter case the default action applies. In netfilter terminology a chain determines when an interception to the regular packet flow occurs. In the example above the specified chain is INPUT, which applies to any incoming packet.

In the end this means every single packet which is sent to your host needs to be checked whether it matches the patterns specified in every rule of yours. And believe me, in a server setup, there are lots of packets flowing to your machine. Consider for example a single HTTP requests, which requires at very least four packets sent from a client machine to your web server. Thus, each of these packets is passing through your rules in your INPUT chain as a bare minimum, before it is eventually accepted or discarded.

This requires a substantial computing overhead for every rule you are adding to your system. This isn’t so much of a problem if you haven’t many rules (for some values of “many” as I am going to show). However, you may end up in a situation where you end up with a large rule set. For example, if you suffer from a DDoS attack, you may be tempted to block drone clients in your firewall (German; Apache2. Likewise: for Lighttpd). In such a situation you will need to add thousands of rules easily.

Being under attack, the performance of your server is poor already. However, by adding many rules to your firewall you are actually further increasing computing overhead for every request significantly. To illustrate my point, I’ve made some benchmarks. Below you find the response times of a HTTP web server while doing sequential requests for a single file of 10 KiB in size. I am explaining my measurement method in detail further below. For now, look the graph. It shows the average response time of an Apache 2 web server, divided into four parts:

  • connect time: this is the time passed by until the server completed the initial TCP handshake
  • send time: this is the time passed by which I needed to reliably send a HTTP request over the established TCP connection reliably (that means: one packet sent and waiting for acknowledged by the server)
  • first byte: this is time passed by until the server sent the first byte from the corresponding HTTP response
  • response complete: this is time passed by until the server sent all of the remaining bytes of the corresponding HTTP response (remaining HTTP header + 10 KiB of payload)
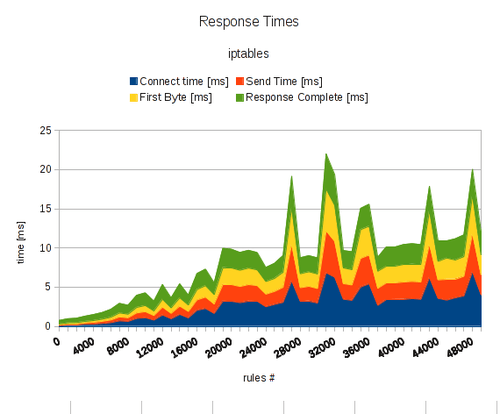
ipset2

Lire la suite…

How to run iptables automatically after reboot on Debian

27/10/2023 Comments off

reboot iptablesIf you have customized iptables rules, and would like to load the customized iptables rules persistently across reboots on Debian, you can leverage if-up.d scripts that are located in /etc/network/if-up.d. On Debian, any script that is marked as executable and placed in /etc/network/if-up.d gets executed when a network interface is brought up.

In order to run iptables automatically after reboot on Debian, do the following.

First, customize iptables as you wish, and then save the current iptables rule-set using iptables-save command.

$ sudo iptables-save > /etc/firewall.conf

The above command will dump the current iptables rule set into /etc/firewall.conf file which iptables-restore command can later use to restore the same rule set.

Now create the following if-up.d script called iptables that restores the saved iptables rule set.

$ sudo vi /etc/network/if-up.d/iptables
#!/bin/sh
iptables-restore < /etc/firewall.conf
$ sudo chmod  x /etc/network/if-up.d/iptables

Alternatively, you can add « iptables-restore < /etc/firewall.conf » command to /etc/rc.local, which gets executed at the end of system boot-up.

Source: Xmodulo

Securing your server with iptables

12/08/2021 Comments off

Securing your server with iptables

securing your server linuxIn the Getting Started guide, you learned how to deploy a Linux distribution, boot your Linode and perform some basic administrative tasks. Now it’s time to harden your Linode to protect it from unauthorized access.

Update Your System–Frequently

Keeping your software up to date is the single biggest security precaution you can take for any operating system–be it desktop, mobile or server. Software updates frequently contain patches ranging from critical vulnerabilities to minor bug fixes, and many software vulnerabilities are actually patched by the time they become public.

Automatic Security Updates

There are opposing arguments for and against automatic updates on servers. Nonetheless, CentOS, Debian, Fedora and Ubuntu can be automatically updated to various extents. Fedora’s Wiki has a good breakdown of the pros and cons, but if you limit updates to those for security issues, the risk of using automatic updates will be minimal.

The practicality of automatic updates must be something which you judge for yourself because it comes down to what you do with your Linode. Bear in mind that automatic updates apply only to packages sourced from repositories, not self-compiled applications. You may find it worthwhile to have a test environment which replicates your production server. Updates can be applied there and reviewed for issues before being applied to the live environment.

Add a Limited User Account

Up to this point, you have accessing your Linode as the root user. The concern here is that roothas unlimited privileges and can execute any command–even one that could accidentally break your server. For this reason and others, we recommend creating a limited user account and using that at all times. Administrative tasks will be done using sudo to temporarily elevate your limited user’s privileges so you can administer your server without logging in as root.

To add a new user, log in to your Linode via SSH.

CentOS / Fedora

  1. Create the user, replacing example_user with your desired username, and assign a password:
    useradd example_user && passwd example_user
  2. Add the user to the wheel group for sudo privileges:
    usermod -aG wheel example_user

Debian / Ubuntu

  1. Create the user, replacing example_user with your desired username. You’ll then be asked to assign the user a password.
    adduser example_user
  2. Add the user to the sudo group so you’ll have administrative privileges:
    adduser example_user sudo

With your new user assigned, disconnect from your Linode as root:

exit

Log back in to your Linode as your new user. Replace example_user with your username, and the example IP address with your Linode’s IP address:

ssh [email protected]

Now you can administer your Linode from your new user account instead of root. Superuser commands can now be prefaced with sudo; for example, sudo iptables -L. Nearly all superuser commands can be executed with sudo, and those commands will be logged to /var/log/auth.log.

Lire la suite…