Archive

Articles taggués ‘firewall’

Interdisez l’accès à votre serveur web par pays

26/02/2024 Comments off

Source: eric-couchelou.net

Linux-debian-300x145En annexe du paramétrage basique de votre serveur web, il se peut que vous soyez confronté à la nécessité ou l’envie de placer une interdiction d’accès Géolocalisée.

Mais avant de procéder à ce type d’installation, gardez à l’esprit plusieurs choses :

  • Si vous avez plusieurs sites sur le même serveur, tous seront concernés par vos règles, soyez donc sûr et certain qu’aucun d’entre eux n’ait pour cible l’un des pays que vous aller blacklister,
  • La très grande majorité des internautes des pays que vous pouvez considérer comme à risque (Russie, Chine, Taiwan, Roumanie, Brésil…) n’ont pas de mauvaises intentions, vous vous priverez donc volontairement d’une source de trafic potentiel.
  • Internet est ainsi fait que cette solution est loin d’être fiable à 100%, et les filtres géolocalisés facilement contournables

Bref, le jeu en vaut-il la chandelle? Si vous êtes convaincu que oui, alors ce petit tutoriel est fait pour vous. Je vous proposer d’installer le module de surveillance GEOIP.

1 – Installation du programme :

apt-get install libapache2-mod-geoip

2- Configuration du programme :

vi  etc/apache2/mods-available/geoip.conf

Et Mettre :

GeoIPEnable On
GeoIPDBFile /usr/share/GeoIP/GeoIP.dat
SetEnvIf GEOIP_COUNTRY_CODE CN BlockCountry=1
SetEnvIf GEOIP_COUNTRY_CODE RU BlockCountry=1
SetEnvIf GEOIP_COUNTRY_CODE RO BlockCountry=1
SetEnvIf GEOIP_COUNTRY_CODE TW BlockCountry=1

Deny from env=BlockCountry

Chaque ligne de type SetEnvIf GEOIP_COUNTRY_CODE XX BlockCountry=1 correspond à une restriction d’accès pour un pays où XX définit le code du pays concerné par la règle. Pour info vous trouverez les différents codes pays (FR, DE, etc.) à cette adresse:
http://www.maxmind.com/app/iso3166

Redémarrez Apache :

/etc/init.d/apache2 restart

C’est en place!

Pour la mise à jour, téléchargez les dernières définitions d’IPs (une fois par mois pour la version gratuite) à cette adresse :
http://www.maxmind.com/app/geolitecountry

et remplacer celles existantes dans

/usr/share/GeoIP/GeoIP.dat

J’attire votre attention sur le fait que le blacklistage géolocalisé présenté ci-dessus fonctionne pour Apache, c’est à dire que vous devrez faire des paramétrages supplémentaires si vous voulez interdire les accès aux serveurs email par exemple. Nous verrons cela plus tard…

System: fail2ban and iptables

26/02/2024 Comments off

source: http://www.the-art-of-web.com/system/fail2ban/

Around the beginning of 2005 we saw an increase in brute-force ssh attacks – people or robots trying different combinations of username and password to log into remote servers. A quick search on this topic returns many references to iptables and ipchains but noone really explained how they work.

Having just gone through this learning curve myself, and found a satisfactory solution in the fail2ban package, I’m going to try and explain how to achieve the simple goal of banning IP addresses that make repeated failed ssh login attempts.

If you want more technical information regarding firewalls and iptables in particular, see the References section at the bottom of this page. Lire la suite…

Rate-limit Incoming Port 22 Connections

17/02/2024 Comments off

Both netfilter and pf provides rate-limit option to perform simple throttling on incoming connections on port # 22.

Iptables Example

The following example will drop incoming connections which make more than 5 connection attempts upon port 22 within 60 seconds:

#!/bin/bash
inet_if=eth1
ssh_port=22
$IPT -I INPUT -p tcp --dport ${ssh_port} -i ${inet_if} -m state --state NEW -m recent  --set
$IPT -I INPUT -p tcp --dport ${ssh_port} -i ${inet_if} -m state --state NEW -m recent  --update --seconds 60 --hitcount 5 -j DROP

Call above script from your iptables scripts. Another config option:

$IPT -A INPUT  -i ${inet_if} -p tcp --dport ${ssh_port} -m state --state NEW -m limit --limit 3/min --limit-burst 3 -j ACCEPT
$IPT -A INPUT  -i ${inet_if} -p tcp --dport ${ssh_port} -m state --state ESTABLISHED -j ACCEPT
$IPT -A OUTPUT -o ${inet_if} -p tcp --sport ${ssh_port} -m state --state ESTABLISHED -j ACCEPT
# another one line example
# $IPT -A INPUT -i ${inet_if} -m state --state NEW,ESTABLISHED,RELATED -p tcp --dport 22 -m limit --limit 5/minute --limit-burst 5-j ACCEPT

See iptables man page for more details.

*BSD PF Example

The following will limits the maximum number of connections per source to 20 and rate limit the number of connections to 15 in a 5 second span. If anyone breaks our rules add them to our abusive_ips table and block them for making any further connections. Finally, flush keyword kills all states created by the matching rule which originate from the host which exceeds these limits.

sshd_server_ip="202.54.1.5"
table <abusive_ips> persist
block in quick from <abusive_ips>
pass in on $ext_if proto tcp to $sshd_server_ip port ssh flags S/SA keep state (max-src-conn 20, max-src-conn-rate 15/5, overload <abusive_ips> flush)

IPtables dans Webmin

10/02/2024 Comments off

Lorsque vous utilisez Webmin pour administrer votre serveur, les paramètres de votre firewall iptables sont visibles et manageables depuis la console Webmin.

Toutefois, les règles iptables présentées par Webmin sont celles qui ont été préalablement sauvées par /sbin/iptables-save dans le fichier que vous avez choisi.

Donc si vous utilisez un script depuis le shell pour changer les règles de iptables, ce ne seront pas ces règles que Webmin vous présentera mais celles que vous avez sauvées préalablement avec Webmin.When using Webmin as an administration tool, iptables rules visible for Webmin are those previously saved through Webmin.

So when you use a shell script to change iptables rules on the fly, these rules won’t be the ones Webmin present to you.

The solution is to use:

iptables-save > the_file_used_by_webmin_last_time_you_backed_up_rules

to retrieve the exact actual state of iptables rules.

Punching holes into firewalls

07/02/2024 Comments off

5b3f38bb3b78c6acd6bbfe3dfb33a470-pearlsquareFirewalls are heavily used to secure private networks (home or corporate). Usually, they are used to protect the network from:
  • intrusions from outsiders
  • misuse from insiders

In a TCP/IP environment, the typical corporate firewall configuration is to block everything (both incoming and outgoing), and give access to the internet only through a HTTP proxy. The proxy usually has filtering capabilities (censors URLs and file types), and access to the proxy often requires credentials (login/password). This gives greater contol to the network administrator over what and who is going in and out of the network.

Still, this should not considered a ultimate weapon, and network administrators should not rely on the firewalls only.

Encapsulation is the basis of networking. For example, HTTP is encapsulated by TCP, TCP is encapsulated by IP, and IP is often encapsulated in PPP or Ethernet.
Encapsulating protocols in an unsual way is often reffered as tunnelling.

As soon as you let a single protocol out, tunelling allows to let anything go through this protocol, and thus through the firewall.

This paper demonstrates how to encapsulate any TCP-based protocol (SMTP, POP3, NNTP, telnet…) into HTTP, thus bypassing the firewall protection/censorship (depending on your point of view)

A word of warning:

In many countries and corporate environments, bypassing a firewall is forbidden and exposes you to sanctions, redundancy, legal proceedings and – in some countries – death penalty.
You are warned.

Nevertheless, in some countries this kind of firewall/proxy bypassing is the only way to ensure free speech (such as China or United Arab Emirates where the government severly censors the internet and where firewall bypassing is a national sport.)

Now you known what you’re doing, let’s move on.


The problem

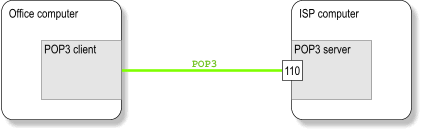
Say you want to fetch your mail from your ISP mail server. You usually simply connect to port 110 on the POP server of your ISP.

punch1


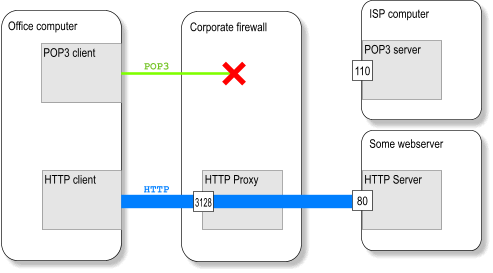
Trouble: there is a Big Bad firewall which blocks everything.

punch2

Well… it does not exactly block everything: it lets HTTP out through a proxy.
Let’s encapsulate our POP3 connection into HTTP.


The tools

We need:

  • A computer on the internet which has unrestricted access to the internet, such as a home ADSL computer.
  • GNU HTTP Tunnel (http://www.nocrew.org/software/httptunnel.html). It encapsulates TCP into HTTP requests.
  • SSH is a secure shell (http://www.openssh.com). It provides secure (and compressed) channels between two hosts using SSL. Besides providing a shell (like telnet), it also provides file copy (scp) and TCP port forwarding (tunnelling). We will use the port forwarding feature.


Why not use GNU HTTP Tunnel alone ?

In principle, only HTTP Tunnel is necessary. But this is not desirable:

  • the tunnel is public: anyone can use your tunnel. Your could be held liable for what anybody has done with your tunnel.
  • the tunnel is cleartext: anyone can spy on your connection. Your passwords (SMTP, POP3, telnet…) are transmitted in clear text.
  • the tunnel is not protected: anyone can alter the datastream.
  • you have to run a new instance of the HTTP Tunnel client and the server for each new tunnel you want to set up.

This is where ssh come in. ssh provides:

  • authentication (only authorised users can use the tunnel)
  • privacy (no one can spy on what’s going through the tunnel)
  • integrity (no one can tamper data going through the tunnel)
  • easy tunnel set-up (you can create a new tunnel with a single ssh command on the client side).

These tools are available on Unix/Linux and Windows environments.


The whole chain

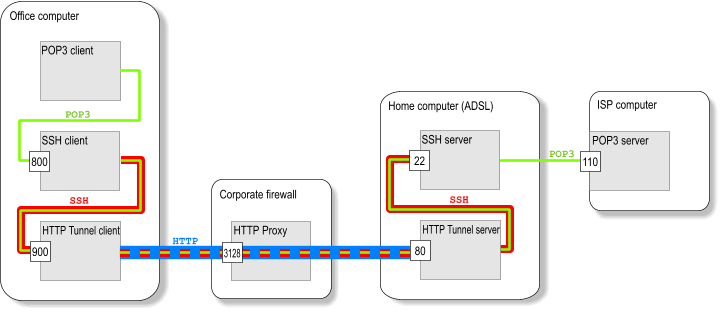
Let’s see how this works. Here is the full chain:

punch3

Technically speaking, once this chain is established, connecting to OfficeComputer:800 is identical to connecting to pop3server:110.
The mail client will not see the difference.

  • On the office computer:
    • TCP data sent to port 800 is encrypted by ssh, which forwards data to port 900.
    • ssh stream sent to port 900 is chunked in individual HTTP requests by the HTTP Tunnel client and sent to the home computer through the proxy.
  • On the home computer:
    • the HTTP Tunnel server receives HTTP requests, decapsulates and re-assembles the ssh stream and forwards it to port 22 (to the ssh server).
    • the ssh server decrypts the datastream and forwards it to the pop3server on port 110.

As TCP is a bi-directionnaly datastream, once established, the TCP connection can pass data back and forth through the HTTP proxy.

Lire la suite…

Categories: Réseau, Sécurité Tags: ,