Archive

Articles taggués ‘firewall’

Defend Your Web Server Against Distributed Denial of Services (DDos) Attacks

31/05/2024 Comments off

Source: Tech Recipes – Quinn McHenry

In computer security, it quickly becomes apparent that preventing computer attacks is much more challenging than attacking computers. A good example of an easy technique to prevent a website from functioning is a distributed denial of service, or DDoS, attack in which a number of compromised computers around the internet make web (or other protocol) requests on some poor server. If the web page requested is one that requires lots of server-side processing, the resulting load from the combined requests prevents the web server from responding to legitimate requests, thus denying the service. As Tech-Recipes.com was subjected to such an attack recently, we felt it might be beneficial to others if we described the steps we took in our response.


Note: The following information is relevant to UNIX-based servers running Apache (although other platforms and software may be applicable). A prerequisite for this approach requires the use of iptables which likely means you need root access to the server, so this will probably not help you if you are using shared hosting. Sorry! Your best bet in this case is to contact your ISP for their help (good luck) as it is in their best interest to prevent high loads on their shared servers, although it is likely that they will temporarily disable your domain services, which is definitely not the best solution from your perspective.

To minimize the impact of a denial of service attack, you should make yourself aware of problems with your web server in near real-time. Several server monitoring services are available. We use both Pingdom and SiteUptime. Using these services, we have redundant notifications of any service disruption sent to our cell phones via SMS and to several email addresses (none of which are handled by our monitored servers, of course). Using these services, we are notified within a minute of a failed request to our production servers.

Before you implement specific anti-DDoS techniques, it is wise to make sure that the problem is actually a DDoS attack. Services may fail to answer a request for a number of reasons among them the executable running the service dying unexpectedly, the ISP hosting the server experiencing a network or server outage, or some other self-correcting glitch in the matrix. To determine if the service failure is due to a DDoS and to collect information necessary to take actions against the attack, you need to dig around first.

You need access to your access_log, the log file which contains a text entry for every request made to your web server. There are many places that this file can hide and it is dependent on your server setup. When in doubt, you can check the ISP’s documentation (search for access log) — the log data may be accessible through a web console, but it is optimal if you have shell access to your server. If your ISP’s online help is not so helpful in finding the access log, you can use the UNIX find command.

Once you have found your access log, cd into the directory containing the log and run the tail command on it with the -f option:

tail -f access_log

The tail command on its own will display the last 10 lines of the specified file and then quit. The -f option will tell tail to keep running after the last 10 lines are displayed and keep displaying subsequent lines that are added to the file. You’re likely to see a flurry of entries. If you don’t see any log messages after the default 10, you’re either looking at the wrong file or the web server is dead or otherwise not seeing any traffic. It is possible that one server can host many websites and each can have a separate access_log file, so be certain that you’re tailing the right one. If the service is dead, resuscitate it through whatever mechanism is appropriate. We’re going to assume from here on out that you’re seeing a ton of access log messages that look very similar (probably hitting the same URL) that don’t have a valid or any referrer (if the referrer is slashdot.org or digg.com, well, then you can be both happy and sad that the traffic, though server crippling, is legitimate) and have a bunch of different IP addresses. During our recent siege, there were so many bogus requests that very few legitimate requests made it to the access_log file. Here are a few lines from our access_log during the attack:

220.255.7.204 - - [07/Jul/2008:19:28:18 -0700] "GET /modules.php?name=Forums&file=index HTTP/1.1" 200 0 "-" "Mozilla/4.0 (compatible; MSIE 6.0; Windows NT 5.1; SV1; .NET CLR 1.1.4322)"
220.255.7.209 - - [07/Jul/2008:19:28:18 -0700] "GET /modules.php?name=Forums&file=index HTTP/1.1" 200 0 "-" "Mozilla/4.0 (compatible; MSIE 6.0; Windows NT 5.1; SV1; .NET CLR 1.1.4322)"
220.255.7.208 - - [07/Jul/2008:19:28:18 -0700] "GET /modules.php?name=Forums&file=index HTTP/1.1" 200 0 "-" "Mozilla/4.0 (compatible; MSIE 6.0; Windows NT 5.1; SV1; .NET CLR 1.1.4322)"
71.232.78.53 - - [07/Jul/2008:19:28:19 -0700] "GET /modules.php?name=Forums&file=index HTTP/1.1" 200 14313 "-" "Mozilla/4.0 (compatible; MSIE 7.0; Windows NT 5.1; .NET CLR 1.1.4322; .NET CLR 2.0.50727)"

If you aren’t familiar with the default structure of Apache’s access_log, the first value is the source IP address of the request, then the date and time of the request is in square brackets, and the first string in double quotes is the HTTP request made. In our example, the request was always the same: “GET /modules.php?name=Forums&file=index HTTP/1.1” — a GET request of the URL (/modules.php?….) and the HTTP protocol used (1.1). The portion of the URL used is important since it is the one thing we can use to identify the offending IP addresses. The second string in quotes is the referring URL, in our case there isn’t one so it shows up as “-” which lends credence to the suspicion that it is a DDoS attack. The remaining string describes the platform and software that has made the request and isn’t very meaningful or helpful to us as it can easily be forged.

Lire la suite…

Categories: Réseau, Sécurité Tags: , ,

Iptables Limits Connections Per IP

30/05/2024 Comments off

How do I restrict the number of connections used by a single IP address to my server for port 80 and 25 using iptables?

You need to use the connlimit modules which allows you to restrict the number of parallel TCP connections to a server per client IP address (or address block).

This is useful to protect your server or vps box against flooding, spamming or content scraping.

Syntax

The syntax is as follows:

/sbin/iptables -A INPUT -p tcp --syn --dport $port -m connlimit --connlimit-above N -j REJECT --reject-with tcp-reset
# save the changes see iptables-save man page, the following is redhat and friends specific command
service iptables save

Example: Limit SSH Connections Per IP / Host

Only allow 3 ssg connections per client host:

/sbin/iptables  -A INPUT -p tcp --syn --dport 22 -m connlimit --connlimit-above 3 -j REJECT
# save the changes see iptables-save man page, the following is redhat and friends specific command
service iptables save

Example: Limit HTTP Connections Per IP / Host

Only allow 20 http connections per IP (MaxClients is set to 60 in httpd.conf):

warning-40pxWARNING! Please note that large proxy servers may legitimately create a large number of connections to your server. You can skip those ips using ! syntax
/sbin/iptables -A INPUT -p tcp --syn --dport 80 -m connlimit --connlimit-above 20 -j REJECT --reject-with tcp-reset
# save the changes see iptables-save man page, the following is redhat and friends specific command
service iptables save

Skip proxy server IP 1.2.3.4 from this kind of limitations:

/sbin/iptables -A INPUT -p tcp --syn --dport 80 -d ! 1.2.3.4 -m connlimit --connlimit-above 20 -j REJECT --reject-with tcp-reset

Example: Class C Limitations

In this example, limit the parallel http requests to 20 per class C sized network (24 bit netmask)

/sbin/iptables  -A INPUT -p tcp --syn --dport 80 -m connlimit --connlimit-above 20 --connlimit-mask 24 -j REJECT --reject-with tcp-reset
# save the changes see iptables-save man page
service iptables save

Lire la suite…

Categories: Réseau, Sécurité Tags: ,

How to protect server from simple DoS attack

30/05/2024 2 commentaires

You can use a firewall to limit the number of concurrent connections and the rate of new connections coming from a network (e.g. a /32 for IPv4 and a /64 for IPv6). Example of what it may look like using iptables:

# Limit number of concurrent connections
-A INPUT -i eth0 -p tcp --syn -m connlimit --connlimit-above 50 -j DROP
# Limit rate of new connections
-A INPUT -i eth0 -p tcp --syn -m hashlimit --hashlimit-name tcp --hashlimit-mode srcip --hashlimit-above 3/sec --hashlimit-burst 7 --hashlimit-srcmask 32 -j DROP

(Same thing for ip6tables except adding --connlimit-mask 64 to the first and changing --hashlimit-srcmask to 64 in the second.)

You can also limit the rate of HTTP requests, for example with the limit_req module of nginx.

Source: serverfault.com

Categories: Réseau, Sécurité Tags: , ,

Communication Networks/IP Tables

28/05/2024 Comments off

Operational summary

The netfilter framework, of which iptables is a part of, allows the system administrator to define rules for how to deal with network packets. Rules are grouped into chains—each chain is an ordered list of rules. Chains are grouped into tables—each table is associated with a different kind of packet processing.

Each rule contains a specification of which packets match it and a target that specifies what to do with the packet if it is matched by that rule. Every network packet arriving at or leaving from the computer traverses at least one chain, and each rule on that chain attempts to match the packet. If the rule matches the packet, the traversal stops, and the rule’s target dictates what to do with the packet. If a packet reaches the end of a predefined chain without being matched by any rule on the chain, the chain’s policy target dictates what to do with the packet. If a packet reaches the end of a user-defined chain without being matched by any rule on the chain or the user-defined chain is empty, traversal continues on the calling chain (implicit target RETURN). Only predefined chains have policies.

Rules in iptables are grouped into chains. A chain is a set of rules for IP packets, determining what to do with them. Each rule can possibly dump the packet out of the chain (short-circuit), and further chains are not considered. A chain may contain a link to another chain – if either the packet passes through that entire chain or matches a RETURN target rule it will continue in the first chain. There is no limit to how many nested chains there can be. There are three basic chains (INPUT, OUTPUT, and FORWARD), and the user can create as many as desired. A rule can merely be a pointer to a chain.

Tables

There are three built-in tables, each of which contains some predefined chains. It is possible for extension modules to create new tables. The administrator can create and delete user-defined chains within any table. Initially, all chains are empty and have a policy target that allows all packets to pass without being blocked or altered in any fashion.

  • filter table — This table is responsible for filtering (blocking or permitting a packet to proceed). Every packet passes through the filter table. It contains the following predefined chains, and any packet will pass through one of them:
    • INPUT chain — All packets destined for this system go through this chain (hence sometimes referred to as LOCAL_INPUT)
    • OUTPUT chain — All packets created by this system go through this chain (aka. LOCAL_OUTPUT)
    • FORWARD chain — All packets merely passing through the system (being routed) go through this chain.
  • nat table — This table is responsible for setting up the rules for rewriting packet addresses or ports. The first packet in any connection passes through this table: any verdicts here determine how all packets in that connection will be rewritten. It contains the following predefined chains:
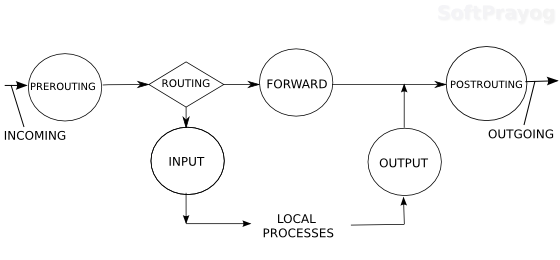
    • PREROUTING chain — Incoming packets pass through this chain before the local routing table is consulted, primarily for DNAT (destination-NAT).
    • POSTROUTING chain — Outgoing packets pass through this chain after the routing decision has been made, primarily for SNAT (source-NAT).
    • OUTPUT chain — Allows limited DNAT on locally-generated packets
  • mangle table — This table is responsible for adjusting packet options, such as quality of service. All packets pass through this table. Because it is designed for advanced effects, it contains all the possible predefined chains:
    • PREROUTING chain — All packets entering the system in any way, before routing decides whether the packet is to be forwarded (FORWARD chain) or is destined locally (INPUT chain).
    • INPUT chain — All packets destined for this system go through this chain
    • FORWARD chain — All packets merely passing through the system go through this chain.
    • OUTPUT chain — All packets created by this system go through this chain
    • POSTROUTING chain — All packets leaving the system go through this chain.

In addition to the built-in chains, the user can create any number of user-defined chains within each table, which allows them to group rules logically.

Each chain contains a list of rules. When a packet is sent to a chain, it is compared against each rule in the chain in order. The rule specifies what properties the packet must have for the rule to match, such as the port number or IP address. If the rule does not match then processing continues with the next rule. If, however, the rule does match the packet, then the rule’s target instructions are followed (and further processing of the chain is usually aborted). Some packet properties can only be examined in certain chains (for example, the outgoing network interface is not valid in the INPUT chain). Some targets can only be used in certain chains, and/or certain tables (for example, the SNAT target can only be used in the POSTROUTING chain of the nat table).

Lire la suite…

Simple Stateful Load Balancer with iptables and NAT

27/05/2024 Comments off

To demonstrate how iptables can perform network address translation this how-to shows how to use it to implement a over-simplified load balancer. In practice we would use a daemon such as HAProxy allowing IP tables to check packets before forwarding them.

Using the method presented in this tutorial packets get forwarded without going through the INPUT, FORWARD and OUTPUT chains.

iptables is a powerful tool that is used to create rules for how incoming or outgoing packets are handled. It keeps track of a packets state – there is NEW, ESTABLISHED, RELATED, INVALID and UNTRACKED. It can make filtering decisions based on the packets header data and the payload section of the packet, for these purposes iptables even has regular expression matching.

On top of that iptables has extensions that can be used to filter packets based on a packets history so we can keep track of packets and sessions. We can set filters to only trigger at specific times, parse the packet contents and header information searching for specific patterns, differentiate protocols such as tcp, udp, icmp, etc.

For load balancing behavior we want the incoming packets on one machine to be routed to another machine. iptables has extentions that helps us achieve this aim but we also need to muck around with its internal PREROUTING and POSTROUTING table, which is not recommended as this could potentially pose a security risk. lets use iptables to route all traffic coming in on an interface eth0 with a destination port 80 and route it to another IP address:

Allow IP forwarding

(Note: if your testing this on the same box your doing this on it won’t work, you need at least 3 machines to test this out, virtual ones work nicely)

First we enable ipv4 forwarding or this will not work:
# echo "1" > /proc/sys/net/ipv4/ip_forward

XOR

# sysctl net.ipv4.ip_forward=1

next we add a filter that changes the packets destination ip and allows us to masquerade:

# iptables -t nat -A PREROUTING -i eth0 -p tcp --dport 80 -j DNAT --to-destination 10.0.0.3:80
# iptables -t nat -A POSTROUTING -j MASQUERADE

The above filter gets added to iptables PREROUTING chain. The packets first go through the filters in the PREROUTING chain before iptables decides where they go. The above filter says all packets input into eth0 that use tcp protocol and have a destination port 80 will have their destination address changed to 1.2.3.4 port 80. The DNAT target in this case is responsible for changing the packets Destination IP address. Variations of this might include mapping to a different port on the same machine or perhaps to another interface all together, that is how one could implement a simple stateful vlan (in theory).

The masquerade option acts as a one to many NAT server allowing one machine to route traffic with one centralized point of access. This is similar to how many commercial firewalls and network routers function.

The above ruleset results in all incoming packets to dport 80 traversing the iptables chains in a straight line from INCOMING to OUTGOING in the image below, effectively bypassing any rules we might have had in our INPUT chain. If we were to choose to implement nat like this we would need to implement those – our desired INPUT filter rules – on the machines where traffic is forwarded OR add them to the FORWARD chain if we want to block things before they are forwarded (Note: packets might go through FORWARD chain in both directions so direction needs to be considered when writing filters for this chain).

560x260xbuilt-in-chains-in-filter-table.png.pagespeed.ic.CVAYVeFJ96

Path incoming packets take through iptables chains

Lire la suite…