Rsync is a program for synchronizing two directory trees across different file systems even if they are on different computers. It can run its host to host communications over ssh to keep things secure and to provide key based authentication. If a file is already present in the target and is the same as on the source the file will not be transmitted. If the file on the target is different than the one on the source then only the parts of it that are different are transferred. These features greatly increase the performance of rsync over a network.
Suppose you as a software developer has set up daily builds of your software for testing purposes. Every day you make a new build, users have to re-download the updated build to evaluate it. In this case you may want to enable differential downloads, so that users can download only difference between two builds, thereby saving on the server’s bandwidth. Users will also be happy as they don’t have to wait to re-download the whole thing. Similar situations are encountered when you want to set up a download archive which allows incremental sync for users.
In these cases, how would you distribute incrementally updated files efficiently for multiple users? In fact, there are open-source storage solutions that come with « delta sync » capability built-in, such as ownCloud or Syncthing. These kinds of full-blown solutions with built-in GUI require users to install a dedicated client, and thus may be an overkill for simple file distribution that you are looking for.
Barring full-blown third-party software like these, perhaps rsync may come to mind, which can do bandwidth-efficient file sync. The problem with rsync, however, is that all the heavy duty computations is done at the server side. That is, when a client requests for a file sync, the server needs to perform block-by-block checksum computation and search for blocks not available on the client. Obviously this procedure can place a significant strain on the server’s resources if the server needs to handle many users, and thus is not scalable.
What is Zsync?
This is when a command-line tool called zsync comes in handy. While zsync uses the same delta-encoding based sync algorithm as rsync does, it moves the heavy duty computation away from the server and onto the clients. What do I mean by that?
Well, in zsync, the server maintains a separate .zsync metadata file for a file to distribute, which contains a list of « precomputed » checksums for individual blocks of the file. When zsync client requests for a file sync, the client downloads .zsync metadata file first, and performs block-by-block checksum calculation to find missing blocks on its own. The client then requests for missing blocks using HTTP range requests. As you can see, the server is totally out of the loop from the sync algorithm, and simply serves requested file blocks over HTTP, which makes it ideal when incremental file sync is needed for many users.
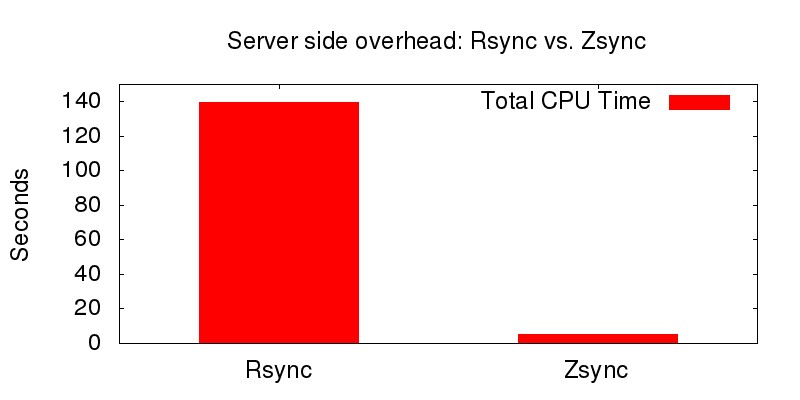
Here is a quick rundown on the server-side overhead difference between rsync and zsync. In the plot below, I compare rsync and zsync in terms of the server’s CPU usage when 200 users are downloading a tarball file with 2.5% discrepancy of a previous version. For fair comparison, SSH is not used for rsync.
With zsync, since all checksum computation overhead has shifted from the server to individual clients, the server overhead is reduced dramatically. A small neat idea makes zsync a real winner!
In the rest of the tutorial, I will show how to distribute a file incrementally using zsync under the Linux environment.
Zsync: Client Side Setup
On the client side, you need to install zsync to initiate file transfer from a remote web server. zsync is extremely lightweight, and is included in the most Linux distros. Here is how to install zsync on various distros.
rsync is used to perform the backup operation in UNIX / Linux.
rsync utility is used to synchronize the files and directories from one location to another in an effective way. Backup location could be on local server or on remote server.
Important features of rsync
Speed: First time, rsync replicates the whole content between the source and destination directories. Next time, rsync transfers only the changed blocks or bytes to the destination location, which makes the transfer really fast.
Security: rsync allows encryption of data using ssh protocol during transfer.
Less Bandwidth: rsync uses compression and decompression of data block by block at the sending and receiving end respectively. So the bandwidth used by rsync will be always less compared to other file transfer protocols.
Privileges: No special privileges are required to install and execute rsync
Syntax
$ rsync options source destination
Source and destination could be either local or remote. In case of remote, specify the login name, remote server name and location.
Example 1. Synchronize Two Directories in a Local Server
To sync two directories in a local computer, use the following rsync -zvr command.
$ rsync -zvr /var/opt/installation/inventory/ /root/temp
building file list ... done
sva.xml
svB.xml
.
sent 26385 bytes  received 1098 bytes  54966.00 bytes/sec
total size is 44867  speedup is 1.63
$
In the above rsync example:
-z is to enable compression
-v verbose
-r indicates recursive
Now let us see the timestamp on one of the files that was copied from source to destination. As you see below, rsync didn’t preserve timestamps during sync.
$ ls -l /var/opt/installation/inventory/sva.xml /root/temp/sva.xml
-r--r--r-- 1 bin  bin  949 Jun 18  2009 /var/opt/installation/inventory/sva.xml
-r--r--r-- 1 root bin  949 Sep  2  2009 /root/temp/sva.xml
Example 2. Preserve timestamps during Sync using rsync -a
rsync option -a indicates archive mode. -a option does the following,
Recursive mode
Preserves symbolic links
Preserves permissions
Preserves timestamp
Preserves owner and group
Now, executing the same command provided in example 1 (But with the rsync option -a) as shown below:
$ rsync -azv /var/opt/installation/inventory/ /root/temp/
building file list ... done
./
sva.xml
svB.xml
.
sent 26499 bytes  received 1104 bytes  55206.00 bytes/sec
total size is 44867  speedup is 1.63
$
As you see below, rsync preserved timestamps during sync.
$ ls -l /var/opt/installation/inventory/sva.xml /root/temp/sva.xml
-r--r--r-- 1 root  bin  949 Jun 18  2009 /var/opt/installation/inventory/sva.xml
-r--r--r-- 1 root  bin  949 Jun 18  2009 /root/temp/sva.xml
Ce qui permet de réinjecter des données résultantes d’un SELECT * FROM base.table WHERE my_id='66666666'.
Il est évidement possible de faire toutes ces opération sur une instance en précisant son port avec l’option –port (valable pour mysqldump et mysql).
Pour obtenir une liste des utilisateurs mysql, on peut utiliser cette fonction (glanée sur serverfault) :
mygrants()
{
  mysql -B -N -e "SELECT DISTINCT CONCAT(
    'SHOW GRANTS FOR ''', user, '''@''', host, ''';'
    ) AS query FROM mysql.user" |
  mysql |
  sed 's/(GRANT .*)/1;/;s/^(Grants for .*)/## 1 ##/;/##/{x;p;x;}'
}
rsnapshot is a backup tool written in Perl that utilizes rsync as its back-end. rsnapshot allows users to create customized incremental backup solutions. This article will discuss the following: the benefits of an incremental backup solution, rsnapshot’s installation, its configuration, and usage examples.
2. Back-it up!
I was recently discussing with a colleague the benefits of backing up your data. My colleague was telling me how one of her customers had recently lost a rather lengthy article that they had been working on. I decided that this may be a good chance to experiment with my netbook and rsnapshot. For this tutorial, I’ll assume you have have 2 pieces of hardware: your host computer, and your destination equipment. I’ll be using an external hard drive for the majority of this post. However, I will briefly cover usage for backing up files over a LAN.
Backing up your data should not be the question to ask but rather how should I backup my stuff? What’s the best way? Well there are many different backup pathways you can take, including block level (dd, partimage), partition level (RAID and all its variations), file level (rsyncand its children applications). I’ll discuss two types of backups in the context of file-based backups.
Normal backups, or full backups, are self explanatory. Normal backups are one way of backing up ALL your files every time you perform a backup. One issue with utilizing a multiple normal backup scheme is that a normal backup takes up a considerable amount of space. For example, if you perform a full backup of a 250gig hard drive at 20% capacity, everyday for just one week (assuming that the amount of data does not fluctuate) will mean that you already have used 350gigs for only one week’s worth of backups. As you can see, that is not feasible in the long run. The other method that I prefer is the incremental backup method. An incremental backup consists of one full backup and then performing additional backups. These additional backups will only backup files that have changed since the last backup. Instead of backing up your entire hard drive, only the specific files that have changed since the last backup are backed up. As you can probably imagine this is a much more efficient process. One tool that does this on *nix is rsnapshot.
3. What is rsnapshot?
rsnapshot, as mentioned earlier, is an incremental backup utility. In this tutorial, I will show you how to create a seven day rotation backup scheme using rsnapshot. Essentially, rsnapshot will create 1 full backup and then subsequent backups will backup only files that have changed. The true power of rsnapshot is its ability to utilize hard-links between each backup. Each backup will appear to be a full backup. In reality each new backup consists of newly created or updated files. rsnapshot can be used over a LAN and can also be ran from cron. In this tutorial, I’ll show both usage examples.
4. Installation
Installation of rsnapshot is pretty straightforward, simply run the following command:
 Rsync is a program for synchronizing two directory trees across different file systems even if they are on different computers. It can run its host to host communications over ssh to keep things secure and to provide key based authentication. If a file is already present in the target and is the same as on the source the file will not be transmitted. If the file on the target is different than the one on the source then only the parts of it that are different are transferred. These features greatly increase the performance of rsync over a network.