Archive

Articles taggués ‘Apache’

13 Apache Web Server Security and Hardening Tips

15/11/2023 Comments off

Apache-Security-Tips1We all are very familiar with Apache web server, it is a very popular web server to host your web files or your website on the web. Here are some links which can help you to configure Apache web server on your Linux box.

Here in this tutorial, I’ll cover some main tips to secure your web server. Before you apply these changes in your web server, you should have some basics of the Apache server.

  • Document root Directory: /var/www/html or /var/www
  • Main Configuration file: /etc/httpd/conf/httpd.conf (RHEL/CentOS/Fedora) and /etc/apache/apache2.conf(Debian/Ubuntu).
  • Default HTTP Port: 80 TCP
  • Default HTTPS Port: 443 TCP
  • Test your Configuration file settings and syntax: httpd -t
  • Access Log files of Web Server: /var/log/httpd/access_log
  • Error Log files of Web Server: /var/log/httpd/error_log

1. How to hide Apache Version and OS Identity from Errors

When you install Apache with source or any other package installers like yum, it displays the version of your Apache web server installed on your server with the Operating system name of your server in Errors. It also shows the information about Apache modules installed in your server.

Show-Apache-Version

Show-Apache-Version

In above picture, you can see that Apache is showing its version with the OS installed in your server. This can be a major security threat to your web server as well as your Linux box too. To prevent Apache to not to display these information to the world, we need to make some changes in Apache main configuration file.

Open configuration file with vim editor and search for “ServerSignature“, its by default On. We need to Off these server signature and the second line “ServerTokens Prod” tells Apache to return only Apache as product in the server response header on the every page request, It suppress the OS, major and minor version info.

# vim /etc/httpd/conf/httpd.conf (RHEL/CentOS/Fedora)
# vim /etc/apache/apache2.conf (Debian/Ubuntu)
ServerSignature Off
ServerTokens Prod
# service httpd restart (RHEL/CentOS/Fedora)
# service apache2 restart (Debian/Ubuntu)
 

Hide-Apache-Version

2. Disable Directory Listing

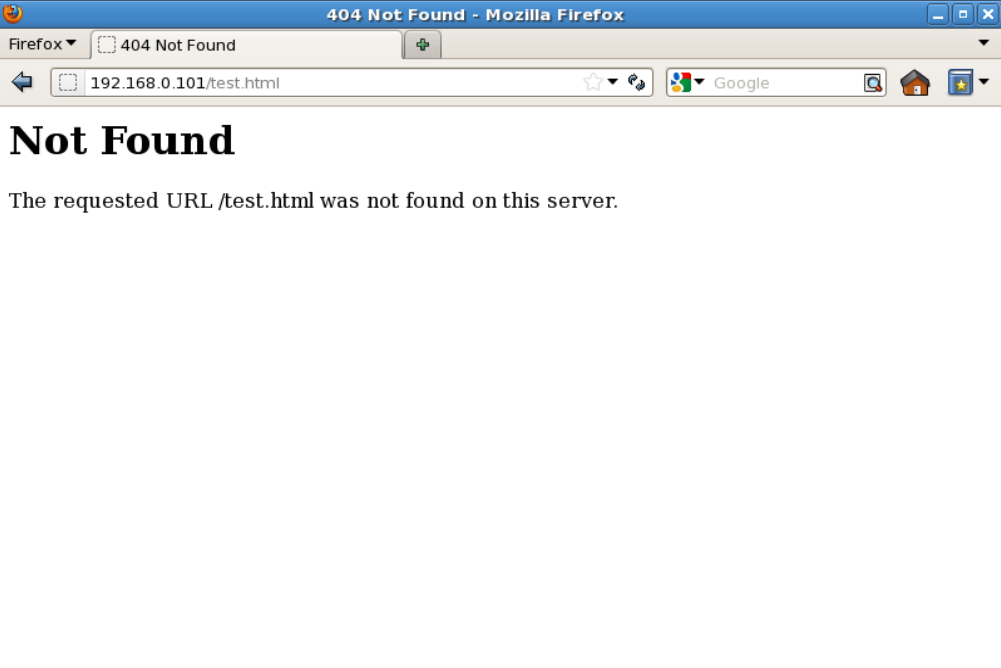
By default Apache list all the content of Document root directory in the absence of index file. Please see the image below.

Apache-Directory-Listing

Apache-Directory-Listing

We can turn off directory listing by using Options directive in configuration file for a specific directory. For that we need to make an entry in httpd.conf or apache2.conf file.
<Directory /var/www/html>
    Options -Indexes
</Directory>
Hide-Apache-Directory-Listing
Hide-Apache-Directory-Listing

Lire la suite…

Categories: Logiciel, Sécurité Tags: , ,

How to turn off server signature on Apache2 web server

14/11/2023 Comments off

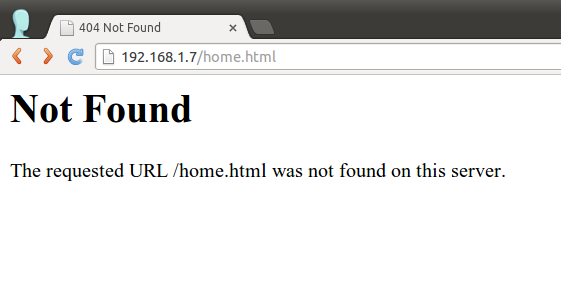
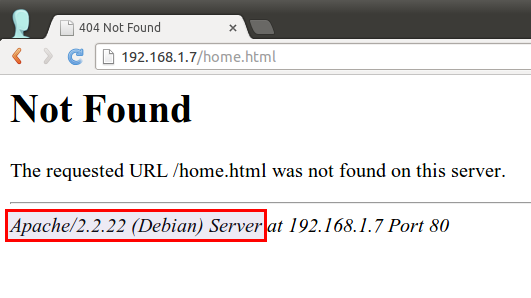
Question: Whenever Apache2 web server returns error pages (e.g., 404 not found, 403 access forbidden pages), it shows web server signature (e.g., Apache version number and operating system info) at the bottom of the pages. Also, when Apache2 web server serves any PHP pages, it reveals PHP version info. How can I turn off these web server signatures in Apache2 web server?

Revealing web server signature with server/PHP version info can be a security risk as you are essentially telling attackers known vulnerabilities of your system. Thus it is recommended you disable all web server signatures as part of server hardening process.

14902970545_c3d406322f_o14879982016_7c7b8bbf3d_o

Disable Apache Web Server Signature

Disabling Apache web server signature can be achieved by editing Apache config file.

On Debian, Ubuntu or Linux Mint:

$ sudo vi /etc/apache2/apache2.conf

On CentOS, Fedora, RHEL or Arch Linux:

$ sudo vi /etc/httpd/conf/httpd.conf

Add the following two lines at the end of Apache config file.

ServerSignature Off
ServerTokens Prod

Then restart web server to activate the change:

$ sudo service apache2 restart (Debian, Ubuntu or Linux Mint)
$ sudo service httpd restart (CentOS/RHEL 6)
$ sudo systemctl restart httpd.service (Fedora, CentOS/RHEL 7, Arch Linux)

The first line ‘ServerSignature Off‘ makes Apache2 web server hide Apache version info on any error pages.

14879982016_7c7b8bbf3d_o

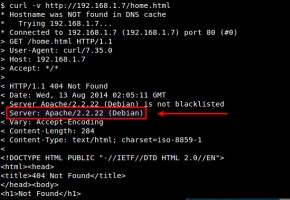
However, without the second line ‘ServerTokens Prod‘, Apache server will still include a detailed server token in HTTP response headers, which reveals Apache version number.

14902970535_e84ec23090_z

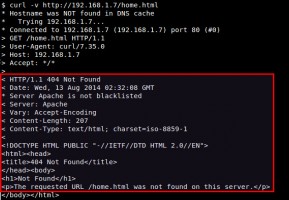
What the second line ‘ServerTokens Prod‘ does is to suppress a server token in HTTP response headers to a bare minimal.

So with both lines in place, Apache will not reveal Apache version info in either web pages or HTTP response headers.

14902970505_d79225f25d_z

Hide PHP Version

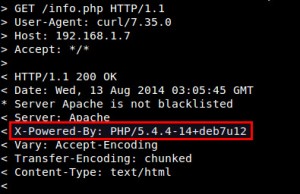
Another potential security threat is PHP version info leak in HTTP response headers. By default, Apache web server includes PHP version info via « X-Powered-By » field in HTTP response headers. If you want to hide PHP version in HTTP headers, open php.ini file with a text editor, look for « expose_php = On », and change it to « expose_php = Off ».

14899917981_aaef71eb0a

On Debian, Ubuntu, or Linux Mint:

$ sudo vi /etc/php5/apache2/php.ini

On CentOS, Fedora, RHEL or Arch Linux:

$ sudo vi /etc/php.ini

expose_php = Off

Finally, restart Apache2 web server to reload updated PHP config file.

Now you will no longer see « X-Powered-By » field in HTTP response headers.

Source: Xmodulo

Categories: Logiciel, Sécurité Tags: , ,

How to Restrict IP Addresses from Accessing your Web Server using .htaccess

01/11/2023 Comments off

If you are running the Apache Web Server or your web hosting provider running Apache based web server, you can use .htaccess configuration file to restrict access to your website. This could be a very important issue from security stand point of view especially if your server is being attacked or hacked from any specific or range of IP addresses.

Now, restricting access method works in two ways. First, you can restrict access to certain IP addresses and allow others. Second, you can restrict access to everyone but few IP addresses only. On this post, I will focus on both method and will try to explain as much as I can.

Restrict Certain IP Addresses

If you want to restrict specific IP addresses from accessing your site, you can use the following lines on your .htaccess file.

order deny,allow
deny from 123.4.5.6
deny from 654.3.2.1
allow from all

These lines above will block “123.4.5.6” and “654.3.2.1” IP addresses from accessing your site. You can add as many IP addresses as you want on this “deny from” list. One interesting fact is, Apache web server gives you lot more flexibility in terms of blocking IP addresses. Take a look at the following lines.

order deny,allow
deny from 123.4.5.
allow from all

If you observe it carefully, you will see that the fourth set of digit is missing on this IP address. It means, if any IP address that matches the first three set of digits will be blocked. So basically anyone with IP address like “123.4.5.1” or “123.4.5.244” won’t be able to access your site as in both IP address matches with the first three (123.4.5.) sets of digits blocked by the Apache web server.

Allow Specific IP Addresses

Think of about a site that you built for a very specific purpose and for very few people, where you do not want everyone to show up. Apache allows you to do that as well.

For an example, lets assume that you built a site that you want one of your friend to be able to access and his IP address is “123.4.5.12”. Simply write the following line on your .htaccess file and you are good to go.

order allow,deny
allow from 123.4.5.12
deny from all

In this case Apache will block all IP addresses except your friends IP address. This is as simple as it can get and I hope you got the basic idea.

Note: On all of my example I used either “allow from all” or “deny from all” at the bottom, this is very important. You must declare either one of these line based on your requirement or things might get little more complicated.

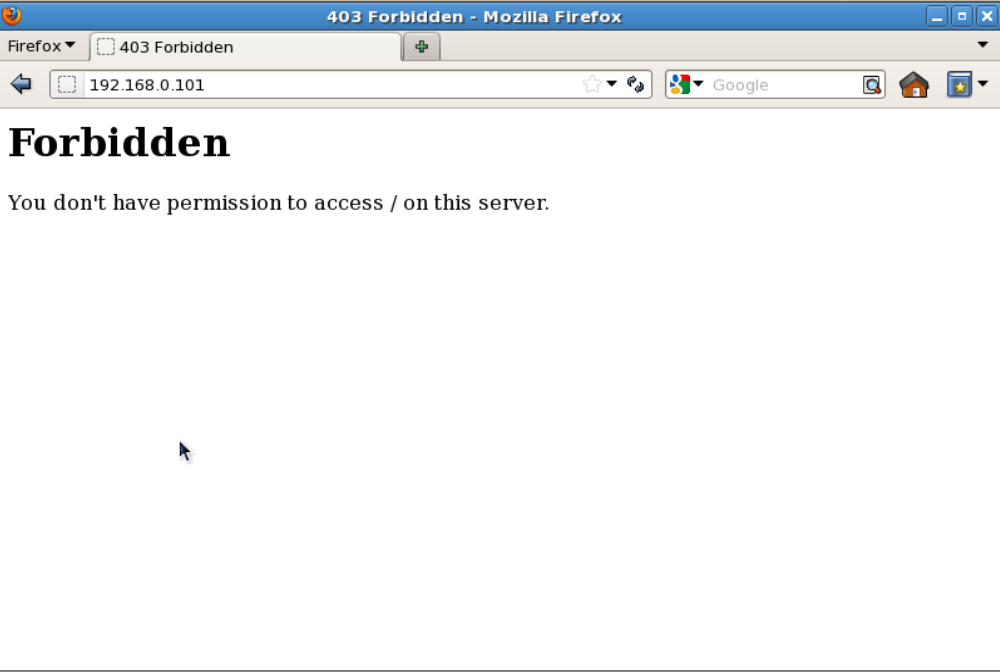
Also remember that all blocked IP addresses would be forwarded or shown an “403 Forbidden” error message. You can definitely customize this message as well but that’s something I will talk about in another post.

Source: iftekhar.net

Categories: Logiciel Tags: , , ,

How To Isolate Servers Within A Private Network Using Iptables

05/07/2021 Comments off

Source: DigitalOcean – Mitchell Anicas

Introduction

In this tutorial, we will teach you how to use a Iptables with shared private networking to simulate the network traffic isolation that a true private network can provide. We will also cover why you would want to do this, and provide an example of how to implement this in your own environment. The example should explain the concept well enough that you should be able to adapt the configuration to your own needs.

DigitalOcean’s private networking option grants a second networking interface to a VPS, which is only accessible to other VPSs in the same datacenter–which includes the VPSs of other customers in the same datacenter. This is known as shared private networking. This means that data sent over a VPS’s private interface does not leave the datacenter at all, and no billable bandwidth usage will be incurred.

At the time of this writing, DigitalOcean offers the private networking option for VPSs in the following data centers:

  • Amsterdam 2
  • New York 2
  • Singapore 1

Note: This tutorial covers IPv4 security. In Linux, IPv6 security is maintained separately from IPv4. For example, iptables only maintains firewall rules for IPv4 addresses but it has an IPv6 counterpart called ip6tables, which can be used to maintain firewall rules for IPv6 network addresses.

If your VPS is configured for IPv6, please remember to secure both your IPv4 and IPv6 network interfaces with the appropriate tools. For more information about IPv6 tools, refer to this guide: How To Configure Tools to Use IPv6 on a Linux VPS

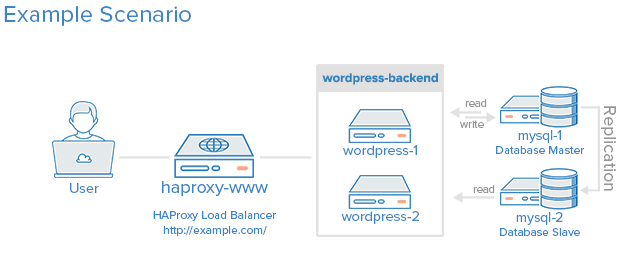
Example Scenario

For our example, we will use the environment created by the following tutorial: How To Optimize WordPress Performance With MySQL Replication On Ubuntu 14.04.

Here is a diagram of what the environment looks like:

prereq_no_private

The example environment uses five VPSs (and iptables are not configured):

  • haproxy-www: Reverse proxy load balancer
  • wordpress-1: First application server
  • wordpress-2: Second application server
  • mysql-1: Master MySQL database server
  • mysql-2: Slave MySQL database server

If your setup doesn’t look like this, you should still be able to follow along. Also, if you would like to read up on setting up a VPS with private networking or iptables basics, here are a few links that you might find to be useful (this tutorial assumes you know the basics of iptables):

If you are already familiar with the concepts, and would like to see the iptables setup, feel free to skip to the Overview of Iptables Configuration section.

Our Goal

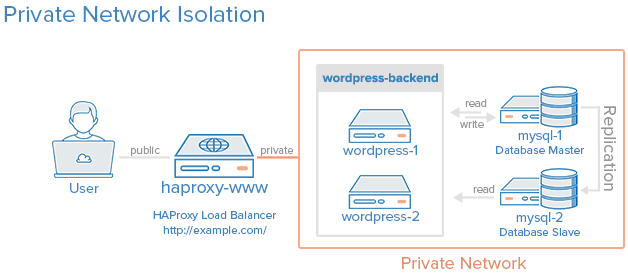
When we are finished with this tutorial, we should have an environment that looks something like the following diagram:

goal

All of the servers in the private network area can only be communicated with by other servers within this private network (the orange box). The load balancer will be accessible via the Internet and also be linked to the private network. The enforcement of this policy will be implemented via iptables on each server.

Note: To block traffic to your public interface, you can either disable your public interface or set up firewall rules to achieve a similar effect with Iptables. We will go with the firewall option because we can configure it block unwanted network traffic, while allowing our server to access the Internet when it initiates the connection (this is useful for things like downloading updates on the server).

Un site web sur plusieurs serveurs avec load balancing

20/05/2021 Comments off

site web load balancing

En 2014 petit budget ne signifie pas nécessairement configuration bas de gamme et il est assez facile de faire tourner de grosses applications ou un grand nombr
e de sites internet pour quelques centaines, voire dizaines d’euros. En conséquence directe de la deuxième loi de Moore (qui annonce que la puissance des ordinateurs double tous les 2 ans) et de la guerre que se livrent les société d’hébergement, il est assez facile de se procurer 2 serveurs assez puissants pour bien moins cher qu’un seul serveur de la même puissance il y a 2 ans.

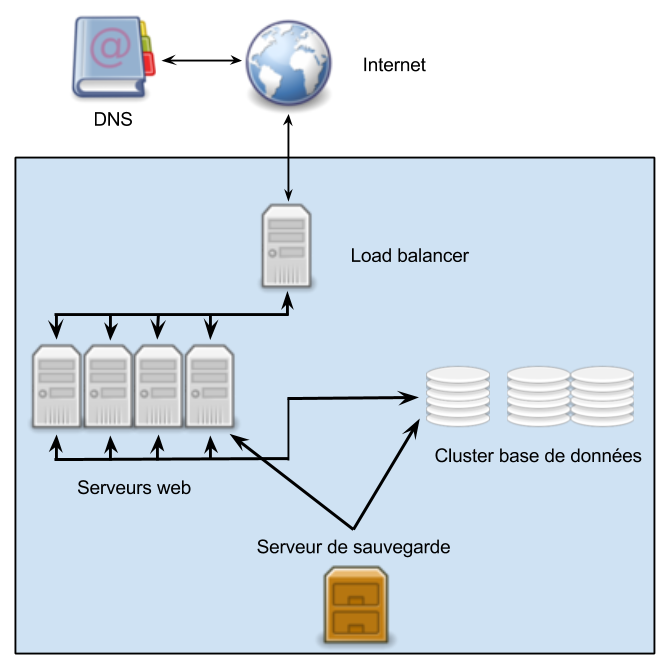
Cela explique que de plus en plus de société se tournent vers des configurations comportant plusieurs serveurs, avec une seule adresse présentée aux internautes. Ces configurations peuvent être plus ou moins complexes et dépendent à la fois des besoins et des ressources à allouer mais globalement ça ressemble à ça :

cluster-serveurs-load-balancing

De quoi se compose notre système ?

Je pense qu’il est nécessaire de détailler les éléments ci-dessus afin de comprendre leur rôle et la façon dont ils interagissent.

  • Internet : il s’agit du client, l’internaute qui accède au site internet ou à l’application;
  • DNS : lorsque le client veut accéder à une ressource sur internet, il fait appel à un serveur DNS pour faire la traduction entre le nom de domaine et l’adresse IP du serveur qui fournit la ressource. Ici le serveur DNS semble un peu hors sujet mais j’ai préféré l’inclure parce qu’il va jouer un rôle dans la mise en oeuvre que je vous proposerai par la suite;
  • Load balancer : bien souvent il s’agit d’un serveur reverse proxy qui se charge de répartir les requêtes entre les différents serveurs de la grappe, parfois il s’agit d’une configuration plus complexe. Pour les montages simples, le load balancing est attribué au serveur DNS, nous y reviendrons par la suite. Ce que vous pouvez constater ici c’est que notre load balancer est le seul serveur visible depuis le monde extérieur.
  • Serveurs web : nous avons ici une grappe de n serveurs (en fonction de la puissance demandée) dont le rôle est de traiter les requêtes et de renvoyer les ressources demandées. Les fichiers disponibles sur toutes ces machines sont strictement identiques. Bien souvent il s’agit même d’un cluster dans lequel tous les nœuds agissent comme une seule et même entité, parfois il s’agit de machines indépendantes qui ont un système de fichiers distribué tel que Glusterfs;
  • Cluster base de données : les principaux systèmes de gestion de base de données sont capables de fonctionner en cluster, même sur des environnements hétérogènes. Pour cette raison, quelque soit le nombre de serveurs sur lesquels les bases de données sont réparties, j’ai choisi de les faire apparaître comme un cluster et non comme des serveurs distincts;
  • Serveur de sauvegarde : il n’est peut-être pas nécessaire de s’étendre. Quel que soit le dispositif, il dispose d’une grande capacité de stockage et d’un accès à sens unique à l’un des serveurs applicatifs (s’ils ont tous les mêmes fichiers, inutile d’ouvrir une porte sur tous) et au cluster de base de données.

Lire la suite…