Knockd est un petit daemon qui autorise ou non une connexion à votre serveur. Pour cela il écoute les ports de votre machine et attend une séquence bien précise de connexions sur les ports que vous avez définis. Si la séquence définie est exécuté dans le bon ordre, le daemon va ouvrir le port et permettre une connexion pour un temps déterminé sur le port ssh par exemple. La séquence peut utiliser des connexions TCP ou UDP ou les deux.
Ainsi, d’un point de vue extérieur le serveur n’a aucun port d’ouverts exception faite pour les clients qui ont la séquence « magique ».
Sometimes that we need to connect via SSH into another computer, we find out that this computer that we intend to SSH into (which we are going to call "destiny") may be utilizing NAT and therefore it doesn 't count with a public IP address that we could use to connect to it, or it may be behind a firewall that won' t allow access from the outside.
If "destiny" can successfully establish a SSH connection to another computer that is accessible, we can utilize this second computer to establish a reverse SSH tunnel to our "destiny" computer, we are going to call this second computer "origin" (even if it is not actually the computer that we are going to use to manage "target" remotely, but only a bridge).
A reverse SSH tunnel works by connecting "destiny" to "origin" and then utilizing this connection to SSH into "destiny" from any computer that is connected to "origin". This reverse SSH tunnel should work in most Linux systems without any problem.
So, lets assume that we have this two computers:
"Origin" IP: aaa.bbb.ccc.ddd
"Destiny" IP: unknown or unavailable
First of all, we establish the SSH connection from "destiny" to "origin", enabling the reverse SSH functionality with the parameter – a:
The first number (61999) indicates which port are we going to use in "origin" to log into "destiny", localhost is the domain name that we will be using for this as well, and the last number (22) indicates which port is "destiny" listening to for SSH.
Once this connection is live, and being logged in "origin" (it doesn't matter if we are logged in locally or remotely), we can establish the connection to "destiny":
SSH p 61999 destiny_user@localhost
Effectively, we can use a computer with permanent SSH access as a bridge between computers that are not otherwise accessible via SSH. Any computer that is connected to "origin" can log into other computers with reverse SSH tunneling enabled.
Bon, a priori vous connaissez la commande "ssh-copy-id" pour copier sa clé publique sur un serveur distant afin de s’identifier par clé et plus par mot de passe.
Le principe est d’avoir une paire de clés privée/publique, le plus souvent dans "~/.ssh/id_rsa(.pub)" et de la copier à l’intérieur du fichier "~/.ssh/authorized_keys" sur la machine distante.
$ ssh-copy-id -i ~/.ssh/id_rsa.pub user@host
Mais si la machine distante n’accepte pas les connexions sur le port 22 ou bien qu’il y a une redirection de ports sur le routeur, il faut lui indiquer ce port, par exemple :
Mais ça ne marche pas car ssh-copy-id ne comprend que 2 paramètres et si on met "-p 2222" en second, ça n’est pas un motif de type "[user@]host", et si on le met après, en troisième, il est ignoré.
Et bien il suffit d’entourer les infos de connexion ssh par des guillemets pour qu’ils soient vus comme un seul paramètre :
Voici un petit outil qui pourrait se révéler bien pratique dans votre vie de SysAdmin GNU/Linuxien
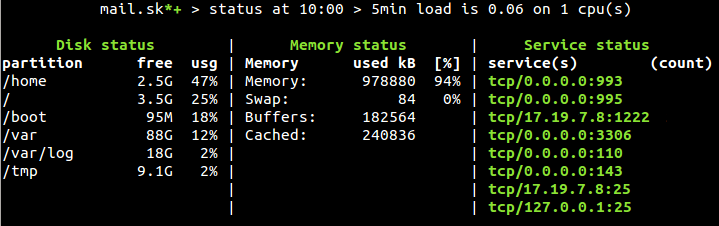
Il s’agit de MOTDStat qui via MOTD va vous permettre d’afficher le statut du serveur sur lequel vous vous connectez.
Cela va vous permettre de savoir en un coup d’œil si il y a un problème quelconque sur le serveur.
MOTDStat va générer dynamiquement le fichier /etc/motd avec les informations sur le systèmes et l’utilisation des ressources.
Les informations sont mises à jour via une tâche périodique en crontab. Le message d’origine est stocké dans /etc/motd.orig
Vous pouvez également configurer une adresse de notification, au cas où vous n’auriez pas un service de supervision qui l’aurait déjà fait, selon des limites prédéfinies :
Charge CPU
Espace disque
Si des process spécifiques ne tourne pas
Si des services réseaux sont indisponibles
Si NTP n’est pas synchronisé avec sa référence
Trop de mail en queue
Afin de permettre l’affichage de MOTDStat lorsque vous vous connectez en ssh il faut mettre à jour la configuration du serveur ssh (/etc/ssh/sshd_config) et positionner à « yes » le paramètre PrintMotd, puis redémarrer le service sshd.
PrintMotd yes
Le rapport MoTDStat est organisé en 3 colonnes :
1ère colonne : Informations sur les partitions
2ème colonne : information sur l’utilisation de la mémoire et du swap
3ème colonne : les process et services supervisés
Il est possible de configurer via le fichier /etc/motdstat/netservice d’indiquer un nom de service, ce qui rendra l’affichage plus parlant, par exemple :
tcp 127.0.0.1:80 httpd
Pour définir la liste des process à surveiller, il suffit de les préciser dans /etc/motdstat/process
Bref, un petit outils qui peut être sympa lorsque l’on a plusieurs dizaines, centaines, milliers de serveurs
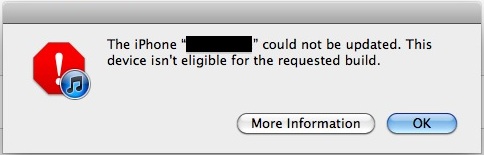
If you're trying to update iOS to the latest version on an iPhone, iPad, or iPod touch and you get an error in iTunes saying:
The iOS Device "Device Name" could not be updated. This device isn't eligible for the requested build.
You're encountering one the following problems: either you are using an old version of iTunes, you are using an incorrect version of the firmware for your device, or you have gs.apple.com re-routed in your hosts file.
If you know you're on the right iTunes and iOS version and you're familiar with editing a hosts file, just throw # in front of the "74.208.10.249 gs.apple.com" entry and you'll be good to go. If you have no idea what that means, read on and it'll be explained easily. First let's cover the iTunes and firmware aspect, then explain hosts changes. Try these in order, one of them will certainly fix the ineligible build error:
(1) Update iTunes
This is easy, just open iTunes and update to the latest version. This is required because the newest version of iOS require the newest versions of iTunes. Easy to resolve.
(2) use Proper iOS Firmware
The next thing you need to do is make sure you're using the proper IPSW firmware file for your iOS hardware. You can download any firmware files from these links:
A fair amount of confusion regarding IPSW seems to be in the difference between GSM and CDMA downloads in the USA this is easiest to determine based on the cellular provider: AT & T is GSM, Verizon is CDMA. If you're not sure what to do with an IPSW file, you can read our walkthrough ofhow to use them.
If you're certain you have the correct firmware file and you're still getting the "device isn't eligible" iTunes error, it's almost certainly a result of gs.apple.com being blocked in the hosts file.
(2) remove the Hosts Block
This usually comes from users who have jailbroken an iOS device at some point on their computer, or did the error 3194 fix, and as a result have a line in their hosts file blocking Apple's servers. There's two ways to fix this, the first is the easiest:
Easy: Using TinyUmbrella TinyUmbrella prevents you from having to use the Terminal to edit system files, instead you can just launch the app and quit it.
After you've downloaded and installed TinyUmbrella, here's how to use it to remove a hosts block:
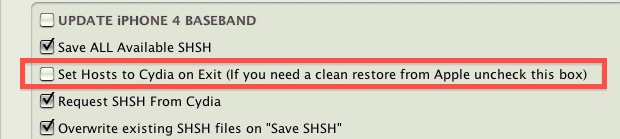
Open TinyUmbrella and click on the 'Advanced' button tab at the bottom
Uncheck the box next to "Set Hosts to Cydia on Exit"
Now quit out of TinyUmbrella and the app will modify the hosts file in the process to remove the block, allowing you to connect to Apple's servers again. Before you try though, be sure to turn the iPhone, iPad, or iPod touch on and off again, and relaunch iTunes as well.
If you still run into problems, you may need to flush the DNS cache as well. Quit out of iTunes and open the Terminal in OS X Lion, then type: dscacheutil - flushcache Now relaunch iTunes and you'll be good.
Advanced: Manually Editing Hosts
Quit out of iTunes
Go to the hosts file. For Mac OS X this is located at: / etc/hosts or/private/etc/hosts and in Windows it is located at: c:windowssystem32driversetchosts
Open the hosts file with Administrative privileges so that changes can be made and saved (eg: sudo nano/etc/hosts)
Look for a line that resembles something like this:
74.208.10.249 gs.apple.com
Put a # in front of that to how it out, making it now look like this:
# 74.208.10.249 gs.apple.com
Save the hosts file
Flush DNS cache and restart iTunes
Whichever approach you took, this fixed the "eligible build" error and the iOS device will update as intended.