Archive

Archives pour la catégorie ‘Système’

OTPW – A one-time password login package

27/11/2023 Comments off

Abstract

otpw one time passwordThe OTPW package consists of the one-time-password generator otpw-gen plus two verification routinesotpw_prepare() and otpw_verify() that can easily be added to programs such as login or ftpd on POSIX systems. For platforms that support the Pluggable Authentication Method (PAM) interface, a suitable wrapper is included as well. Login software extended this way will allow reasonably secure user authentication over insecure network lines. The user carries a password list on paper. The scheme is designed to be robust against theft of the paper list and race-for-the-last-letter attacks. Cryptographic hash values of the one-time passwords are stored for verification, either in the user’s home directory or in a dedicated system directory.

Introduction

A well-known classic vulnerability of the Internet application protocol suite is the frequent cleartext transfer of passwords in the telnet, rsh, and ftp protocols. Modern replacements for these protocols such as Tatu Ylönen’sSecure Shell allow comfortable and secure remote sessions and file transfers over network connection that are not trusted to provide confidentiality.

However, traveling computer users often want to connect to their home system via untrusted terminals at conference hotels, other universities, and airports, where trusted encryption software is not available. Even Secure Shell does not protect against keyboard eavesdropping software on the untrusted terminal. A loss of confidentiality is often acceptable in these situations for the session content, but not for reusable login passwords. One-time-password schemes avoid the transmission of authentication secrets that are of any value after they have been used. This provides a reasonable level of protection against the widely encountered password sniffing attacks. The goal of a one-time-password login scheme is merely to provide a significant increase of security over the classic telnet/rlogin login procedure. It does not aim to protect from sophisticated active attacks such as session hijacking, host emulation, man-in-the-middle, etc. against which ssh and SSL based protocols should be used if this level of protection is required.

A widely known one-time-password scheme is S/KEY [Hal94, HM96]. OTPW is not compatible with and is not derived from either S/KEY or OPIE. It is a completely independent and different design, which I believe fulfils my functional and security requirements better.

How it works

One-time password authentication with the OTPW package is accomplished via a file containing hash values of passwords. Depending on the installation option chosen, this can either be a file ~john/.otpw located in the user’s home directory, or it can be a file ~otpw/john in the home directory of a dedicated pseudo user “otpw”. In the latter case, the otpw-gen tool for generating new passwords must be owned by pseudo user “otpw” and have the SETUID bit set. As long as users do not have such a hash file, the one-time-password facility is not active for them.

A user who wants to setup the one-time-password capability just executes the otpw-gen program. The program will ask for a prefix password that the user has to select and memorize and it will then write to standard output a password list such as:

  OTPW list generated 2003-08-31 21:06 on trillium.cl.cam.ac.uk

  000 IZdB bqyH  006 rF62 k6zi  012 JCFe 6at3  018 uaYT azuu  024 Nt7n b=fQ
  001 yCSo /VQs  007 Phvb =6ZW  013 8Pm7 DbYJ  019 OdAk H62c  025 /pOm :ZEA
  002 mESf  nWK  008 J9fH iXrn  014 MAds 6TTS  020 Aj6W 9O4P  026 DhCc yrPY
  003 x4vX HXr2  009 DGPC amts  015 B=xZ waPx  021 MzUP Ahsc  027 UWTe G3Fh
  004 A5z9 japt  010 s6cr xwZ5  016 sCgq Da5Y  022 Q=XK 4I7w  028 xszW Ha9L
  005 YCcA k29/  011 inn6 Rsa/  017 m8za o/HB  023 umS= gYoU  029  HmG Rr6P

              !!! REMEMBER: Enter the PREFIX PASSWORD first !!!

Normally the output of otpw-gen should be sent directly to the printer as in

  otpw-gen | lpr

or should be first formatted with an ASCII to PostScript converter where necessary.

Fetch the printed list immediately from the printer, fold it, and keep it with you. The list shows the machine name and the creation time to allow users to find the latest list for the right machine. It does not show the user’s name, because nobody is supposed to have the list of anyone else, but printer drivers such as a2ps might add it. Only a single list is required for a set of networked machines on which the user has a common home directory.

By default, otpw-gen generates 60 lines of output. Use the command line options -h lines, -w columns, and -s pages to specify the length of the output. No more than 1000 passwords will be generated at a time.

Where one-time-password authentication is used, the password prompt will be followed by a 3-digit password number. Enter first the prefix password that was given to otpw-gen, followed directly (without hitting return between) by the password with the requested number from the printed password list:

  login: kuhn
  Password 019: geHeimOdAkH62c

In this example, geHeim was the prefix password. The spaces in the password list are just there to increase readability and can be dropped.

A clever attacker might observe the password being entered and might try to use the fact that computers can send data much faster than users can finish entering passwords. In the several hundred milliseconds that the user needs to press the return key after the last character, an attacker could on a parallel connection to the same machine send the code of the return key faster than the user.

To prevent such a race-for-the-last-key attack, any login attempt that is taking place concurrently with another attempt will require three one-time passwords to be entered:

  login: kuhn
  Password 022/000/004: geHeimQ=XK4I7wIZdBbqyHA5z9japt

This might look inconvenient at first, but remember that three passwords will only be requested when someone tries to login simultaneously, which in itself should already cause suspicion. The three requested passwords are randomly selected but they will never include the single password that was requested in the first of the concurrent login attempts. Only the first requested single password will be locked, not any of the requested triples. This way, the three-password method ensures that an attacker cannot disable the OTPW mechanism by locking all passwords. The triple challenge ensures that many ten thousand network connections would be necessary to perform a race attack on the same password triple, which is not practical. The OTPW package creates a symbolic link .otpw.lock in the user’s home directory to lock the first requested password while its input is pending. If a system crash created a stale lock, it will be removed after 24 hours.


Lire la suite…

10 Amazing and Mysterious Uses of (!) Symbol or Operator in Linux Commands

26/11/2023 Comments off

Linux-logo-without-version-number-banner-sized-348x196The '!' symbol or operator in Linux can be used as Logical Negation operator as well as to fetch commands from history with tweaks or to run previously run command with modification. All the commands below have been checked explicitly in bash Shell. Though I have not checked but a major of these won’t run in other shell. Here we go into the amazing and mysterious uses of '!' symbol or operator in Linux commands.

1. Run a command from history by command number.

You might not be aware of the fact that you can run a command from your history command (already/earlier executed commands). To get started first find the command number by running ‘history‘ command.

$ history

History shell command

Now run a command from history just by the number at which it appears, in the output of history. Say run a command that appears at number 1551 in the output of ‘history‘ command.

$ !1551

History by number

And, it runs the command (top command in the above case), that was listed at number 1551. This way to retrieving already executed command is very helpful specially in case of those commands which are long. You just need to call it using ![Number at which it appears in the output of history command].

Lire la suite…

Categories: Système Tags: , ,

How To Secure Nginx with Let’s Encrypt on Ubuntu 14.04

25/11/2023 Comments off

Introduction

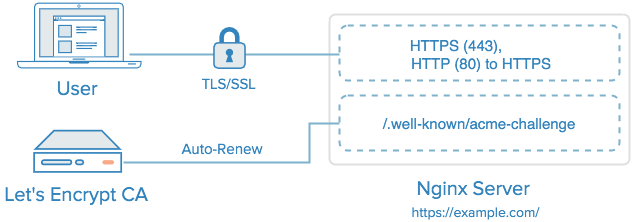
nginx lets encrypt ubuntuLet’s Encrypt is a new Certificate Authority (CA) that provides an easy way to obtain and install free TLS/SSL certificates, thereby enabling encrypted HTTPS on web servers. It simplifies the process by providing a software client, letsencrypt, that attempts to automate most (if not all) of the required steps. Currently, as Let’s Encrypt is still in open beta, the entire process of obtaining and installing a certificate is fully automated only on Apache web servers. However, Let’s Encrypt can be used to easily obtain a free SSL certificate, which can be installed manually, regardless of your choice of web server software.

In this tutorial, we will show you how to use Let’s Encrypt to obtain a free SSL certificate and use it with Nginx on Ubuntu 14.04. We will also show you how to automatically renew your SSL certificate. If you’re running a different web server, simply follow your web server’s documentation to learn how to use the certificate with your setup.

Nginx with Let's Encrypt TLS/SSL Certificate and Auto-renewal


Prerequisites

Before following this tutorial, you’ll need a few things.

You should have an Ubuntu 14.04 server with a non-root user who has sudo privileges. You can learn how to set up such a user account by following steps 1-3 in our initial server setup for Ubuntu 14.04 tutorial.

You must own or control the registered domain name that you wish to use the certificate with. If you do not already have a registered domain name, you may register one with one of the many domain name registrars out there (e.g. Namecheap, GoDaddy, etc.).

If you haven’t already, be sure to create an A Record that points your domain to the public IP address of your server. This is required because of how Let’s Encrypt validates that you own the domain it is issuing a certificate for. For example, if you want to obtain a certificate for example.com, that domain must resolve to your server for the validation process to work. Our setup will use example.com and www.example.com as the domain names, so both DNS records are required.

Once you have all of the prerequisites out of the way, let’s move on to installing the Let’s Encrypt client software.


Step 1 — Install Let’s Encrypt Client

The first step to using Let’s Encrypt to obtain an SSL certificate is to install the letsencrypt software on your server. Currently, the best way to install Let’s Encrypt is to simply clone it from the official GitHub repository. In the future, it will likely be available via a package manager.

Install Git and bc

Let’s install Git and bc now, so we can clone the Let’s Encrypt repository.

Update your server’s package manager with this command:

sudo apt-get update

Then install the git and bc packages with apt-get:

sudo apt-get -y install git bc

With git and bc installed, we can easily download letsencrypt by cloning the repository from GitHub.

Clone Let’s Encrypt

We can now clone the Let’s Encrypt repository in /opt with this command:

sudo git clone https://github.com/letsencrypt/letsencrypt /opt/letsencrypt

You should now have a copy of the letsencrypt repository in the /opt/letsencrypt directory.
Lire la suite…

Categories: Sécurité, Système Tags: ,

Track Multiple Files Simultaneously With MultiTail

25/11/2023 Comments off

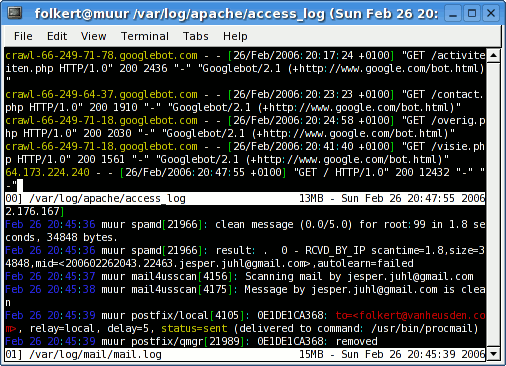
https://www.dbsysnet.com/wp-content/uploads/2016/06/multitail-gnome-terminal.pngThe tail utility is one of the most useful tools an admin has — but it’s also a bit limited and dated. For watching two or more logs at once, and much more, you want MultiTail.

The tail utility is one of the most useful admin tools, but it’s limited and outdated. Bring your log-watching capabilities into the 21st century and view multiple logs at one time with MultiTail.

What’s MultiTail? It’s an ncurses utility that can display multiple files using « windows » (much like GNU Screen or Tmux) in a terminal or at the console. It also supports color highlighting, filtering and much more.

To get MultiTail, head over to the download page or see if your operating system already has packages. On Debian-based systems, you should need to look for only the multitail package. The project released an update (5.2.8) on April 14, so the most recent release probably won’t be in your upstream package repo just yet.

Once it’s installed, run multitail and hit F1. It will pop up a help menu with all of its keybindings. You’ll need to scroll down (use the down arrow key) to see all of the commands. It can be deceptive, otherwise, and it looks like you just have a few commands. Let’s look at a couple of the commands you’ll want to start with.

First, run t — this displays the stats for your instance of MultiTail. To add files, use the a command.

If you want to start multitail with a file or output of a command to access, use multitailfilename or multitail filename1 filename2 for more than one file. Use multitail -R 3 -l "command" -R 3 -l "command2" to see two commands displayed in one window.

Using the h command within MultiTail, you can set the height of each window. If you want to search through a window, use / or shift / to highlight the search string. Using I will toggle case sensitivity.

When you’ve used the search feature, you’ll get a buffer that displays in a « window » above the file. You can write this to a file using s, which will bring up a dialog that prompts for a filename to which to save.

If you get a MultiTail session configured just right you can save it for later using w from within the session. It will prompt you for a filename to which to save the script.

Basically, you can do just about anything you’d be able to do with tail and then some. It’s very interactive, and much of its commands have dialogs that will walk you through creating regular expressions or re-arranging windows and more.

The only caveat I have is that, occasionally, MultiTail is a bit crashy. Not wholly unreliable, but I have managed to crash MultiTail a few times while putting it through its paces. (I’ve never managed to crashtail…). But it’s still an invaluable tool to have around for any Linux or UNIX admin.

Joe ‘Zonker’ Brockmeier is a freelance writer and editor with more than 10 years covering IT. Formerly the openSUSE Community Manager for Novell, Brockmeier has written for Linux Magazine, Sys Admin, Linux Pro Magazine, IBM developerWorks, Linux.com, CIO.com, Linux Weekly News, ZDNet, and many other publications. You can reach Zonker at [email protected] and follow him on Twitter.

Source: ServerWatch

Categories: Système Tags: , ,

/etc/hosts vs. /etc/resolv.conf

24/11/2023 Comments off

From Wikipedia:

resolv.conf is the name of a computer file used in various operating systems to configure the system’s Domain Name System (DNS) resolver. The file is a plain-text file usually created by the network administrator or by applications that manage the configuration tasks of the system. The resolvconf program is one such program on FreeBSD or other Unix machines which manages the resolv.conf file.

When an application performs DNS lookup as part of its operations on Linux, it can leverage both /etc/hosts and /etc/resolv.conf configuration files to resolve DNS names. How these configuration files are used for DNS lookup can vary among different applications, complicating system administration. But Linux libc library and the GNU C Library (glibc) provides a clean solution to this problem, by defining DNS lookup orders with Name Service Switch (NSS). NSS defines a set of databases and their lookup order in NSS configuration file (/etc/nsswitch.conf in Linux). Applications built with those libraries will then perform DNS lookups in a consistent manner.

In /etc/nsswitch.conf, the database for DNS lookup is called « hosts« . For example:

$ cat /etc/nsswitch.conf | grep "hosts"
hosts: files dns

The above means that DNS lookup refers to /etc/hosts first, and then DNS servers specified in /etc/resolv.conf

gethostbyname() in glibc will follow the DNS lookup order specified in /etc/nsswitch.conf. So do other programs like wget and curl.

Note that DNS lookup tools such as nslookup/dig which are made to query DNS servers, will ignore /etc/nsswitch.conf, and always refer to DNS servers in /etc/resolv.conf

Source: Xmodulo

Categories: Réseau, Système Tags: