Archive

Archives pour la catégorie ‘Système’

How To Secure Apache with Let’s Encrypt on Ubuntu 16.04

12/12/2023 Comments off

Introduction

This tutorial will show you how to set up a TLS/SSL certificate from Let’s Encrypt on an Ubuntu 16.04 server running Apache as a web server. We will also cover how to automate the certificate renewal process using a cron job.

SSL certificates are used within web servers to encrypt the traffic between the server and client, providing extra security for users accessing your application. Let’s Encrypt provides an easy way to obtain and install trusted certificates for free. 

Prerequisites

In order to complete this guide, you will need:

  • An Ubuntu 16.04 server with a non-root sudo user, which you can set up by following our Initial Server Setup guide
  • The Apache web server installed with one or more domain names properly configured through Virtual Hosts that specify ServerName.

When you are ready to move on, log into your server using your sudo account.


Step 1 — Install the Let’s Encrypt Client

First, we will download the Let’s Encrypt client from the official repositories. Although the Let’s Encrypt project has renamed their client to certbot, the client included in the Ubuntu 16.04 repositories is simply called letsencrypt. This version is completely adequate for our purposes.

Update the server’s local apt package indexes and install the client by typing:

  • sudo apt-get update
  • sudo apt-get install python-letsencrypt-apache

The letsencrypt client should now be ready to use.


Step 2 — Set Up the SSL Certificate

Generating the SSL Certificate for Apache using the Let’s Encrypt client is quite straightforward. The client will automatically obtain and install a new SSL certificate that is valid for the domains provided as parameters.

To execute the interactive installation and obtain a certificate that covers only a single domain, run the letsencrypt command like so, where example.com is your domain:

  • sudo letsencrypt --apache -d example.com

If you want to install a single certificate that is valid for multiple domains or subdomains, you can pass them as additional parameters to the command. The first domain name in the list of parameters will be the base domain used by Let’s Encrypt to create the certificate, and for that reason we recommend that you pass the bare top-level domain name as first in the list, followed by any additional subdomains or aliases:

  • sudo letsencrypt --apache -d example.com -d www.example.com

For this example, the base domain will be example.com. 

After the dependencies are installed, you will be presented with a step-by-step guide to customize your certificate options. You will be asked to provide an email address for lost key recovery and notices, and you will be able to choose between enabling both http and https access or forcing all requests to redirect to https. It is usually safest to require https, unless you have a specific need for unencrypted http traffic.

When the installation is finished, you should be able to find the generated certificate files at /etc/letsencrypt/live. You can verify the status of your SSL certificate with the following link (don’t forget to replace example.com with your base domain):

https://www.ssllabs.com/ssltest/analyze.html?d=example.com&latest

You should now be able to access your website using a https prefix.


Step 3 — Set Up Auto Renewal

Let’s Encrypt certificates are valid for 90 days, but it’s recommended that you renew the certificates every 60 days to allow a margin of error. The Let’s Encrypt client has a renew command that automatically checks the currently installed certificates and tries to renew them if they are less than 30 days away from the expiration date.

To trigger the renewal process for all installed domains, you should run:

  • sudo letsencrypt renew

Because we recently installed the certificate, the command will only check for the expiration date and print a message informing that the certificate is not due to renewal yet. The output should look similar to this:

   Processing /etc/letsencrypt/renewal/example.com.conf

   The following certs are not due for renewal yet:
     /etc/letsencrypt/live/example.com/fullchain.pem (skipped)
     No renewals were attempted.

Notice that if you created a bundled certificate with multiple domains, only the base domain name will be shown in the output, but the renewal should be valid for all domains included in this certificate.

A practical way to ensure your certificates won’t get outdated is to create a cron job that will periodically execute the automatic renewal command for you. Since the renewal first checks for the expiration date and only executes the renewal if the certificate is less than 30 days away from expiration, it is safe to create a cron job that runs every week or even every day, for instance.

Let’s edit the crontab to create a new job that will run the renewal command every week. To edit the crontab for the root user, run:

  • sudo crontab -e

You may be prompted to select an editor:

Output
no crontab for root - using an empty one

Select an editor.  To change later, run 'select-editor'.
  1. /bin/ed
  2. /bin/nano        <---- easiest
  3. /usr/bin/vim.basic
  4. /usr/bin/vim.tiny

Choose 1-4 [2]:

Unless you’re more comfortable with ed or vim, press Enter to use nano, the default.

Include the following content at the end of the crontab, all in one line:

crontab

30 2 * * 1 /usr/bin/letsencrypt renew >> /var/log/le-renew.log

Save and exit. This will create a new cron job that will execute the letsencrypt-auto renew command every Monday at 2:30 am. The output produced by the command will be piped to a log file located at /var/log/le-renewal.log.

For more information on how to create and schedule cron jobs, you can check our How to Use Cron to Automate Tasks in a VPS guide. 


Conclusion

In this guide, we saw how to install a free SSL certificate from Let’s Encrypt in order to secure a website hosted with Apache. We recommend that you check the official Let’s Encrypt blog for important updates from time to time.
Categories: Sécurité, Système Tags:

Make the configuration of iptables persistent (Debian)

11/12/2023 Comments off

Objective

To make the configuration of iptables persistent on a Debian-based system

Background

The iptables and ip6tables commands can be used to instruct Linux to perform functions such as firewalling and network address translation, however the configuration that they create is non-persistent so is lost whenever the machine is rebooted. For most practical applications this is not the desired behaviour, so some means is needed to reinstate the configuration at boot time.

For security, the iptables configuration should be applied at an early stage of the bootstrap process: preferably before any network interfaces are brought up, and certainly before any network services are started or routing is enabled. If this is not done then there will be a window of vulnerability during which the machine is remotely accessible but not firewalled.

Scenario

Suppose you have a machine that you wish to protect using a firewall. You have written iptables and ip6tables rulesets, and wish to install them so that they will remain active if the machine is rebooted.

Lire la suite…

The role of shells in the Linux environment

10/12/2023 Comments off

Shell is used for various purposes under Linux. Linux user environment is made of the following components:

  • Kernel – The core of Linux operating system.
  • Shell – Provides an interface between the user and the kernel.
  • Terminal emulator – The xterm program is a terminal emulator for the X Window System. It allows user to enter commands and display back their results on screen. 
  • Linux Desktop and Windows Manager – Linux desktop is collection of various software apps. It includes the file manger, the windows manager, the Terminal emulator and much more. KDE and Gnome are two examples of the complete desktop environment in Linux.

Login

User can login locally into the console when in runlevel # 3 or graphically when in runlevel # 5 (the level numbers may differ depending on the distribution). In both cases you need to provide username and password. Bash uses the following initialization and start-up files:

  1. /etc/profile – The systemwide initialization file, executed for login shells.
  2. /etc/bash.bashrc – The systemwide per-interactive-shell startup file. This is a non-standard file which may not exist on your distribution. Even if it exists, it will not be sourced unless it is done explicitly in another start-up file.
  3. /etc/bash.logout – The systemwide login shell cleanup file, executed when a login shell exits.
  4. $HOME/.bash_profile – The personal initialization file, executed for login shells.
  5. $HOME/.bashrc – The individual per-interactive-shell startup file.
  6. $HOME/.bash_logout – The individual login shell cleanup file, executed when a login shell exits.
  7. $HOME/.inputrc – Individual readline initialization file.

Bash Startup Scripts

Script of commands executed at login to set up environment. For example, setup JAVA_HOME path.

Login Shell

Login shells are first shell started when you log in to the system. Login shells set environment which is exported to non-login shells. Login shell calls the following when a user logs in:

Non-Login Shell

Bash Logout Scripts

  • When a login shell exits, bash reads and executes commands from the file $HOME/.bash_logout, if it exists.

Source: Cybercitiz

Categories: Système Tags: , ,

Detect Webcam & Microphone Activity on Mac with Oversight

09/12/2023 Comments off

Source: osxdaily.com

Though Mac users don’t usually have to worry excessively about “camfecting” malware and spyware, some security conscious users may find it nice to know if a process or application is attempting to access their computers web camera or microphone. 


With the help of a free third party security utility called Oversight, you can have your Mac alert you anytime an application or process tries to activate either recording device on the computer. 

The developer of Oversight explains why a tool like Oversight could be valuable to some users:

“One of the most insidious actions of malware, is abusing the audio and video capabilities of an infected host to record an unknowing user. Macs, of course, are not immune; malware such as OSX/Eleanor, OSX/Crisis, OSX/Mokes, and others, all attempt to spy on OS X users. OverSight constantly monitors a system, alerting a user whenever the internal microphone is activated, or the built-in webcam is accessed. And yes, while the webcam’s LED will turn on whenever a session is initially started, new research has shown that malware can surreptitious piggyback into such existing sessions (FaceTime, Sykpe, Google Hangouts, etc.) and record both audio and video – without fear of detection.” 

Sound good? If so, it’s a free download that is easy to install on a Mac with either macOS or Mac OS X:

If you’re interested in this app, simply download Oversight and run the installer (it can be just as easily uninstalled later if you decide you do not need it).

Once installed, Oversight is small and lightweight running quietly in the background, and it will alert you anytime the Mac microphone or webcam FaceTime camera are attempting to be activated. You can then directly intervene and either allow the webcam or microphone access (for legitimate use), or deny it (for theoretical illegitimate use).

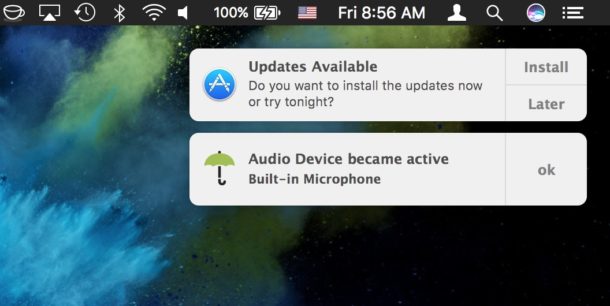
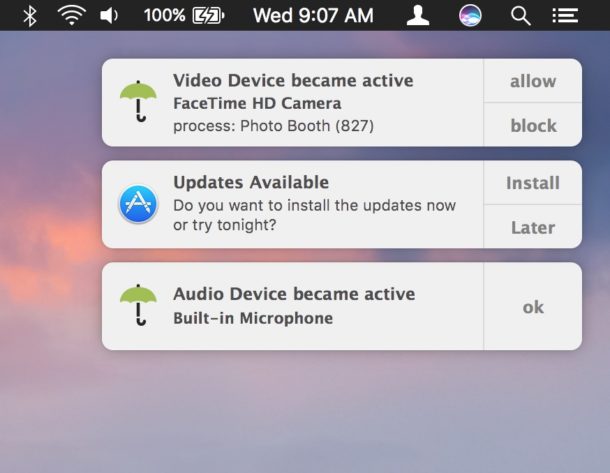
Oversight alerting to camera and microphone access on Mac

Keep in mind that Oversight does not differentiate between legitimate and illegitimate use of the webcam and microphone on your Mac, that is up to you. For example, you will get a notification alert that the microphone and FaceTime camera are trying to be accessed when you open an app like Skype, Photo Booth, FaceTime, or are recording a video on your Mac with the webcam, but since those applications legitimately use the computers microphone and camera they are probably nothing to be concerned about (assuming you have launched them yourself anyway). On the other hand, if out of the blue and with no provocation if you see a process has attempted to access your microphone, that could potentially be an unauthorized attempt to use the microphone and you could choose to reject it and block the device access with Oversight. Whenever possible, Oversight will attempt to notify you of the process name and PID, but sometimes you will see blank notifications of access anyway – again just think about what apps you are using and if they have any reason to use your camera or microphone, similar to how you can control this type of access in iOS for Photos, camera, and microphone. 

Microphone activated found by Oversight on Mac

This is a software solution which is quite a bit more fancy than the low-tech solution of putting tape on your web camera like the FBI Director does and many security professionals do. You could always use Oversight along with some tape too if you’re extra concerned about your Mac webcam or microphone access and want to be sure nothing fishy is going on from camfecting or otherwise. 

While apps like Oversight could be considered overboard and unnecessary for many Mac users, others who are privacy conscious or in fields where higher security matters may find them to be helpful. I’ve personally noticed a particular web browser will occasionally attempt to access the microphone on my Mac from time to time without an obvious reason which I find to be… curious… and Oversight notified me each time. It’s not for everyone, but if you want to be notified when something is trying to use your Mac camera or microphone, check out the app yourself. 

How to Migrate a Web Server Running Apache, MySQL, WordPress and Drupal

09/12/2023 Comments off

Well folks its time that my old home hosted server is retired. Which means I have to migrate all of my 5 websites to a new server. Thanks to the way apache, MySQL WordPress and Drupal work, its easy.

1. Copy Apache Config Files

# ssh username@oldserver
# scp /etc/apache2/sites-available/ user@newserver:/etc/apache2/sites-available/

This will copy all the apache config files over to the new server. Now enable all the sites you copied by creating a symbolic link for each .config file you copied in sites-enabled.

# ln -s /etc/apache2/sites-available/yourwebsite.com.conf /etc/apache2/sites-enabled/yourwebsite.com.conf

or use the command a2ensite which does the same thing for you

# a2ensite yourwebsite.com

Restart apache for the changes to take effect.

# /etc/init.d/apache2 restart

2. Copy Your Websites

# scp -r /var/www/ username@newserver:/var/www

Default WordPress and Drupal installs are just files and we have now copied them across. However all the content, comments etc are stored within MySQL so lets migrate that now.

3. Migrate MySQL

Start by being logged into the old server.

# mysqldump --all-databases -u root -p > backup.sql
# scp backup.sql username@newserver:/home/username/
# ssh username@newserver
# mysql -u root -p < backup.sql

What we did here was use mysqldump to script every database and its contents into several sql commands. Then we copied them to the new server and piped them into the new sql server. All our databases, users and table contents have been imported. Magic.

4. DNS Migration

Now all you need to do is reconfigure your DNS servers to point to the new IP address. Chances are your not hosting your own DNS server so you will have to update them using your provider’s web interface. A word of advice though, create a new entry like test.yourdomain.com and point it to the new server first to make sure everything works.

Categories: Logiciel, Système Tags: ,