A residual-current device (RCD), or residual-current circuit breaker (RCCB), is a device that instantly breaks an electric circuit to prevent serious harm from an ongoing electric shock. Injury may still occur in some cases, for example if a human falls after receiving a shock. In the United States and Canada, the device is more commonly known as a ground fault circuit interrupter (GFCI), ground fault interrupter (GFI) or an appliance leakage current interrupter (ALCI). In the United Kingdom, these are better known by their initials RCD, and a combined RCD+MCB (miniature circuit breaker) is known as a RCBO (residual-current circuit breaker with overcurrent protection). In Australia, they are sometimes known as safety switches or an RCD. An earth leakage circuit breaker (ELCB) may be a residual-current device, although an older type of voltage-operated earth leakage circuit breaker also exists. In German-speaking countries the device is sometimes known as FI where the F stands for fault (Fehler) and I for the symbol that represents electric current.
These electrical wiring devices are designed to quickly and automatically disconnect a circuit when it detects that the electric current is not balanced between the energized (line) conductor(s) and the return (neutral) conductor. Under normal circumstances, these two wires are expected to carry matching currents, and any difference can indicate a short circuit or other electrical anomaly is present, such as leakage. Leakage can indicate a shock hazard (or shock in progress) which is a potential danger to a person. Current leakage can result in harm or death due to electric shock, especially if the leaking electric current passes through the torso of a human. A current of around 30 mA (0.030 amperes) is potentially sufficient to cause cardiac arrest or serious harm if it persists for more than a small fraction of a second. RCDs are designed to disconnect the conducting wires quickly enough to prevent serious injury from such shocks, commonly described as the RCD being « tripped ».
An RCD does not provide protection against unexpected or dangerously high current (called spikes or surges) when current is flowing in the usual wires in the circuit, therefore it cannot replace a fuse or protect against overheating or fire risk due to overcurrent (overload) or short circuits if the fault does not lead to current leakage. Therefore, RCDs are often used or integrated as a single product along with some kind of circuit breaker, such as a fuse or miniature circuit breaker (MCB), which adds protection in the event of excessive current in the circuit (the resulting RCD with overcurrent protection called an RCBO). RCDs also cannot detect the situation where a human accidentally touches both conductors at the same time, since the flow of current through an expected device, an unexpected route, or a human, are indistinguishable if the current returns through the expected conductor.
RCDs are usually testable and resettable devices. Commonly they include a button that when pressed, safely creates a small leakage condition, and a switch that reconnects the conductors when a fault condition has been cleared. Depending upon their design, some RCDs disconnect both the energized and return conductors upon a fault, while others only disconnect the energized conductor and rely upon the return conductor being at ground (earth) potential. The former are commonly known as « double-pole » designs; the latter as « single-pole » designs. If the fault has left the return wire « floating » or not at its expected ground potential for any reason, then a single-pole RCD will leave this conductor still connected to the circuit when it detects the fault.
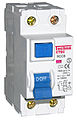
[one-third-first]A two-pole, or double-pole, residual-current device. The test button and connect/disconnect switch are colored blue. A fault will trigger the switch to its down (off) position, which in this device would disconnect both conductors.[/one-third-first] [one-third]
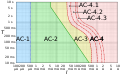
Log-log graph of the effect of alternating current I of duration Tpassing from left hand to feet as defined in IEC publication 60479-1.[1]
The default firewall in the Control Panel is so poor because of the poor design of Synology’s firewall policy. You can not use the white list in the global environment if you have both IPv4 or IPv6 network environment. To decrease the risk of being hacked, I’ve decided to change the firewall manually. We should use iptables and ip6tables to change both IPv4 and IPv6 firewall. If you don’t have the need for IPv6 network environment, you can ignore the ip6tables part.
Warning: If you don’t have enough IT experience, you should run the following sections carefully. Maybe you will lose your connection to your Synology and find it hard to connect to it again.
I wrote some IPv4 rules, the following code section is part of the rule file, you can run the iptables-save to export the rule file:
DiskStation>iptables-save>ipv4
# For your simple reference, I delete the
# unuseful part of rule file which exported by iptables-save. The following
# part is completely different from the file exported by iptables-save.
DiskStation>catipv4
*filter
:INPUT DROP# Drops all inbound connections that doesn't use the following rules
:FORWARD ACCEPT# It may be default, you can ignore it
:OUTPUT ACCEPT# It may be default, you can ignore it
-AINPUT-ilo-jACCEPT# Allows all loopback (lo0) traffic
-AINPUT-mstate--state ESTABLISHED,RELATED-jACCEPT# Accepts all established inbound connections
-AINPUT-s192.168.1.1/255.255.255.0-jACCEPT# Allows your Intranet inbound connections
-AINPUT-s1.2.3.4-jACCEPT# Allows the specified ip address inbound connections
COMMIT
After run the iptables-restore and iptables -L, you can see the following result:
Try the following connection options in iSpy to connect to your Hikvision IP camera. If VLC or FFMPEG options are available we recommend you try those first as they will often be faster and include audio support. If you don’t have VLC installed (or are experiencing problems with the VLC plugin) you may be able to use the same URL under the FFMPEG source type (VLC is based on FFMPEG).
The settings for Hikvision cameras are built into our open source project ispy – click « Add » then « IP camera with wizard » to automatically setup your Hikvision cameras. If the camera is not listed in iSpy then click « Get Latest List » when on the add camera wizard. If you need to modify the URL then add or edit the Hikvision camera in iSpy and you can modify the connection type and URL in the video source dialog (button is top of the first tab). Lire la suite…