Archive

Archives pour la catégorie ‘Sécurité’

How to secure SSH login with one-time passwords on Linux

28/10/2023 Comments off

As someone says, security is a not a product, but a process. While SSH protocol itself is cryptographically secure by design, someone can wreak havoc on your SSH service if it is not administered properly, be it weak passwords, compromised keys or outdated SSH client.

As far as SSH authentication is concerned, public key authentication is in general considered more secure than password authentication. However, key authentication is actually not desirable or even less secure if you are logging in from a public or shared computer, where things like stealth keylogger or memory scraper can always a possibility. If you cannot trust the local computer, it is better to use something else. This is when « one-time passwords » come in handy. As the name implies, each one-time password is for single-use only. Such disposable passwords can be safely used in untrusted environments as they cannot be re-used even when they are stolen.

One way to generate disposable passwords is via Google Authenticator. In this tutorial, I am going to demonstrate another way to create one-time passwords for SSH login: OTPW, a one-time password login package. Unlike Google Authenticator, you do not rely on any third party for one-time password generation and verification.

What is OTPW?

OTPW consists of one-time password generator and PAM-integrated verification routines. In OTPW, one-time passwords are generated apriori with the generator, and carried by a user securely (e.g., printed in a paper sheet). Cryptographic hash of the generated passwords are then stored in the SSH server host. When a user logs in with a one-time password, OTPW’s PAM module verifies the password, and invalidates it to prevent re-use.

Step One: Install and Configure OTPW on Linux

Debian, Ubuntu or Linux Mint:

Install OTPW packages with apt–get.

$ sudo apt-get install libpam-otpw otpw-bin

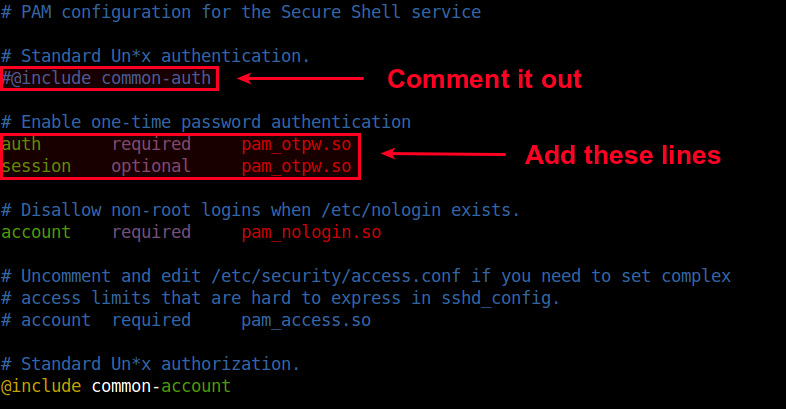
Open a PAM configuration file for SSH (/etc/pam.d/sshd) with a text editor, and comment out the following line (to disable password authentication).

#@include common-auth

and add the following two lines (to enable one-time password authentication):

auth       required     pam_otpw.so
session    optional     pam_otpw.so
16775121360_d1f93feefa_b

Fedora or CentOS/RHEL:

OTPW is not available as a prebuilt package on Red Hat based systems. So let’s install OTPW by building it from the source.

First, install prerequites:

$ sudo yum git gcc pam-devel
$ git clone https://www.cl.cam.ac.uk/~mgk25/git/otpw
$ cd otpw

Open Makefile with a text editor, and edit a line that starts with « PAMLIB= » as follows.

On 64-bit system:

PAMLIB=/usr/lib64/security

On 32-bit system:

PAMLIB=/usr/lib/security

Compile and install it. Note that installation will automatically restart an SSH server. So be ready to be disconnected if you are on an SSH connection.

$ make
$ sudo make install

Now you need to update SELinux policy since /usr/sbin/sshd tries to write to user’s home directory, which is not allowed by default SELinux policy. The following commands will do. If you are not using SELinux, skip this step.

$ sudo grep sshd /var/log/audit/audit.log | audit2allow -M mypol
$ sudo semodule -i mypol.pp

Next, open a PAM configuration file for SSH (/etc/pam.d/sshd) with a text editor, and comment out the following line (to disable password authentication).

#auth       substack     password-auth

and add the following two lines (to enable one-time password authentication):

auth       required     pam_otpw.so
session    optional     pam_otpw.so

Lire la suite…

How to run iptables automatically after reboot on Debian

27/10/2023 Comments off

reboot iptablesIf you have customized iptables rules, and would like to load the customized iptables rules persistently across reboots on Debian, you can leverage if-up.d scripts that are located in /etc/network/if-up.d. On Debian, any script that is marked as executable and placed in /etc/network/if-up.d gets executed when a network interface is brought up.

In order to run iptables automatically after reboot on Debian, do the following.

First, customize iptables as you wish, and then save the current iptables rule-set using iptables-save command.

$ sudo iptables-save > /etc/firewall.conf

The above command will dump the current iptables rule set into /etc/firewall.conf file which iptables-restore command can later use to restore the same rule set.

Now create the following if-up.d script called iptables that restores the saved iptables rule set.

$ sudo vi /etc/network/if-up.d/iptables
#!/bin/sh
iptables-restore < /etc/firewall.conf
$ sudo chmod  x /etc/network/if-up.d/iptables

Alternatively, you can add « iptables-restore < /etc/firewall.conf » command to /etc/rc.local, which gets executed at the end of system boot-up.

Source: Xmodulo

Securing your server with iptables

12/08/2021 Comments off

Securing your server with iptables

securing your server linuxIn the Getting Started guide, you learned how to deploy a Linux distribution, boot your Linode and perform some basic administrative tasks. Now it’s time to harden your Linode to protect it from unauthorized access.

Update Your System–Frequently

Keeping your software up to date is the single biggest security precaution you can take for any operating system–be it desktop, mobile or server. Software updates frequently contain patches ranging from critical vulnerabilities to minor bug fixes, and many software vulnerabilities are actually patched by the time they become public.

Automatic Security Updates

There are opposing arguments for and against automatic updates on servers. Nonetheless, CentOS, Debian, Fedora and Ubuntu can be automatically updated to various extents. Fedora’s Wiki has a good breakdown of the pros and cons, but if you limit updates to those for security issues, the risk of using automatic updates will be minimal.

The practicality of automatic updates must be something which you judge for yourself because it comes down to what you do with your Linode. Bear in mind that automatic updates apply only to packages sourced from repositories, not self-compiled applications. You may find it worthwhile to have a test environment which replicates your production server. Updates can be applied there and reviewed for issues before being applied to the live environment.

Add a Limited User Account

Up to this point, you have accessing your Linode as the root user. The concern here is that roothas unlimited privileges and can execute any command–even one that could accidentally break your server. For this reason and others, we recommend creating a limited user account and using that at all times. Administrative tasks will be done using sudo to temporarily elevate your limited user’s privileges so you can administer your server without logging in as root.

To add a new user, log in to your Linode via SSH.

CentOS / Fedora

  1. Create the user, replacing example_user with your desired username, and assign a password:
    useradd example_user && passwd example_user
  2. Add the user to the wheel group for sudo privileges:
    usermod -aG wheel example_user

Debian / Ubuntu

  1. Create the user, replacing example_user with your desired username. You’ll then be asked to assign the user a password.
    adduser example_user
  2. Add the user to the sudo group so you’ll have administrative privileges:
    adduser example_user sudo

With your new user assigned, disconnect from your Linode as root:

exit

Log back in to your Linode as your new user. Replace example_user with your username, and the example IP address with your Linode’s IP address:

ssh [email protected]

Now you can administer your Linode from your new user account instead of root. Superuser commands can now be prefaced with sudo; for example, sudo iptables -L. Nearly all superuser commands can be executed with sudo, and those commands will be logged to /var/log/auth.log.

Lire la suite…

Linux Firewalls Using iptables

10/08/2021 Comments off

Source: linuxhomenetworking.com

Introduction

Network security is a primary consideration in any decision to host a website as the threats are becoming more widespread and persistent every day. One means of providing additional protection is to invest in a firewall. Though prices are always falling, in some cases you may be able to create a comparable unit using the Linux iptables package on an existing server for little or no additional expenditure.
This chapter shows how to convert a Linux server into:

  • A firewall while simultaneously being your home website’s mail, web and DNS server.
  • A router that will use NAT and port forwarding to both protect your home network and have another web server on your home network while sharing the public IP address of your firewall.

Creating an iptables firewall script requires many steps, but with the aid of the sample tutorials, you should be able to complete a configuration relatively quickly.

What Is iptables?

Originally, the most popular firewall/NAT package running on Linux was ipchains, but it had a number of shortcomings. To rectify this, the Netfilter organization decided to create a new product called iptables, giving it such improvements as:

  • Better integration with the Linux kernel with the capability of loading iptables-specific kernel modules designed for improved speed and reliability.
  • Stateful packet inspection. This means that the firewall keeps track of each connection passing through it and in certain cases will view the contents of data flows in an attempt to anticipate the next action of certain protocols. This is an important feature in the support of active FTP and DNS, as well as many other network services.
  • Filtering packets based on a MAC address and the values of the flags in the TCP header. This is helpful in preventing attacks using malformed packets and in restricting access from locally attached servers to other networks in spite of their IP addresses.
  • System logging that provides the option of adjusting the level of detail of the reporting.
  • Better network address translation.
  • Support for transparent integration with such Web proxy programs as Squid.
  • A rate limiting feature that helps iptables block some types of denial of service (DoS) attacks.

Considered a faster and more secure alternative to ipchains, iptables has become the default firewall package installed under RedHat and Fedora Linux.

Download And Install The Iptables Package

Before you begin, you need to make sure that the iptables software RPM is installed. (See Chapter 6, « Installing Linux Software« , if you need a refresher.) When searching for the RPMs, remember that the filename usually starts with the software package name by a version number, as in iptables-1.2.9-1.0.i386.rpm.

Managing the iptables Server

Managing the iptables daemon is easy to do, but the procedure differs between Linux distributions. Here are some things to keep in mind.

  • Firstly, different Linux distributions use different daemon management systems. Each system has its own set of commands to do similar operations. The most commonly used daemon management systems are SysV and Systemd.
  • Secondly, the daemon name needs to be known. In this case the name of the daemon is iptables.

Armed with this information you can know how to:

  • Start your daemons automatically on booting
  • Stop, start and restart them later on during troubleshooting or when a configuration file change needs to be applied.

For more details on this, please take a look at the « Managing Daemons » section of Chapter 6 « Installing Linux Software »

Note: Remember to configure your daemon to start automatically upon your next reboot.

Lire la suite…

Les Firewalls

09/08/2021 Comments off

par Alban Jacquemin et Adrien Mercier

1 – Pourquoi un firewall

De nos jours, toutes les entreprises possédant un réseau local possèdent aussi un accès à Internet, afin d’accéder à la manne d’information disponible sur le réseau des réseaux, et de pouvoir communiquer avec l’extérieur. Cette ouverture vers l’extérieur est indispensable… et dangereuse en même temps. Ouvrir l’entreprise vers le monde signifie aussi laisser place ouverte aux étrangers pour essayer de pénétrer le réseau local de l’entreprise, et y accomplir des actions douteuses, parfois gratuites, de destruction, vol d’informations confidentielles, … Les mobiles sont nombreux et dangereux.

Pour parer à ces attaques, une architecture sécurisée est nécessaire. Pour cela, le coeur d’une tel architecture est basé sur un firewall. Cette outil a pour but de sécuriser au maximum le réseau local de l’entreprise, de détecter les tentatives d’intrusion et d’y parer au mieux possible. Cela représente une sécurité supplémentaire rendant le réseau ouvert sur Internet beaucoup plus sûr.  De plus, il peut permettre de restreindre l’accès interne vers l’extérieur. En effet, des employés peuvent s’adonner à des activités que l’entreprise ne cautionne pas, le meilleur exemple étant le jeu en ligne. En plaçant un firewall limitant ou interdisant l’accès à ces services, l’entreprise peut donc avoir un contrôle sur les activités se déroulant dans son enceinte.

Le firewall propose donc un véritable contrôle sur le trafic réseau de l’entreprise. Il permet d’analyser, de sécuriser et de gérer le trafic réseau, et ainsi d’utiliser le réseau de la façon pour laquelle il a été prévu et sans l’encombrer avec des activités inutiles, et d’empêcher une personne sans autorisation d’accéder à ce réseau de données.

2 – Les différents types de filtrages

2.1 – Le filtrage simple de paquet (Stateless)

2.1.1 – Le principe

C’est la méthode de filtrage la plus simple, elle opère au niveau de la couche réseau et transport du modèle Osi. La plupart des routeurs d’aujourd’hui permettent d’effectuer du filtrage simple de paquet. Cela consiste à accorder ou refuser le passage de paquet d’un réseau à un autre en se basant sur :

– L’adresse IP Source/Destination.
– Le numéro de port Source/Destination.
– Et bien sur le protocole de niveau 3 ou 4.

Cela nécessite de configurer le Firewall ou le routeur par des règles de filtrages, généralement appelées des ACL (Access Control Lists).

2.1.2 – Les limites

Le premier problème vient du fait que l’administrateur réseau est rapidement contraint à autoriser un trop grand nombre d’accès, pour que le Firewall offre une réelle protection. Par exemple, pour autoriser les connexions à Internet à partir du réseau privé, l’administrateur devra accepter toutes les connexions TCP provenant de l’Internet avec un port supérieur à 1024. Ce qui laisse beaucoup de choix à un éventuel pirate.

Il est à noter que de définir des ACL sur des routeurs haut de gamme – c’est à dire, supportant un débit important – n’est pas sans répercussion sur le débit lui-même. Enfin, ce type de filtrage ne résiste pas à certaines attaques de type IP Spoofing / IP Flooding, la mutilation de paquet, ou encore certaines attaques de type DoS. Ceci est vrai sauf dans le cadre des routeurs fonctionnant en mode distribué. Ceci permettant de gérer les Acl directement sur les interfaces sans remonter à la carte de traitement central. Les performances impactées par les Acl sont alors quasi nulles.

Lire la suite…