Archive

Archives pour la catégorie ‘Sécurité’

Stop DDoS attack with iptables

15/05/2024 Comments off

stop ddos attack iptablesIn fight against DDoS through the years, i’ve compiled a list of useful iptables commands which may come handy in time of trouble.

Here is how to stop DDoS attack with iptables

To block small SYN floods:
iptables -A INPUT -p tcp --syn -m limit --limit 1/s --limit-burst 3 -j RETURN

To block small UDP floods:
iptables -N udp-flood
iptables -A OUTPUT -p udp -j udp-flood
iptables -A udp-flood -p udp -m limit --limit 50/s -j RETURN
iptables -A udp-flood -j LOG --log-level 4 --log-prefix 'UDP-flood attempt: '
iptables -A udp-flood -j DROP

To limit rate of connections on a port:
iptables -A INPUT -p tcp --dport (port-here) -m state --state NEW -m recent --set --name DDOS --rsource
iptables -A INPUT -p tcp --dport (port-here) -m state --state NEW -m recent --update --seconds 5 --hitcount 5 --name DDOS --rsource -j DROP

Limit connections per ip on a port
iptables -A INPUT -p tcp --syn --dport (port-here) -m connlimit --connlimit-above (limit-here) --connlimit-mask 32 -j REJECT --reject-with tcp-reset

To block an ip using iptables
iptables -A INPUT -s (ip-here) -j DROP

If you use haproxy as load balancer use this to limit concurrent connections:
stick-table type ip size 200k expire 30s store conn_cur
tcp-request connection reject if { src_conn_cur ge 6 }
tcp-request connection track-sc1 src

Resources:
iptables man page
Haproxy website

Source: Stickpoll

Contrer une attaque DDoS de type SYN flood sous Linux

15/05/2024 Comments off

Source: Tux-planet 

Une attaque par déni de services SYN flood est une technique visant à saturer un serveur en envoyant une multitude de paquets TCP, avec le flag SYN. Les connexions sont alors établies vers la machine, mais restent à moitié ouvertes, car le client malveillant (hacker) ne renvoie pas de confirmation (ACK).

Le serveur attend pendant un certain délai la réponse et la connexion semi-ouverte consomme alors un certain nombre de ressources. En multipliant ce type de connexions, le hacker peut arriver à créer un déni de service qui rendra la machine inopérante.

1. Détection d’une l’attaque DDoS SYN flood

Pour détecter la présence de l’attaque, il faut utiliser la commande netstat et repérer la présence des connexions de type SYN_RECV. Si il y a beaucoup de réponses, c’est qu’une attaque est sans doute en cours :

# netstat -an | grep SYN_RECV
 tcp 0 0 10.xxx.xxx.xxx 237.177.154.8:25882 SYN_RECV -
 tcp 0 0 10.xxx.xxx.xxx 236.15.133.204:2577 SYN_RECV -
 tcp 0 0 10.xxx.xxx.xxx 127.160.6.129:51748 SYN_RECV -
 tcp 0 0 10.xxx.xxx.xxx 230.220.13.25:47393 SYN_RECV -

Voici une autre commande, un peu plus sophistiquée, qui donnera de meilleures résultats quant à la détection d’une attaque DDoS :

for i in ` netstat -tanpu | grep "SYN_RECV" | awk {'print $5'} | cut -f 1 -d ":" | sort | uniq -c | sort -n | awk {'if ($1 > 3) print $2'}` ; do echo $i; done

Lire la suite…

Categories: Réseau, Sécurité Tags: , , ,

Use a load-balancer as a first row of defense against DDoS

14/05/2024 Comments off

Source: haproxy.com

We’ve seen recently more and more DOS and DDoS attacks. Some of them were very big, requiring thousands of computers…
But in most cases, this kind of attacks are made by a few computers aiming to make a service or website unavailable, either by sending it too many requests or by taking all its available resources, preventing regular users to use the service.
Some attacks targets known vulnerabilities of widely used applications.

In the present article, we’ll explain how to take advantage of an application delivery controller to protect your website and application against DoS, DDoS and vulnerability scans.

Why using a LB for such protection since a firewall and a Web Application Firewall (aka WAF) could already do the job?
Well, the Firewall is not aware of the application layer but would be useful to pretect against SYN flood attacks. That’s why we saw recently application layer firewalls: Web Application Firewalls, also known as WAF.
Well, since the load balancer is in front of the platform, it can be a good partner for the WAF, filtering out 99% of the attacks, which are managed by script kiddies. The WAF can then happily clean up the remaining attacks.
Well, maybe you don’t need a WAF and you want to take advantage of your Aloha and save some money ;).

Note that you need an application layer load-balancer, like Aloha or OpenSource HAProxy to be efficient.

TCP syn flood attacks

The syn flood attacks consist in sending as many TCP syn packets as possible to a single server trying to saturate it or at least, saturating its uplink bandwith.

If you’re using the Aloha load-balancer, you’re already protected against this kind of attacks: the Aloha includes mechanism to protect you.
The TCP syn flood attack mitigation capacity may vary depending on your Aloha box.

It you’re running your own LB based on HAProxy or HAPEE, you should have a look at the sysctl below (edit /etc/sysctl.conf or play with sysctl command):

# Protection SYN flood
 net.ipv4.tcp_syncookies = 1
 net.ipv4.conf.all.rp_filter = 1
 net.ipv4.tcp_max_syn_backlog = 1024

Note: If the attack is very big and saturates your internet bandwith, the only solution is to ask your internet access provider to null route the attackers IPs on its core network.

Lire la suite…

Différents accès aux différentes organisations avec un pare-feu

13/05/2024 Comments off

Zone démilitarisée, la DMZ.

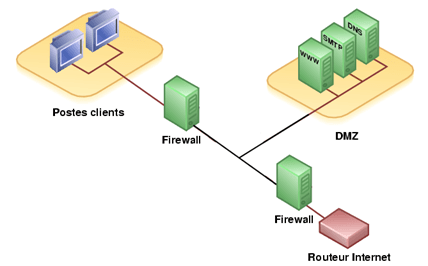
Une zone démilitarisée est un sous-réseau (DMZ) isolé par deux pare-feux (firewall). Ce sous-réseau contient des machines se situant entre un réseau interne (LAN – postes clients) et un réseau externe (typiquement, Internet).

La DMZ permet à ces machines d’accéder à Internet et/ou de publier des services sur Internet sous le contrôle du pare-feu externe. En cas de compromission d’une machine de la DMZ, l’accès vers le réseau local est encore controlé par le pare-feu interne.

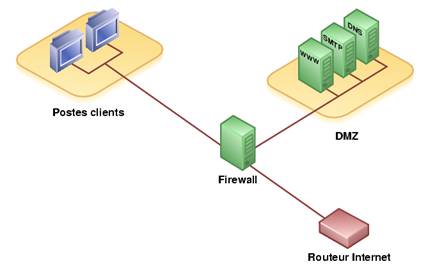
La figure ci-contre représente un cas particulier de DMZ; pour des raisons d’économie, les deux pare-feu sont fusionnés. C’est la ‘colapsed dmz‘, moins sure, car dès que le pare-feu est compromis, plus rien n’est contrôlé.

Schéma DMZ avec 1 seul pare-feu

Schéma DMZ avec 1 seul pare-feu

Schéma DMZ avec 2 pare-feux

Schéma DMZ avec 2 pare-feux

une installation complète contient :

  • Un réseau privé, dont on considère (souvent à tort) qu’il ne sera pas utilisé pour attaquer notre système informatique. Dans cette zone, il n’y a que des clients du réseau et des serveurs qui sont inaccessibles depuis l’Internet. Normalement, aucune connexion, au sens TCP du terme, aucun échange, au sens UDP du terme, ne peuvent être initiés depuis le Net vers cette zone.
  • Une « DMZ » (Zone DéMilitarisée), qui contient des serveurs accessibles depuis le Net et depuis le réseau privé. Comme ils sont accessibles depuis le Net, ils risquent des attaques. Ceci induit deux conséquences :
    • Il faut étroitement contrôler ce que l’on peut faire dessus depuis le Net, pour éviter qu’ils se fassent « casser » trop facilement,
    • Il faut s’assurer qu’ils ne peuvent pas accéder aux serveurs de la zone privée, de manière à ce que si un pirate arrivait à en prendre possession, il ne puisse directement accéder au reste du réseau.

Le dispositif qui va permettre d’établir ces règles de passages s’appelle un pare-feu. Techniquement, ce pourra être un logiciel de contrôle installé sur un routeur.

1.1 Les trois passages.

1.1.1 Entre le réseau privé et le Net.

Toujours typiquement, ce sont les clients du réseau (les utilisateurs) à qui l’on va donner des possibilités d’accéder au Net comme par exemple le surf ou la messagerie. Toutes les requêtes partent du réseau privé vers le Net. Seules les réponses à ces requêtes doivent entrer dans cette zone. Les accès peuvent être complètement bridés (les clients du réseau privé n’ont aucun droit d’accès vers le Net, ça nuit à leur productivité.

Seul le patron y a droit). Ou alors, les utilisateurs ne pourront consulter qu’un nombre de sites limités, dans le cadre de leurs activités professionnelles exclusivement. Très généralement, cette zone est construite sur une classe d’adresses privées et nécessite donc une translation d’adresse pour accéder au Net. C’est le routeur qui se chargera de cette translation.

1.1.2 Entre la DMZ et le Net.

Ici, nous avons des serveurs qui doivent être accessibles depuis le Net. Un serveur Web, un serveur de messagerie, un FTP… Il faudra donc permettre de laisser passer des connexions initiées depuis l’extérieur. Bien entendu, ça présente des dangers, il faudra surveiller étroitement et ne laisser passer que le strict nécessaire.

Si l’on dispose d’adresses IP publiques, le routeur fera un simple routage. Si l’on n’en dispose pas, il devra faire du « port forwarding » pour permettre, avec la seule IP publique dont on dispose, d’accéder aux autres serveurs de la DMZ. Cette technique fonctionne bien sur un petit nombre de serveurs, mais devient très vite un casse-tête si, par exemple, plusieurs serveurs HTTP sont présents dans la DMZ.

1.1.3 Entre le réseau privé et la DMZ.

Les accès devraient être à peu près du même type qu’entre la zone privée et le Net, avec un peu plus de souplesse. En effet, il faudra

  • Mettre à jour les serveurs web,
  • Envoyer et recevoir les messages, puisque le SMTP est dedans
  • Mettre à jour le contenu du FTP (droits en écriture).

En revanche, depuis la DMZ, il ne devrait y avoir aucune raison pour qu’une connexion soit initiée vers la zone privée.
Lire la suite…

Installing a high availability web server cluster on Ubuntu 12.04 LTS using HAProxy, HeartBeat and Nginx

12/05/2024 Comments off

How to set-up a high-availability cluster

Here are a few notes about how to set-up a high-availability web server farm using Ubuntu 12.04 LTS using a whole load of awesome software (HAProxy, HeartBeat, Watchdog and Nginx)

The setup

In my setup I have five virtual machines, these are named and used for the following:-

haproxy1 – Our first proxy (master)/load-balancer (running HAProxy, HeartBeat and Watchdog) [IP address: 172.25.87.190]
haproxy2 – Our second proxy (failover)/load-balancer (running HAProxy, HeartBeat and Watchdog) [IP address: 172.25.87.191]
web1 – Our first web server node (running nginx) [IP address: 172.25.87.192]
web2 – Our second web server node (running nginx) [IP address: 172.25.87.193]
web3 – Our third web server node (running nginx) [IP address: 172.25.87.194]

The servers are connected in the following way:-
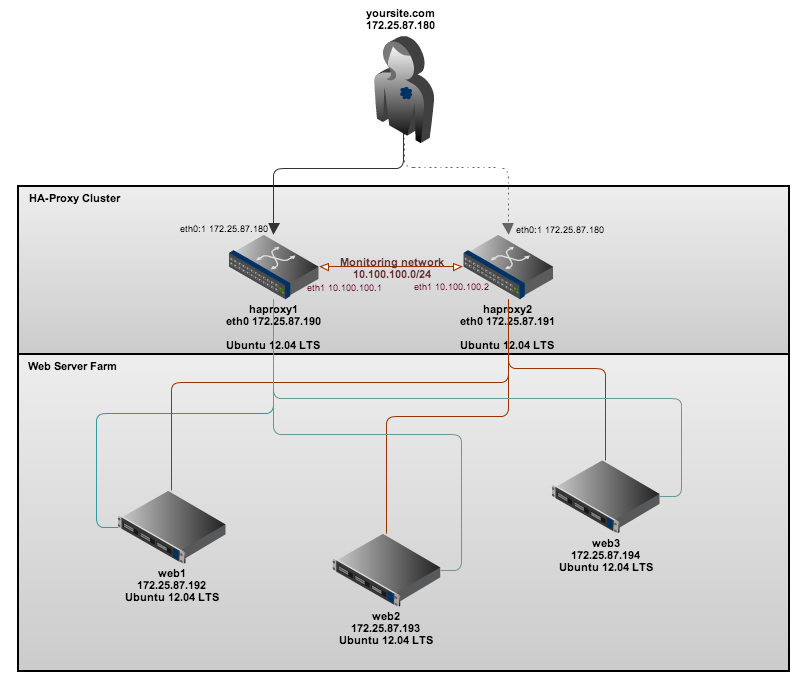
thesetup


In my next post I will also explain how to configure the web servers to point to a backend shared storage cluster (using NFS) and a MySQL cluster server to have a truly highly available web hosting platform.

Lets get going…

Firstly, add the following to each of your server’s /etc/hosts file (to ensure all machines can resolve each other’s hostnames)

172.25.87.180 yoursite.com #This is our 'floating' (virtual IP) for our web-cluster.
172.25.87.190 haproxy1
172.25.87.191 haproxy2
172.25.87.192 web1
172.25.87.193 web2
172.25.87.194 web3
10.100.100.1 haproxy1
10.100.100.2 haproxy2
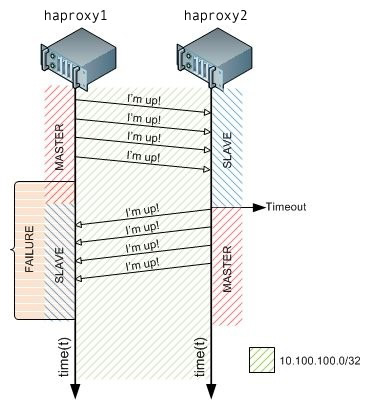
heartbeatNext ensure that both of the load balancers (haproxy1 and haproxy2) have a second network card installed so we can configure a separate ‘monitoring’ network between the two load-balancers. The second network card will enable Heartbeat to constantly send ‘Im alive’ messages to one another, when the master stops responding to the fail-over load-balancer, the fail-over proxy will take over! This image on the left demonstrates how this looks.


The network configuration in /etc/network/interfaces should look as follows:

On haproxy1 (Our master load-balancer):

# This file describes the network interfaces available on your system
# and how to activate them. For more information, see interfaces(5).
# The loopback network interface
auto lo
iface lo inet loopback
# The primary network interface
auto eth0
iface eth0 inet static
 address 172.25.87.190
 netmask 255.255.255.0
 gateway 172.25.87.1
 dns-nameservers 8.8.8.8 8.8.4.4
auto eth0:1
iface eth0:1 inet static
 address 172.25.87.180
 netmask 255.255.255.0
auto eth1
iface eth1 inet static
 address 10.100.100.1
 netmask 255.255.255.0

On haproxy2 (our failover load-balancer):

# This file describes the network interfaces available on your system
# and how to activate them. For more information, see interfaces(5).
# The loopback network interface
auto lo
iface lo inet loopback
# The primary network interface
auto eth0
iface eth0 inet static
 address 172.25.87.191
 netmask 255.255.255.0
 gateway 172.25.87.1
 dns-nameservers 8.8.8.8 8.8.4.4
auto eth0:1
iface eth0:1 inet static
 address 172.25.87.180
 netmask 255.255.255.0
auto eth1
iface eth1 inet static
 address 10.100.100.2
 netmask 255.255.255.0

As you can see above, we’ve configured a virtual IP address of which both machines are able to use, to ensure that both machines can start (as normally two machines in the same network cannot have the same IP address) we need to run the following command (on both haproxy1 and haproxy2):-

echo "net.ipv4.ip_nonlocal_bind=1" >> /etc/sysctl.conf

Then confirm that the changes have been made by running (sysctl -p) (it should return ‘net.ipv4.ip_nonlocal_bind = 1‘)

Now you should be able to restart the networking service on both our HAProxy servers.

service networking restart

We now need to create a few config files, these files are for the configuration of HeartBeat, these files are the same on both the haproxy servers (haproxy1 and haproxy2) servers!

First file to create should be located in: /etc/ha.d/ha.cf

watchdog            /dev/watchdog
logfile             /var/log/ha-log
debugfile           /var/log/ha-debug
deadtime            5
warntime            10
initdead            15
bcast               eth1
auto_failback       on
node                haproxy1
node                haproxy2

Second file, to be located: /etc/ha.d/authkeys

auth 3
1 crc
2 sha1 yourpasswordhere
3 md5 yourpasswordhere

Now, change the file permissions to 600 like so:-

chmod 600 /etc/ha.d/authkeys

Lastly, the final Heartbeat configuration file which is to be located in: /etc/ha.d/haresources

haproxy1 \
       IPaddr::172.25.87.180/24/eth0

Now we need to configure HAProxy, HAProxy shares the traffic  web server nodes. In the below configuration, HAProxy will ’roundrobin’ the web server requests to all active web server nodes.

The configuration on both servers, identicial again! – So ensure that both servers have the following content appended to the end of /etc/haproxy/haproxy.cfg

listen     web-cluster         172.25.87.180:80
                 mode http
                 stats enable
                 stats auth admin:password # Change this to your own username and password!
                 balance roundrobin
                 option httpclose
                 option forwardfor
                 cookie JSESSIONID prefix
                 server web1 172.25.87.192:80 cookie A check
                 server web2 172.25.87.193:80 cookie B check
                 server web3 172.25.87.194:80 cookie C check

The very last step, before starting the HAProxy daemon is to enable the daemon, again, this step needs to be carried out on both servers!

nano /etc/default/haproxy

and change:

ENABLED=0

to

ENABLED=1

Fantastic, HAProxy should now start without any problems, lets try starting it (on both servers) like so:-

/etc/init.d/haproxy start

Installing the web servers

For this simple test, I’ve very quickly installed nginx on each of the web servers, you can do so by running the following command:

apt-get install nginx

Then, to test the load-balancing is working correctly later on, I’ve edited the default nginx ‘welcome’ page found in /usr/share/nginx/www/index.html and then simply added the name of the server to display on that page, later on when testing our new setup you can then easily see what server is serving the content!

The content of my index.html file looks as follows:-

<html>
<head>
<title>Welcome to nginx!</title>
</head>
<body bgcolor="white" text="black">
<center><h1>Welcome to nginx! (web1)</h1></center>
</body>
</html>

Thats great, thats all we need to do on the web servers!

Testing it out…

Now, as long as your web servers are online, you should now be able to access your webserver cluster from your web browser at: http://172.25.87.180/

Screen Shot 2013-01-21 at 21.44.36


Now, refresh the pages a few times, the page should then change to ‘Welcome to nginx (web2)’ and then ‘Welcome to nginx (web3)’ and then will go back to ‘Welcome to nginx (web1)’ etc. – This is known as ’roundrobin’ load-balancing.

As we’ve also enabled the HAProxy stats you can also see your cluster stats (which web servers are online etc) by typing:- http://172.25.87.180/haproxy?stats, once you’ve entered the correct username and password combination you’ll be faced with a nice statistics page like so:-
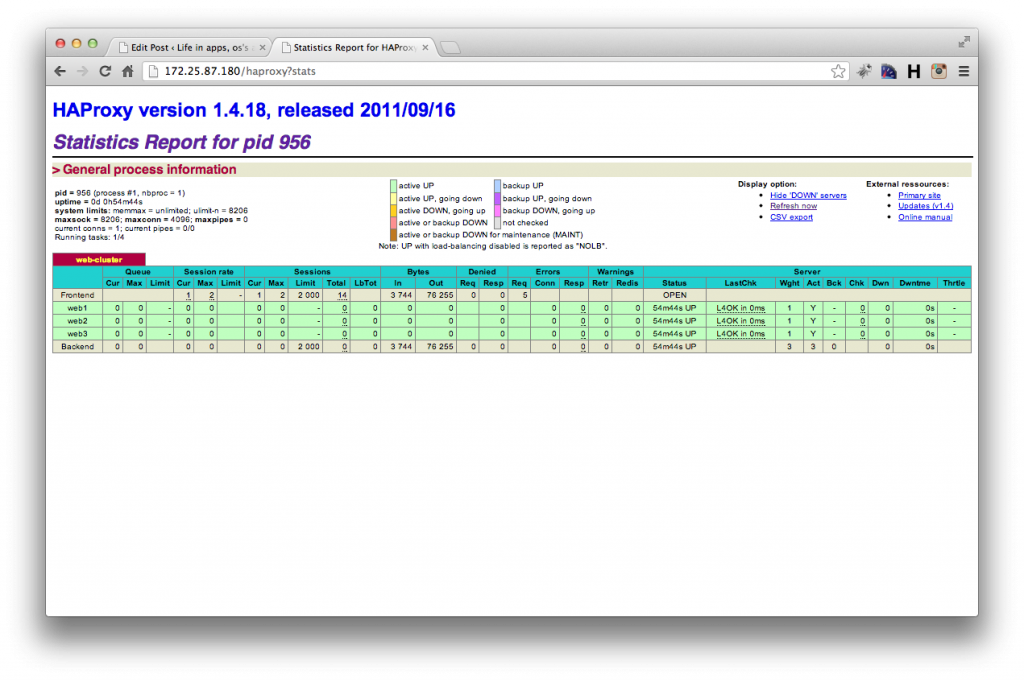
Screen Shot 2013-01-21 at 21.43.43


Credit where credit is due, most of the information for this I found on this great webpage:- http://blog.romerojunior.com/linux/linux-building-basic-high-availability-infrastructure-for-web-servers/