Archive

Archives pour la catégorie ‘Réseau’

Packet Analyzer: 15 TCPDUMP Command Examples

31/10/2023 Comments off

Packet Analyzer: efficient network traffic analysispacket analyzer

tcpdump command is also called as packet analyzer.

tcpdump command will work on most flavors of unix operating system. tcpdump allows us to save the packets that are captured, so that we can use it for future analysis. The saved file can be viewed by the same tcpdump command. We can also use open source software like wireshark to read the tcpdump pcap files.

In this tcpdump tutorial, let us discuss some practical examples on how to use the tcpdump command.

1. Capture packets from a particular ethernet interface using tcpdump -i

When you execute tcpdump command without any option, it will capture all the packets flowing through all the interfaces. -i option with tcpdump command, allows you to filter on a particular ethernet interface.

$ tcpdump -i eth1
14:59:26.608728 IP xx.domain.netbcp.net.52497 > valh4.lell.net.ssh: . ack 540 win 16554
14:59:26.610602 IP resolver.lell.net.domain > valh4.lell.net.24151:  4278 1/0/0 (73)
14:59:26.611262 IP valh4.lell.net.38527 > resolver.lell.net.domain:  26364  PTR? 244.207.104.10.in-addr.arpa. (45)

In this example, tcpdump captured all the packets flows in the interface eth1 and displays in the standard output.

Note: Editcap utility is used to select or remove specific packets from dump file and translate them into a given format.

2. Capture only N number of packets using tcpdump -c

When you execute tcpdump command it gives packets until you cancel the tcpdump command. Using -c option you can specify the number of packets to capture.

$ tcpdump -c 2 -i eth0
listening on eth0, link-type EN10MB (Ethernet), capture size 96 bytes
14:38:38.184913 IP valh4.lell.net.ssh > yy.domain.innetbcp.net.11006: P 1457255642:1457255758(116) ack 1561463966 win 63652
14:38:38.690919 IP valh4.lell.net.ssh > yy.domain.innetbcp.net.11006: P 116:232(116) ack 1 win 63652
2 packets captured
13 packets received by filter
0 packets dropped by kernel

The above tcpdump command captured only 2 packets from interface eth0.

Note: Mergecap and TShark: Mergecap is a packet dump combining tool, which will combine multiple dumps into a single dump file. Tshark is a powerful tool to capture network packets, which can be used to analyze the network traffic. It comes with wireshark network analyzer distribution.

3. Display Captured Packets in ASCII using tcpdump -A

The following tcpdump syntax prints the packet in ASCII.

$ tcpdump -A -i eth0
tcpdump: verbose output suppressed, use -v or -vv for full protocol decode
listening on eth0, link-type EN10MB (Ethernet), capture size 96 bytes
14:34:50.913995 IP valh4.lell.net.ssh > yy.domain.innetbcp.net.11006: P 1457239478:1457239594(116) ack 1561461262 win 63652
E.....@.@..]..i...9...*.V...]...P....h....E...>{..U=...g.
......G..7 KA....A...L.
14:34:51.423640 IP valh4.lell.net.ssh > yy.domain.innetbcp.net.11006: P 116:232(116) ack 1 win 63652
E.....@[email protected]...*.V..*]...P....h....7......X..!....Im.S.g.u:*..O&....^#Ba...
E..(R.@.|.....9...i.*...]...V..*P..OWp........

Note: Ifconfig command is used to configure network interfaces
Lire la suite…

Categories: Réseau Tags:

How to Backup Linux? 15 rsync Command Examples

30/10/2023 Comments off

rsync stands for remote sync.

rsync is used to perform the backup operation in UNIX / Linux.

rsync utility is used to synchronize the files and directories from one location to another in an effective way. Backup location could be on local server or on remote server.

Important features of rsync

  • Speed: First time, rsync replicates the whole content between the source and destination directories. Next time, rsync transfers only the changed blocks or bytes to the destination location, which makes the transfer really fast.
  • Security: rsync allows encryption of data using ssh protocol during transfer.
  • Less Bandwidth: rsync uses compression and decompression of data block by block at the sending and receiving end respectively. So the bandwidth used by rsync will be always less compared to other file transfer protocols.
  • Privileges: No special privileges are required to install and execute rsync

Syntax

$ rsync options source destination

Source and destination could be either local or remote. In case of remote, specify the login name, remote server name and location.

Example 1. Synchronize Two Directories in a Local Server

To sync two directories in a local computer, use the following rsync -zvr command.

$ rsync -zvr /var/opt/installation/inventory/ /root/temp
building file list ... done
sva.xml
svB.xml
.
sent 26385 bytes  received 1098 bytes  54966.00 bytes/sec
total size is 44867  speedup is 1.63
$

In the above rsync example:

  • -z is to enable compression
  • -v verbose
  • -r indicates recursive

Now let us see the timestamp on one of the files that was copied from source to destination. As you see below, rsync didn’t preserve timestamps during sync.

$ ls -l /var/opt/installation/inventory/sva.xml /root/temp/sva.xml
-r--r--r-- 1 bin  bin  949 Jun 18  2009 /var/opt/installation/inventory/sva.xml
-r--r--r-- 1 root bin  949 Sep  2  2009 /root/temp/sva.xml

Example 2. Preserve timestamps during Sync using rsync -a

rsync option -a indicates archive mode. -a option does the following,

  • Recursive mode
  • Preserves symbolic links
  • Preserves permissions
  • Preserves timestamp
  • Preserves owner and group

Now, executing the same command provided in example 1 (But with the rsync option -a) as shown below:

$ rsync -azv /var/opt/installation/inventory/ /root/temp/
building file list ... done
./
sva.xml
svB.xml
.
sent 26499 bytes  received 1104 bytes  55206.00 bytes/sec
total size is 44867  speedup is 1.63
$

As you see below, rsync preserved timestamps during sync.

$ ls -l /var/opt/installation/inventory/sva.xml /root/temp/sva.xml
-r--r--r-- 1 root  bin  949 Jun 18  2009 /var/opt/installation/inventory/sva.xml
-r--r--r-- 1 root  bin  949 Jun 18  2009 /root/temp/sva.xml

Lire la suite…

Categories: Réseau, Système Tags: ,

Mass-blocking IP addresses with ipset

30/10/2023 Comments off

Using ipset to block many IP addresses

I was sponsoring an upload of ipset to Debian the other day. This reminded me of ipset, a very cool program as I am going to show. It makes administering related netfilter (that is: firewall) rules easy along with a good performance. This is achieved by changing how rules match in iptables. Traditionally, an iptables rule matches a single network identity, for example a single IP address or a single network only. With ipsets you can operate on a bunch of (otherwise unrelated) addresses at once easily. If you happen to need bulk actions in your firewall, for example you want to blacklist a long list of IP addresses at once, you will love IP sets. I promise.

Drawbacks of netfilter

IP sets do exist for a longer time, however they made it into the upstream Linux kernel as of version 2.6.39. That means Debian Wheezy will support it as is; for Debian Squeeze you can either use a backported kernel or compile yourself the module shipped in the ipset-source package. In any case you additionally need the command line utilities named ipset. Thus, install that package before you can start. Having that said, Squeeze users should note the ipset syntax I am demonstrating below slightly differs from the syntax supported by the Squeeze utilities. The big picture remains the same, though.

IP utils do not conflict with iptables, but extend it in a useful way. You can combine both as you like. In fact, you still need iptables to turn IP sets into something really useful. Nonetheless you will be hitting iptables‘ limitation soon if you exceed a certain number of rules. You can combine as many conditions within a filter rule as you like, however you can only specify a single pattern for each condition. You figure, this does not scale very well if a pattern to match against does not follow a very tight definition such as a CIDR pattern.

This means you can happily filter whole network blocks such as 192.168.0.0/24 (which translates to 255 hosts) in iptables, but there is no way to specify a particular not specially connected set of IP addresses within this range if it cannot be expressed with a CIDR prefix. For example, there is no way to block, say, 192.168.0.5, 192.168.0.100 and 192.168.0.220 in a single statement only. You really need to declare three rules which only differ by the IP address. Pretend, you want to prevent these three addresses from accessing your host. You would probably do something like this:

iptables -A INPUT -s 192.168.0.5 -p TCP -j REJECT
iptables -A INPUT -s 192.168.0.100 -p TCP -j REJECT
iptables -A INPUT -s 192.168.0.220 -p TCP -j REJECT

Alternatively you could do

iptables -A INPUT -s 192.168.0.0/24 -p TCP -j REJECT

but this would block 251 unrelated hosts, too. Not a good deal I’d say. Now, while the former alternative is annoying, what’s the problem with it? The problem is: It does not scale. Netfilter rules work like a fall-through trapdoor. This means whenever a packet enters the system, it passes through several chains and in each of these chains, netfilter checks all rules until either one rule matches or there are no rules left. In the latter case the default action applies. In netfilter terminology a chain determines when an interception to the regular packet flow occurs. In the example above the specified chain is INPUT, which applies to any incoming packet.

In the end this means every single packet which is sent to your host needs to be checked whether it matches the patterns specified in every rule of yours. And believe me, in a server setup, there are lots of packets flowing to your machine. Consider for example a single HTTP requests, which requires at very least four packets sent from a client machine to your web server. Thus, each of these packets is passing through your rules in your INPUT chain as a bare minimum, before it is eventually accepted or discarded.

This requires a substantial computing overhead for every rule you are adding to your system. This isn’t so much of a problem if you haven’t many rules (for some values of “many” as I am going to show). However, you may end up in a situation where you end up with a large rule set. For example, if you suffer from a DDoS attack, you may be tempted to block drone clients in your firewall (German; Apache2. Likewise: for Lighttpd). In such a situation you will need to add thousands of rules easily.

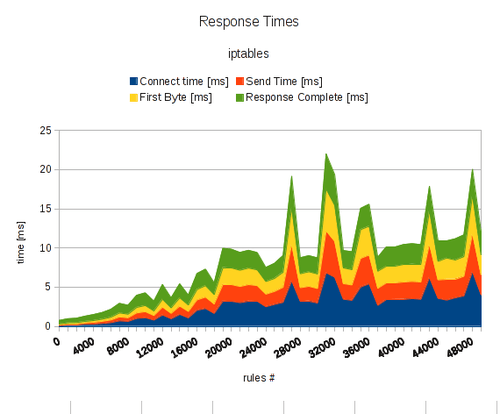
Being under attack, the performance of your server is poor already. However, by adding many rules to your firewall you are actually further increasing computing overhead for every request significantly. To illustrate my point, I’ve made some benchmarks. Below you find the response times of a HTTP web server while doing sequential requests for a single file of 10 KiB in size. I am explaining my measurement method in detail further below. For now, look the graph. It shows the average response time of an Apache 2 web server, divided into four parts:

  • connect time: this is the time passed by until the server completed the initial TCP handshake
  • send time: this is the time passed by which I needed to reliably send a HTTP request over the established TCP connection reliably (that means: one packet sent and waiting for acknowledged by the server)
  • first byte: this is time passed by until the server sent the first byte from the corresponding HTTP response
  • response complete: this is time passed by until the server sent all of the remaining bytes of the corresponding HTTP response (remaining HTTP header + 10 KiB of payload)

ipset2

Lire la suite…

Securing your server with iptables

12/08/2021 Comments off

Securing your server with iptables

securing your server linuxIn the Getting Started guide, you learned how to deploy a Linux distribution, boot your Linode and perform some basic administrative tasks. Now it’s time to harden your Linode to protect it from unauthorized access.

Update Your System–Frequently

Keeping your software up to date is the single biggest security precaution you can take for any operating system–be it desktop, mobile or server. Software updates frequently contain patches ranging from critical vulnerabilities to minor bug fixes, and many software vulnerabilities are actually patched by the time they become public.

Automatic Security Updates

There are opposing arguments for and against automatic updates on servers. Nonetheless, CentOS, Debian, Fedora and Ubuntu can be automatically updated to various extents. Fedora’s Wiki has a good breakdown of the pros and cons, but if you limit updates to those for security issues, the risk of using automatic updates will be minimal.

The practicality of automatic updates must be something which you judge for yourself because it comes down to what you do with your Linode. Bear in mind that automatic updates apply only to packages sourced from repositories, not self-compiled applications. You may find it worthwhile to have a test environment which replicates your production server. Updates can be applied there and reviewed for issues before being applied to the live environment.

Add a Limited User Account

Up to this point, you have accessing your Linode as the root user. The concern here is that roothas unlimited privileges and can execute any command–even one that could accidentally break your server. For this reason and others, we recommend creating a limited user account and using that at all times. Administrative tasks will be done using sudo to temporarily elevate your limited user’s privileges so you can administer your server without logging in as root.

To add a new user, log in to your Linode via SSH.

CentOS / Fedora

  1. Create the user, replacing example_user with your desired username, and assign a password:
    useradd example_user && passwd example_user
  2. Add the user to the wheel group for sudo privileges:
    usermod -aG wheel example_user

Debian / Ubuntu

  1. Create the user, replacing example_user with your desired username. You’ll then be asked to assign the user a password.
    adduser example_user
  2. Add the user to the sudo group so you’ll have administrative privileges:
    adduser example_user sudo

With your new user assigned, disconnect from your Linode as root:

exit

Log back in to your Linode as your new user. Replace example_user with your username, and the example IP address with your Linode’s IP address:

ssh [email protected]

Now you can administer your Linode from your new user account instead of root. Superuser commands can now be prefaced with sudo; for example, sudo iptables -L. Nearly all superuser commands can be executed with sudo, and those commands will be logged to /var/log/auth.log.

Lire la suite…

Linux Firewalls Using iptables

10/08/2021 Comments off

Source: linuxhomenetworking.com

Introduction

Network security is a primary consideration in any decision to host a website as the threats are becoming more widespread and persistent every day. One means of providing additional protection is to invest in a firewall. Though prices are always falling, in some cases you may be able to create a comparable unit using the Linux iptables package on an existing server for little or no additional expenditure.
This chapter shows how to convert a Linux server into:

  • A firewall while simultaneously being your home website’s mail, web and DNS server.
  • A router that will use NAT and port forwarding to both protect your home network and have another web server on your home network while sharing the public IP address of your firewall.

Creating an iptables firewall script requires many steps, but with the aid of the sample tutorials, you should be able to complete a configuration relatively quickly.

What Is iptables?

Originally, the most popular firewall/NAT package running on Linux was ipchains, but it had a number of shortcomings. To rectify this, the Netfilter organization decided to create a new product called iptables, giving it such improvements as:

  • Better integration with the Linux kernel with the capability of loading iptables-specific kernel modules designed for improved speed and reliability.
  • Stateful packet inspection. This means that the firewall keeps track of each connection passing through it and in certain cases will view the contents of data flows in an attempt to anticipate the next action of certain protocols. This is an important feature in the support of active FTP and DNS, as well as many other network services.
  • Filtering packets based on a MAC address and the values of the flags in the TCP header. This is helpful in preventing attacks using malformed packets and in restricting access from locally attached servers to other networks in spite of their IP addresses.
  • System logging that provides the option of adjusting the level of detail of the reporting.
  • Better network address translation.
  • Support for transparent integration with such Web proxy programs as Squid.
  • A rate limiting feature that helps iptables block some types of denial of service (DoS) attacks.

Considered a faster and more secure alternative to ipchains, iptables has become the default firewall package installed under RedHat and Fedora Linux.

Download And Install The Iptables Package

Before you begin, you need to make sure that the iptables software RPM is installed. (See Chapter 6, « Installing Linux Software« , if you need a refresher.) When searching for the RPMs, remember that the filename usually starts with the software package name by a version number, as in iptables-1.2.9-1.0.i386.rpm.

Managing the iptables Server

Managing the iptables daemon is easy to do, but the procedure differs between Linux distributions. Here are some things to keep in mind.

  • Firstly, different Linux distributions use different daemon management systems. Each system has its own set of commands to do similar operations. The most commonly used daemon management systems are SysV and Systemd.
  • Secondly, the daemon name needs to be known. In this case the name of the daemon is iptables.

Armed with this information you can know how to:

  • Start your daemons automatically on booting
  • Stop, start and restart them later on during troubleshooting or when a configuration file change needs to be applied.

For more details on this, please take a look at the « Managing Daemons » section of Chapter 6 « Installing Linux Software »

Note: Remember to configure your daemon to start automatically upon your next reboot.

Lire la suite…