Archive

Archives pour la catégorie ‘Réseau’

Synchronizing folders with rsync

10/01/2024 Comments off

Source: Juan Valencia’s website

In this post I cover the basics of rsync, in preparation for a subsequent post that will cover backups and it’s use in conjunction with cronjobs to automatize the backup process. From the copying and synchronization of local files and folders, to it’s use for transfer information among computers. Itsuse as a daemon when SSH is unavailable was moved to it’s own section.

Topics
The basics of rsync
Copying local files and folders
Dealing with whitespace and rare characters
Update the contents of a folder
Synchronizing two folders with rsync
Compressing the files while transferring them
Transferring files between two remote systems
Excluding files and directories
Running rsync as a daemon (moved to it’s own section)
Some additional rsync parameters
Footnotes

The basics of rsync

rsync is a very versatile copying and backup tool that is included by default in almost every Linux distribution. It can be used as an advanced copying tool, allowing us to copy files both locally and remotely. It can also be used as a backup tool. It supports the creation of incremental backups.

rsync counts with a famous delta-transfer algorithm that allows us to transfer new files as well as recent changes to existent files, while ignoring unchanged files. Additionally to this, the behavior ofrsync can be throughly customized, helping us to automatize backups, it can also be run as a daemon to turn the computer into a host and allow rsync clients connect to it.

Besides the copying of local files and folders, rsync allow us to copy over SSH (Secure Shell), RSH (Remote Shell) and it can be run as a daemon in a computer and allow other computers to connect to it, when rsync is run as a daemon it listens to the port TCP 873.

When we use rsync as a daemon or when we use RSH, the data that is send between computers travels unencrypted, so, if you are transferring files between two computers in the same local network, this is useful, but this shouldn’t be used to transfer files over insecure networks, such as the Internet. For this purpose SSH is the way to go.

This is the main reason why I favor the use of SSH for my transfers, besides, since SSH is secure, many servers have the SSH daemon available. But the use of rsync as a daemon for transfers over fast connections, as is usually the case in a local network, is useful. I don’t have the RSH daemon running in my computers so you may find me a bit biased about SSH in the examples. The examples covering the transfer of files between two computers use SSH as the medium of transport, but in a separate post I cover the use of rsync as a daemon.
Lire la suite…

Categories: Réseau, Système Tags: , ,

Knockd : Sécuriser vos connexions

07/01/2024 Comments off
source: http://www.debianworld.org/securite.knockd

Knockd est un petit daemon qui autorise ou non une connexion à votre serveur. Pour cela il écoute les ports de votre machine et attend une séquence bien précise de connexions sur les ports que vous avez définis. Si la séquence définie est exécuté dans le bon ordre, le daemon va ouvrir le port et permettre une connexion pour un temps déterminé sur le port ssh par exemple. La séquence peut utiliser des connexions TCP ou UDP ou les deux.

Ainsi, d’un point de vue extérieur le serveur n’a aucun port d’ouverts exception faite pour les clients qui ont la séquence « magique ».

Lire la suite…

Astuce pour « ssh-copy-id » sur un port ssh différent

06/01/2024 Comments off

Bon, a priori vous connaissez la commande "ssh-copy-id" pour copier sa clé publique sur un serveur distant afin de s’identifier par clé et plus par mot de passe.

Le principe est d’avoir une paire de clés privée/publique, le plus souvent dans "~/.ssh/id_rsa(.pub)" et de la copier à l’intérieur du fichier "~/.ssh/authorized_keys" sur la machine distante.

$ ssh-copy-id -i ~/.ssh/id_rsa.pub user@host

Mais si la machine distante n’accepte pas les connexions sur le port 22 ou bien qu’il y a une redirection de ports sur le routeur, il faut lui indiquer ce port, par exemple :

$ ssh-copy-id -i ~/.ssh/id_rsa.pub -p 2222 user@host

Mais ça ne marche pas car ssh-copy-id ne comprend que 2 paramètres et si on met "-p 2222" en second, ça n’est pas un motif de type "[user@]host", et si on le met après, en troisième, il est ignoré.

Et bien il suffit d’entourer les infos de connexion ssh par des guillemets pour qu’ils soient vus comme un seul paramètre :

$ ssh-copy-id -i ~/.ssh/id_rsa.pub "-p 2222 user@host"


Source: Jérémy Lecour

Automatically Connect to a Network Drive on Mac OS X Start Up & Login

02/01/2024 Comments off

It can be helpful to configure Mac OS X to automatically mount shared network drives, this is particularly true for those of us who regularly connect to a network drive for file sharing or backups.

Setting up automatic network drive connections in OS X is a two-step process, you must mount the drive, then you add it to your automatic login items. This should work flawlessly in most versions of OS X, but we’ll cover an alternative approach that uses Automator to mount a network drive automatically on login as well.

1) Mounting the Network Drive

If you’re already familiar with mapping a network drive in Mac OS X you can skip the first part of this and go straight to System Preferences in the second section.

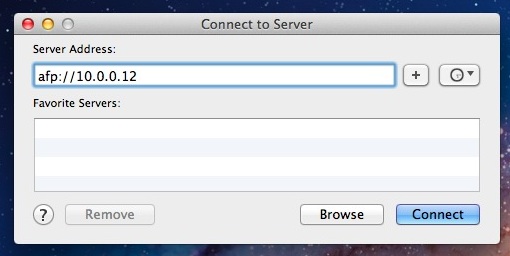
  1. From the OS X desktop, pull down the “Go” menu and select “Connect to Server”
  2. Connect to the server and mount the drive you want to automatically connect to on boot
  3. Choose Guest or for a specific user check the box next to “Remember this password in my keychain” – you must select to remember the password otherwise the automatic login event can not happen without logging into the network drive

Next, you add the network drive to automatically connect on OS X by bringing it into your Login Items list.

Lire la suite…

Categories: Réseau, Système Tags: , ,

Configuration avancée du firewall iptables

01/01/2024 Comments off

Iptables c’est quoi ?

Iptables est un firewall pour les distributions linux. Wikipédia et d’autres articles expliquent ça bien mieux que moi, du coup je ne vais pas m’attarder là dessus. Mais pour faire simple, un pare-feu système est un logiciel qui vient contrôler les flux réseaux connectés avec votre machine. Conceptuellement, le firewall va recevoir les flux réseaux, avant la socket. Il va alors appliquer différentes règles sur ce dernier, en fonction des résultats des tests par rapport à ces règles, un firewall laissera passer la connexion vers la socket ou rejettera le flux.

Les firewalls sont indispensables de nos jours en sécurité informatique, il s’agit souvent de la 1ère ligne de défense d’une machine connectée sur internet et dans le cas de réseau d’entreprise, un des éléments vraiment efficace pour limiter les rebonds d’un attaquant dans votre réseau.

Bref, les firewalls c’est bon mangez-en…

Mettre à jour Iptables en 1.6.1

Alors sur une debian 8, c’est la version 1.4.1 qui était présente sur mon serveur. J’ai profité de ce TP pour la mettre à jour vers la dernière version. Les sources officielles sont disponibles sur le site du projet :

https://www.netfilter.org/projects/iptables/index.html

Et voici comment mettre à jour votre firewall.

Dépendances

Quelques paquets sont nécessaires à la dernière version, certains sont présents dans les dépots debian :

apt-get install libbison-dev, flex

D’autres non, et sont à télécharger et installer depuis netfilter.org .

libmnl

curl -O https://www.netfilter.org/projects/libmnl/files/libmnl-1.0.4.tar.bz2
tar xvf libmnl-1.0.4.tar.bz2
cd libmnl-1.0.4/
./configure && make
make install
cd ..
rm -Rf libmnl-1.0.4*

libnftnl

curl -O https://www.netfilter.org/projects/libnftnl/files/libnftnl-1.0.8.tar.bz2
tar xvf libnftnl-1.0.8.tar.bz2
cd libnftnl-1.0.8/
./configure && make
make install
cd ..
rm -Rf libnftnl-1.0.8*

Mettre à jour iptables 1.6.1

curl -O https://www.netfilter.org/projects/iptables/files/iptables-1.6.1.tar.bz2
tar xvf iptables-1.6.1.tar.bz2
cd iptables-1.6.1
./configure && make
make install

Je vous recommande un petit reboot, suite à l’installation comme on touche à des modules kernel.

shutdown -r now

Et vous pourrez alors vérifier que la dernière version d’iptables est bien installée à l’aide de la commande :

# iptables -V
iptables v1.6.1

Pour les N00bs, quelques règles simples

Conceptuellement, iptables fonctionne avec des « tables » et des « chains« . Si vous débutez avec iptables , considérez qu’il n’existe qu’une table de règles : « filter » dans la chaîne « INPUT« , et ne vous occupez pas (encore) du reste. Et vous devez simplement vous dire qu’un paquet TCP à destination de votre serveur va être analysé par chaque règle présente dans cette table de votre firewall pour décider s’il est accepté ou rejeter. On reviendra sur les autres tables dans la partie configuration avancée du firewall iptables plus tard dans ce tutoriel.

Le b.a.-ba d’un pare-feu c’est « d’ouvrir et de fermer » des ports TCP. Comprendre, autoriser des connexions sur certains ports TCP et les refuser sur les autres.

Lire la suite…