Lorsque vous utilisez Webmin pour administrer votre serveur, les paramètres de votre firewall iptables sont visibles et manageables depuis la console Webmin.
Toutefois, les règles iptables présentées par Webmin sont celles qui ont été préalablement sauvées par /sbin/iptables-save dans le fichier que vous avez choisi.
Donc si vous utilisez un script depuis le shell pour changer les règles de iptables, ce ne seront pas ces règles que Webmin vous présentera mais celles que vous avez sauvées préalablement avec Webmin.When using Webmin as an administration tool, iptables rules visible for Webmin are those previously saved through Webmin.
So when you use a shell script to change iptables rules on the fly, these rules won’t be the ones Webmin present to you.
monit is a utility for managing and monitoring, processes, files, directories and devices on a UNIX system. Monit conducts automatic maintenance and repair and can execute meaningful causal actions in error situations.
Monit Features
Daemon mode – poll programs at a specified interval
Monitoring modes – active, passive or manual
Start, stop and restart of programs
Group and manage groups of programs
Process dependency definition
Logging to syslog or own logfile
Configuration – comprehensive controlfile
Runtime and TCP/IP port checking (tcp and udp)
SSL support for port checking
Unix domain socket checking
Process status and process timeout
Process cpu usage
Process memory usage
Process zombie check
Check the systems load average
Check a file or directory timestamp
Alert, stop or restart a process based on its characteristics
MD5 checksum for programs started and stopped by monit
Alert notification for program timeout, restart, checksum, stop resource and timestamp error
Firewalls are heavily used to secure private networks (home or corporate). Usually, they are used to protect the network from:
intrusions from outsiders
misuse from insiders
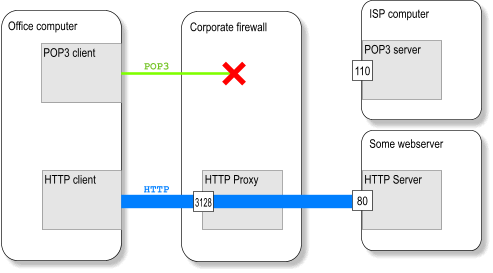
In a TCP/IP environment, the typical corporate firewall configuration is to block everything (both incoming and outgoing), and give access to the internet only through a HTTP proxy. The proxy usually has filtering capabilities (censors URLs and file types), and access to the proxy often requires credentials (login/password). This gives greater contol to the network administrator over what and who is going in and out of the network.
Still, this should not considered a ultimate weapon, and network administrators should not rely on the firewalls only.
Encapsulation is the basis of networking. For example, HTTP is encapsulated by TCP, TCP is encapsulated by IP, and IP is often encapsulated in PPP or Ethernet. Encapsulating protocols in an unsual way is often reffered as tunnelling.
As soon as you let a single protocol out, tunelling allows to let anything go through this protocol, and thus through the firewall.
This paper demonstrates how to encapsulate any TCP-based protocol (SMTP, POP3, NNTP, telnet…) into HTTP, thus bypassing the firewall protection/censorship (depending on your point of view)
A word of warning:
In many countries and corporate environments, bypassing a firewall is forbidden and exposes you to sanctions, redundancy, legal proceedings and – in some countries – death penalty. You are warned.
Nevertheless, in some countries this kind of firewall/proxy bypassing is the only way to ensure free speech (such as China or United Arab Emirates where the government severly censors the internet and where firewall bypassing is a national sport.)
Now you known what you’re doing, let’s move on.
The problem
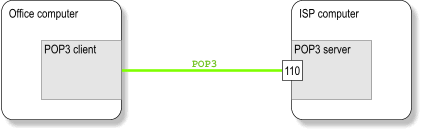
Say you want to fetch your mail from your ISP mail server. You usually simply connect to port 110 on the POP server of your ISP.
Trouble: there is a Big Bad firewall which blocks everything.
Well… it does not exactly block everything: it lets HTTP out through a proxy. Let’s encapsulate our POP3 connection into HTTP.
The tools
We need:
A computer on the internet which has unrestricted access to the internet, such as a home ADSL computer.
SSH is a secure shell (http://www.openssh.com). It provides secure (and compressed) channels between two hosts using SSL. Besides providing a shell (like telnet), it also provides file copy (scp) and TCP port forwarding (tunnelling). We will use the port forwarding feature.
Why not use GNU HTTP Tunnel alone ?
In principle, only HTTP Tunnel is necessary. But this is not desirable:
the tunnel is public: anyone can use your tunnel. Your could be held liable for what anybody has done with your tunnel.
the tunnel is cleartext: anyone can spy on your connection. Your passwords (SMTP, POP3, telnet…) are transmitted in clear text.
the tunnel is not protected: anyone can alter the datastream.
you have to run a new instance of the HTTP Tunnel client and the server for each new tunnel you want to set up.
This is where ssh come in. ssh provides:
authentication (only authorised users can use the tunnel)
privacy (no one can spy on what’s going through the tunnel)
integrity (no one can tamper data going through the tunnel)
easy tunnel set-up (you can create a new tunnel with a single ssh command on the client side).
These tools are available on Unix/Linux and Windows environments.
The whole chain
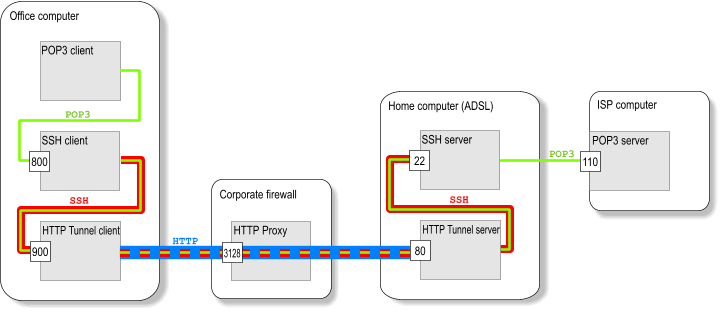
Let’s see how this works. Here is the full chain:
Technically speaking, once this chain is established, connecting to OfficeComputer:800 is identical to connecting to pop3server:110. The mail client will not see the difference.
On the office computer:
TCP data sent to port 800 is encrypted by ssh, which forwards data to port 900.
ssh stream sent to port 900 is chunked in individual HTTP requests by the HTTP Tunnel client and sent to the home computer through the proxy.
On the home computer:
the HTTP Tunnel server receives HTTP requests, decapsulates and re-assembles the ssh stream and forwards it to port 22 (to the ssh server).
the ssh server decrypts the datastream and forwards it to the pop3server on port 110.
As TCP is a bi-directionnaly datastream, once established, the TCP connection can pass data back and forth through the HTTP proxy.
Recently, I had to lease a new server. My old one was ok, but it was 5 years old, and showing it’s age. The most recent bout of problems was due to postfix, and a specific domain that I host mail for.
I had previously set up Policyd in an attempt to stop the influx of spam before it ever hit the server, but it wasn’t doing anything at this point. So approximately 800 messages per minute were getting directly to Postfix, and then running queries against MySQL (I use virtual maps for users, aliases, domains, etc). 99% of these messages were to non-existant users, so Postfix would bounce them. But the little 2.0GHz Celeron couldn’t handle it. The load shot up to 8 for around 3 weeks, and stayed there. I wish the fail2ban idea had come to me sooner… Lire la suite…
Munin est un outil de surveillance basé sur le célèbre RRDTool, permettant de connaître toutes les données systèmes des autres ordinateurs du réseau. Il les présente automatiquement sous forme de graphiques consultables depuis une page web. Par ailleurs, il dispose d’un système de plugins qui le rend simple d’utilisation et très modulaire.
J’ai choisi de le présenter, et non certains de ses concurrents comme Nagios, Cacti ou Zabbix, car il m’a semblé être le plus simple d’utilisation tout en conservant de fortes possibilités d’adaptation.
Un système Munin est composé de :
un serveur principal, récupérant les informations
un nœud par équipement à surveiller
Il faut signaler qu’avec une telle architecture Munin se différencie de Nagios. Ce dernier préfère en effet centraliser toutes les mesures sur le serveur, ce qui permet de ne rien installer sur les équipements surveillés.
 Firewalls are heavily used to secure private networks (home or corporate). Usually, they are used to protect the network from: