Avec ce que l’on suppose être la Golden Master de Snow Leopard, Apple fournit un document sur la manière dont démarre son système d’exploitation. Sur tous les modèles, le kernel se charge en 32 bits à l’exception des Xserve qui bootent en 64 bits.
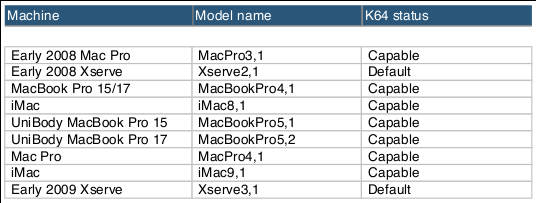
La marque à la pomme récapitule dans un tableau les Mac capables effectivement de démarrer en 64 bits.
Dans ce document, Apple explique que pour démarrer en 64 bits, outre le processeur, il faut que l’EFI de votre machine soit compatible.
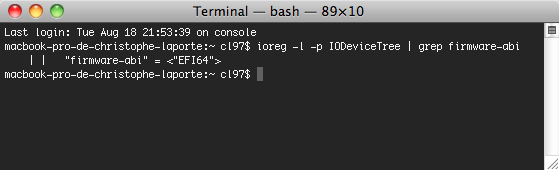
Pour le savoir, il suffit de taper la commande suivante dans le terminal :
ioreg -l -p IODeviceTree | grep firmware-abi
Dans notre cas, le Mac possède bel et bien un EFI compatible 64 bits
Certains ordinateurs comme la première génération de Mac Pro, sont équipés de processeurs 64 bits, mais possèdent un EFI 32 bits. Toutefois, certains ont réussi à utiliser le noyau en 64 bits, même avec un EFI 32 bits, et n’ont pas rencontré de problème particulier. Pour les machines dotées d’un EFI 32 bits, il n’est pas impossible qu’Apple propose lors de la sortie de Snow Leopard une mise à jour firmware.
Pour démarrer en 64 bits, il suffit d’appuyer sur les touches ‘6’ et ‘4’ lors du démarrage de Snow Leopard. En 64 bits, surtout la première fois, le Mac est un peu plus long à démarrer. Il est également possible d’éditer le fichier com.apple.Boot.plist pour systématiser le lancement du kernel en 64 bits.
Si Apple impose encore par défaut le 32 bits, c’est très certainement pour éviter des problèmes de compatibilités avec certains pilotes (imprimantes, scanners…), qui n’ont pas été mis à jour pour le 64 bits. Apple pourrait faire automatiquement le switch d’ici quelques mois lors de la sortie d’une mise à jour mineure de Snow Leopard.
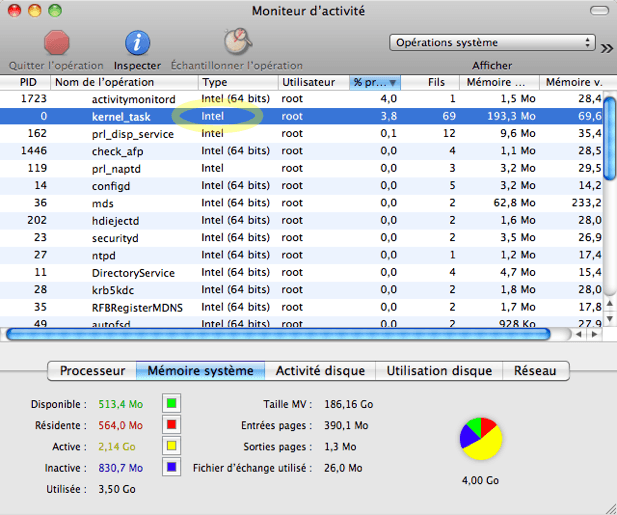
Précisons que si le kernel charge en 32 bits, l’immense majorité des applications livrées avec Snow Leopard tourne bel et bien en 64 bits. La preuve en images :
Apple’s firmware password security is greatly enhanced in recent Mac models, making it a rather robust security feature.
With Apple’s firmware password feature on Mac systems you can lock down the options to select an alternative startup disk, boot to Safe or Single User modes, reset the PRAM, and otherwise start the system in ways that can bypass the security features of OS X.
However, as a security measure the firmware password has been met with some criticism because it could easily be bypassed by someone who has physical access to the system. In earlier Intel-based Macs the firmware password was stored in the PRAM of the system, and was simply read by the system’s EFI firmware before other PRAM variables in order to maintain the lock on the system; however, this setup had drawbacks that allowed the firmware to be reset or even revealed.
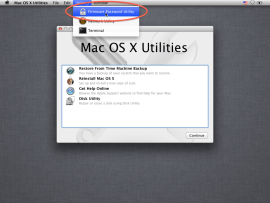
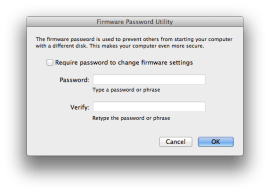
The firmware password on any Mac can be set using the Firmware Password utility that is available on the OS X installation volume.
Altering the system’s hardware configuration, such as by removing or adding RAM modules, would clear the security password and permit booting to alternative modes. Not only did this basic way of bypassing the password exist, but the password was also not stored very securely. While administrative rights are required to uncover it, with these rights one can use included utilities in OS X to reveal the password in the PRAM, which is masked only by a simple obfuscation routine.
These fallbacks made the Mac’s firmware password almost laughable as a security measure, but this has changed with newer Mac systems. Starting in 2011, users began finding they could no longer reset their firmware passwords simply by modifying the hardware configuration. The systems would maintain the lock and prevent the use of alternate boot modes, leaving no choice for those who had set the password and then forgotten it but to bring their systems in to Apple for servicing.
In these newer systems, instead of using the PRAM to store the EFI firmware password, Apple has resorted to using a separate programmable controller from Atmel (PDF) that contains lockable flash memory used to store the password. This tiny chip is tucked away on the motherboard and includes include a security feature that stores the password in ways that require special programming with identifier numbers for both your motherboard and the Atmel chip to access and erase, which must done using special routines during the boot process.
As it’s not dependent on other system components to maintain this lock, this new chip therefore cannot be unlocked simply by a hardware change. The password is also not available in the PRAM, so it cannot be revealed to users, regardless of their administrative status.
To reset the firmware password on newer Macs, you must now follow these steps:
Boot with Option key held to display the boot menu’s firmware password prompt.
Press Control-Option-Command-Shift-S to reveal a 33-digit hash (mixed letters and numbers) that contains an identifier for your specific motherboard and the Atmel chip used for your system. In this hash, the first 17 digits are an identifier for the system’s motherboard, and the last 16 digits are a hash for the password.
Submit the hash to Apple, where someone will put it through a special utility to create a keyfile that is specific for your machine.
Place the file on a special USB boot drive and hold Option to load the boot menu and select this drive.
The system will read the file and properly reset the firmware password stored in the Atmel chip.
This process may seem easy enough, except that the utility for creating the keyfile is kept at Apple so you have to go through an authorized service center, which will contact technicians at Apple for this service. Secondly, the Apple technicians will not give you the keyfile for unlocking your system, so you must get your system serviced to perform this step.
Apple’s Firmware Password utility in OS X’s Recovery HD partition is still used to set the firmware password on newer Macs.(Credit: Screenshot by Topher Kessler/CNET)
Even if you were able to get the keyfile, it cannot be used on any other Mac system. The Atmel chip’s serial number and motherboard identifier are factory-programmed, resulting in a pairing that is unique for your system. This is why the hash numbers for your system must be programmed into the keyfile, making it machine-specific.
Even so, there is one way to bypass the Atmel chip, which is to manually remove it and solder a new, unlocked chip to your motherboard; however, without precise reflow soldering tools and techniques, this would likely result in an unmitigated disaster that not only would void your warranty, but would very likely break your machine.
Coupled with Apple’s FileVault full-disk encryption to protect data should the hard drive be removed, the firmware password in Apple’s latest systems provides a very effective hardware security lock. Setting it up involves the same steps as for all of Apple’s hardware, but these advances make it so that to change or remove it you need to either use the same firmware password utility and remember the previous password, or have it serviced.
J’ai essayé l’astuce fournie ici pour accéder au réglage de la luminosité sur mon Samsung NC-10 et maintenant je peux me servir des touches de fonction comme c’est déjà le cas sous Windows:
These are instructions on how to jailbreak your iPhone 3GS on the iOS 5.1 firmware using RedSn0w for Mac.
This procedure will cause you to upgrade your baseband potentially ruining your chances for an unlock. Please follow this tutorial to update to iOS 5.1 using a custom ipsw if you need an unlock. The jailbreak is also tethered for all devices except the old bootrom iPhone 3GS which means you will need to connect your device to the computer each time you reboot. Finally, it may be prudent to save your SHSH Blobs by following this tutorial before continuing.
If you want to jailbreak a lower firmware version you can find the appropriate tutorial here.
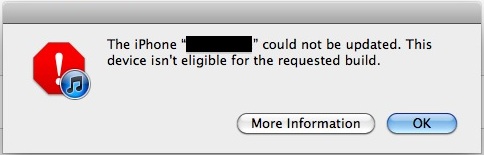
If you’re trying to update iOS to the latest version on an iPhone, iPad, or iPod touch and you get an error in iTunes saying:
The iOS Device “Device Name” could not be updated. This device isn’t eligible for the requested build.
You’re encountering one the following problems: either you are using an old version of iTunes, you are using an incorrect version of the firmware for your device, or you have gs.apple.com re-routed in your hosts file.
If you know you’re on the right iTunes and iOS version and you’re familiar with editing a hosts file, just throw # in front of the “74.208.10.249 gs.apple.com” entry and you’ll be good to go. If you have no idea what that means, read on and it’ll be explained easily. First let’s cover the iTunes and firmware aspect, then explain hosts modifications. Try these in order, one of them will certainly fix the ineligible build error:
1) Update iTunes
This is easy, just open iTunes and update to the latest version. This is required because the newest version of iOS require the newest versions of iTunes. Easy to resolve.
2) Use Proper iOS Firmware
The next thing you need to do is make sure you’re using the proper firmware IPSW file for your iOS hardware. You can download any firmware files from these links:
A fair amount of confusion regarding IPSW seems to be in the difference between GSM and CDMA downloads, in the USA this is easiest to determine based on the cellular provider: AT&T is GSM, Verizon is CDMA. If you’re not sure what to do with an IPSW file, you can read our walkthrough ofhow to use them.
If you’re certain you have the correct firmware file and you’re still getting the “device isn’t eligible” iTunes error, it’s almost certainly a result of gs.apple.com being blocked in the hosts file.
2) Remove the Hosts Block
This usually comes from users who have jailbroken an iOS device at some point on their computer, or did the error 3194 fix, and as a result have a line in their hosts file blocking Apple’s servers. There’s two ways to fix this, the first is the easiest:
Easy: Using TinyUmbrella TinyUmbrella prevents you from having to use the Terminal to edit system files, instead you can just launch the app and quit it.
After you’ve downloaded and installed TinyUmbrella, here’s how to use it to remove a hosts block:
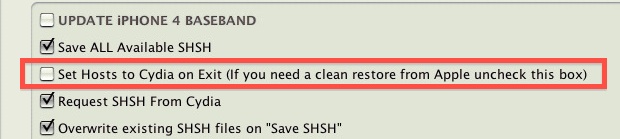
Open TinyUmbrella and click on the “Advanced” button tab at the bottom
Uncheck the box next to “Set Hosts to Cydia on Exit”
Now quit out of TinyUmbrella and the app will modify the hosts file in the process to remove the block, allowing you to connect to Apple’s servers again. Before you try though, be sure to turn the iPhone, iPad, or iPod touch on and off again, and relaunch iTunes as well.
If you still run into problems, you may need to flush the DNS cache as well. Quit out of iTunes and open the Terminal in OS X Lion, then type: dscacheutil -flushcache Now relaunch iTunes and you’ll be good.
Advanced: Manually Editing Hosts
Quit out of iTunes
Go to the hosts file. For Mac OS X this is located at: /etc/hosts or /private/etc/hosts and in Windows it is located at: c:\windows\system32\drivers\etc\hosts
Open the hosts file with Administrative privileges so that changes can be made and saved (eg: sudo nano /etc/hosts)
Look for a line that resembles something like this:
74.208.10.249 gs.apple.com
Put a # in front of that to comment it out, making it now look like this:
# 74.208.10.249 gs.apple.com
Save the hosts file
Flush DNS cache and restart iTunes
Whichever approach you took, this fixes the “eligible build” error and the iOS device will update as intended.